If you're still agonizing over "which model writes code better" in 2026, you've probably already missed the most important engineering shift of the year. DeepSeek AI officially open-sourced DeepSeek Harness (command-line name dsh) in August 2026, and the formula it puts forward is Agent = Model + Harness, with the slogan Everything is a Plugin. This is not yet another "library that wraps a few agents," but a complete plugin-based infrastructure built around the model's runtime environment: models, tools, skills, sessions, sandboxes, storage, loops, scheduling, and UI are all composed from plugins, replaceable at the configuration layer without touching source code. This article is split into two parts. The first part thoroughly explains "why we need a Harness," "what dsh is," and "how 'everything is a plugin' actually lands," including the Cordis kernel, the unprivileged kernel, the four-layer stacking order of Profile + bundle + patch, and the four run modes, along with commands and code you can paste and run directly; the second part then moves on to plugin development, event-driven extension points, and real-world workflows.
Agent = Model + Harness: Why the Bottleneck in 2026 Shifted from Model Intelligence to Runtime Environment
First, look at the full wording of that official statement: The model is the soul of the Agent, while the Harness gives the Agent the ability to understand the environment, use tools, and keep working in real scenarios. This sentence draws the division of responsibilities very cleanly. The model is responsible for "thinking"—it decides what to do next, what code to write, and which tool to call; the Harness is responsible for "living"—it translates the model's intent into real operations on the file system, terminal, retrieval services, and sub-Agents, then reassembles the operation results into context the model can understand and sends them back for the next round. No matter how smart the soul is, if no one gives it hands, feet, memory, and senses, it can't even run a single git status in a real project.
This is exactly the deeper meaning of the formula: An Agent is not a model; an Agent is a model plus a harness layer. After model capabilities rapidly converged between 2023 and 2025, more and more teams in the industry discovered that the same model, given a different runtime environment, can produce output of dramatically different quality. The source material provides two very convincing pieces of supporting evidence: one is the record from the OpenAI team's million-line-code experiment—all the code produced over 5 months was completed by Agents, with engineers not writing a single line of code; the other is LangChain's controlled experiment—by optimizing only the external harness environment (documentation structure, verification loops, tracing systems), the coding Agent's score on Terminal Bench 2.0 rose from 52.8% to 66.5%, and its global ranking jumped from 30th to 5th, without changing a single parameter of the underlying model.
Putting these two things together, the conclusion is very straightforward: The bottleneck is not model intelligence, but infrastructure. No matter how strong the model is, if the context is fed in a messy way, tool calls have no verification loop, and errors have no observable tracing, the Agent is a black box that "looks smart but fails in practice." Conversely, an ordinary model placed in an environment with clear constraints, timely feedback, and traceable state can also run the entire engineering pipeline stably. This is why the focus of discussion in 2026 shifted from "model leaderboards" to "how to build a Harness."

The official positioning of dsh also confirms this: it does not optimize the model itself, but rather the environment in which the model runs. This statement may sound like marketing speak, but at the code level it is very concrete—it turns the constraints, feedback, tools, memory, and observability required for model operation into composable plugin infrastructure, so that every team can harness AI in their own way, rather than being locked by vendors into a black box with fixed functionality. For beginners, the most critical mindset shift in understanding this layer is: you are no longer "calling a model," but "configuring a runtime environment." What you need to care about is not how to change the nth character of a prompt, but what capabilities exist in this environment, how they collaborate, and how you can see what happened when something goes wrong.
And precisely because it is a runtime environment rather than a model, dsh naturally carries several engineering properties: pluggable capabilities, replayable state, auditable configuration, and replaceable models. These properties will appear repeatedly in each section below, because they are not scattered features, but different facets of the same design decision. Once you understand "Agent = Model + Harness," all the later questions of "why plugin-based," "why an unprivileged kernel," and "why dump-config" will be readily resolved.
From Prompt to Context to Harness Engineering: A Comparison of Optimization Targets Across Three Paradigm Shifts
To truly understand why Harness matters, we must first see clearly how we arrived here step by step. This craft has undergone three paradigm shifts, and the common thread each time is: the previous generation of methods was not wrong, just no longer sufficient.
The first was Prompt Engineering, roughly from 2023 to 2024. Its optimization target was input wording—how to phrase the prompt, what format to use, how many examples to include. The problem it solved was the quality of a single conversation, with an interaction pattern basically of one question and one answer. During that period, everyone competed on who was better at "saying things clearly."
The second was Context Engineering, around 2025. Its optimization target became information input—how documents, code snippets, and historical conversations are organized into context. The problem it solved was knowledge boundaries and hallucinations, with an interaction pattern of "information injection → generation." At this point, everyone competed on who was better at feeding information to AI. Soon, people discovered that feeding information alone was not enough: even with clear knowledge boundaries, Agents would still get lost in multi-turn tool calls.
The third is Harness Engineering, beginning in 2026. Its optimization target is the runtime environment—constraints, feedback loops, and control systems. The problem it solves is the reliability and sustainability of Agents, with an interaction pattern of "humans steer, Agents execute." At this point, what is being compared is no longer wording or feeding, but who can place the model into a stable, observable, and replaceable runtime environment.
| Paradigm | Core Problem | Optimization Target | Interaction Pattern | Timeline |
|---|---|---|---|---|
| Prompt Engineering | How to say things clearly | Prompt wording, format, examples | One question, one answer | 2023 ~ 2024 |
| Context Engineering | How to feed information to AI | Documents, code snippets, historical conversations | Information injection → generation | 2025 |
| Harness Engineering | How to make Agents work reliably | Constraints, feedback loops, control systems | Humans steer, Agents execute | 2026 ~ |
The most important way to read this table is this: the three paradigms are not replacements for one another, but layers that stack on top of each other. Harness engineering is not telling you to stop writing prompts; it is saying that prompts and context alone are no longer enough, and that someone must take responsibility for the runtime environment layer. And dsh corresponds precisely to that "runtime environment" layer—it is an open-source implementation that puts constraints, feedback, observability, and replaceability fully into practice, so that harness engineering no longer remains a methodology but becomes out-of-the-box infrastructure.
For beginners, here is a very practical criterion: if you spend far more time "tweaking prompt wording" than "designing what tools return, how errors are fed back, and how state is stored," then you may still be spinning your wheels in the previous paradigm. An Agent's reliability does not come from some magical prompt, but from the constraints and feedback loops in its environment—permission policies block unauthorized operations, verification loops feed failure information back to the model, and tracing systems make every step reviewable. These are precisely the responsibilities of a Harness.
What dsh is: MIT-licensed, written in TypeScript, a developer preview open-sourced in August 2026
Let us first lay out the project's identity information clearly, to avoid conceptual drift in later discussion.
- Full name and alias: DeepSeek Harness, with the command-line entry point
dshand the npm package name@deepseek-ai/dsh. - Developer: DeepSeek AI.
- Open-source date: officially open-sourced in August 2026.
- License: MIT License—this means you are free to use, modify, and distribute it, including for commercial purposes.
- Language: written in TypeScript.
- Stage: currently in the developer preview stage, with the official team explicitly warning that there will be backward-incompatible changes in the future.
- Positioning: Agent Harness, which does not optimize the model itself but optimizes the environment in which the model runs.
The last two points must be underlined here. Many beginners see the words "open-sourced" and assume it is a stable release, put it straight into production, and then after some upgrade find that the configuration no longer matches and plugins throw errors—this is not a bug in dsh, but expected behavior during the preview stage. The official wording is clear: there will be backward-incompatible changes in the future. The engineering implications of this statement are:
- The configuration file structure, plugin API, and event names may all change, so do not hard-code them into production systems you cannot iterate on quickly.
- Get into the habit of checking the changelog before upgrading, and before upgrading use
dsh --profile web --dump-configto compare differences in the configuration tree. - It is very suitable as a tool for learning and internal experimentation, but as long-term infrastructure you promise to the outside world, you need to budget for migration costs.
- The MIT License means that even if upstream introduces breaking changes, you can in theory fork and maintain it yourself, but the cost is losing upstream updates.
In addition, although dsh is written in TypeScript, this does not mean you must know TypeScript to use it. The basic skill requirements given in the material are quite restrained: basic command-line operations (required—being able to use a terminal and set environment variables), Node.js basics (required—being able to install and launch dsh via npx / pnpm), basic API concepts (just understand—knowing what an API Key is is enough), plugin and configuration file concepts (just understand—used in the advanced chapters), Git basics (optional). As for operating systems, it runs on Linux, macOS, or Windows as long as Node.js is installed. There are no requirements for an AI research background or deep machine learning knowledge.
If you just want to get the interface up and running for a quick look, a single command is all it takes:
# After installing Node.js, launch the Web UI with one command (default http://127.0.0.1:3080)
npx @deepseek-ai/dsh web
If you want to install from source and take a look at what the project is like along the way, you can use the following flow (requires pnpm):
# Install from source and launch
git clone https://github.com/deepseek-ai/deepseek-harness.git
cd deepseek-harness
pnpm install
pnpm run build
pnpm dsh web
Getting started with the Web UI takes only three steps: First, open Settings → Models, enter your DeepSeek API key and save it; model routing becomes available immediately, with no restart needed. Second, select a workspace by adding and selecting the project directory where you launched dsh (note: until you select one, the session input box is disabled—this is the most common reason beginners find they "can't type"). Third, send a task, for example Summarize this repository; the Agent will start reading and writing files, running commands, and delegating to sub-agents, while any operation that exceeds the permission policy will first ask for your approval. These three steps hide two engineering points worth expanding on: model routing requires no restart and operations beyond authority require approval. The former reflects the model-agnostic design, and the latter reflects the constraint loop; both will be expanded on below.
The Cordis kernel does only three things: plugin loading, unloading, and dependency management
Once you understand that "everything is a plugin," the next most counterintuitive point is: if everything is a plugin, what exactly is in the kernel? The answer is—very little. dsh is powered underneath by the open-source plugin system Cordis, and the Cordis kernel is only responsible for the loading, unloading, and dependency management of plugins. It does not provide any of the following capabilities: models, tools, skills, sessions, sandboxes, storage, loops, scheduling, or UI. All of these capabilities are provided by plugins.
This is a very radical and very clean architectural decision. Traditional Agent frameworks usually stuff core capabilities into the kernel and leave a few extension points; the only things you can change are those few places you're allowed to change, and if you want to replace the built-in session storage or scheduling logic, you have to fork. dsh is the opposite: the kernel is extremely thin, and all capabilities live in plugins, so "replacing a capability" no longer means "invading the kernel" but rather "swapping in a plugin."
So how do plugins collaborate? Through two mechanisms provided by Cordis: Service and Event. You can think of it this way: a service is the capability interface a plugin exposes to the outside, for example, if some plugin provides a "session storage service," other plugins that want to store sessions just call this service, without needing to know whether it's backed by a database or a file; an event is a signal broadcast between plugins, where one plugin emits an event and plugins interested in it attach listeners to respond, without the two parties knowing each other. This combination of "service + event" lets all capabilities be freely replaced and flexibly recombined.
Why is event-driven design especially critical here? Because the Agent's operation is highly time-sequenced: a round of conversation begins, context is injected, the model returns, a tool is called, the tool returns a result, a sub-Agent is scheduled... every step is a natural extension point. If these extension points relied on inheritance and overriding, the coupling between plugins would quickly spiral out of control; with event broadcasting, any capability can "mount policies and adapters" alongside it, swapping models, tools, or storage at any time without touching anyone else's code. The material explicitly mentions that dsh's event-driven extension point system is divided into three levels of events: session / Agent / capability, and this design also has academic backing—Cordis's design philosophy corresponds to the paper "A Programming Paradigm for Spatiotemporal Composability." For beginner readers, you don't need to read the paper, but you do need to remember this conclusion: dsh's way of extending is to mount new plugins alongside other plugins, rather than modifying existing code.
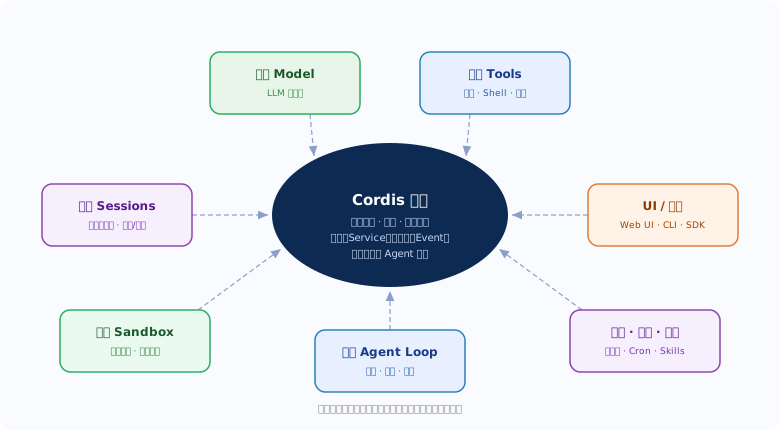
The direct benefit of narrowing the kernel's responsibilities is observability and debuggability. Because capabilities are plugins, plugins have dependencies, and dependencies are managed by the kernel, a running dsh is essentially an enumerable plugin tree. You can print it, inspect it, and replace it—this is the foundation of the configuration-layer capabilities discussed in the next section. Conversely, if a framework hides a large amount of implicit logic inside its kernel, you cannot "inspect what is actually running on your own machine."
Unprivileged kernel and reversible side effects: why extending dsh requires no patching
The most critical engineering constraint in the Cordis architecture is: there is no privileged kernel that needs patching at runtime. This sentence deserves to be unpacked word by word.
In many systems, kernel capabilities are "privileged": once registered, they cannot be revoked, and the only way to change their behavior is to patch or monkey patch them, after which the entire system enters a state where "only the author knows the real behavior." dsh explicitly avoids this path: every capability registration is a reversible side effect, automatically revoked when the plugin is unloaded.
What does "reversible side effect" mean? Put simply, when a plugin is loaded, it registers the capabilities it provides with the kernel (for example, registering a tool, registering a service, or attaching an event listener). These registration actions are recorded by the kernel, and when the plugin is unloaded, the kernel revokes them all—the tool disappears, the service goes offline, the listener is removed, and the system returns to the state it was in before loading. It is like a function with paired forward and reverse operations, where loading and unloading are strictly symmetric.
This constraint brings three practical benefits that have a major impact on engineering practice:
- Extensions require no patching: to add a capability, write a new plugin and mount it alongside other plugins; to change a capability, use a patch to replace it at the configuration layer. The source code never needs to be touched.
- Plugins can be safely experimented with: unloading means revocation, which means you can mount an experimental plugin, run a round, and unload it if you are not satisfied, without leaving "ghost registrations" to pollute subsequent runs.
- System state is reason-able about: what capabilities exist in the system at any moment depends on which plugins are currently loaded, not on "what was patched historically." This makes observability, replayability, and reproducibility possible.
Connecting this with "everything is a plugin," you will find that dsh's extension philosophy is highly consistent: capabilities come from plugins, plugins are composed by configuration, unloading automatically revokes, and extending is mounting. The original wording in the material is: the way to extend dsh is to mount new plugins alongside other plugins. This sentence leaves no room for "modifying source code"—because it is simply unnecessary.
There is also a common pitfall for beginners worth pointing out in advance: precisely because registration is a reversible side effect, the dependency order and dependency declarations between plugins become very important. If your plugin depends on a service and the plugin providing that service has not yet been loaded, your registration will fail; this is also why the kernel must handle "dependency management." When you encounter errors like "service does not exist," your first reaction should be to check plugin loading order and dependency declarations, not to modify the kernel. We will give concrete examples when we discuss plugin development in the next article.
Profile + bundle + patch: the four-layer stacking order of a plugin tree
Since a running dsh is a plugin tree, how does this tree grow? The answer is layered stacking. The material gives the precise stacking order, four layers in total, from first to last:
- Apply each Bundle in the order listed by the profile. The profile determines which set of bundles to use and in what order to install them. This is the most fundamental layer, and it defines the trunk of this tree.
- Layer on the profile's own
cordis.patch.yml. After the bundles are installed, use this patch file to make corrections or additions at the profile level. - Layer on the home-level patch. This is user-level (home-directory-level) personalization, with a broader scope than a single profile, making it ideal for "adjustments I want across all my projects."
- Finally, any
--patchoverlay. An overlay passed in temporarily from the command line, with the highest priority, suited for one-off experiments, debugging, or temporarily swapping capabilities.
This layered "Profile + Bundle" model has a very practical engineering value: separation of concerns. A bundle is a set of capabilities someone else has written, the profile is your choice of scenario, the profile's patch is scenario-level fine-tuning, the home-level patch is your personal preference, and --patch is the temporary decision for this particular run. Each of the four layers handles its own part without contaminating the others. When you can't figure out "which layer should this change of mine go in," work backward from "smallest to largest scope": if it only affects this run, put it in --patch; if it only affects this profile, put it in the profile's patch; if it affects all my work, put it in the home-level patch.
Here is a table that lays out the four layers clearly:
| Overlay order | Layer | Source | Typical use | Scope |
|---|---|---|---|---|
| 1 | Bundle | Applied in the order listed by the profile | Install the capability trunk: models, tools, sessions, storage, UI, etc. | The entire profile |
| 2 | Profile-level patch | The profile's cordis.patch.yml | Scenario-level corrections and additions to the bundles | The current profile |
| 3 | Home-level patch | Patch configuration under the user's home directory | Personal cross-project general preferences | All runs by that user |
| 4 | --patch overlay | Dynamically passed in from the startup command line | One-off experiments, temporarily swapping a capability | This run |
Note that this table is read from top to bottom as layering one on top of another, not as replacing one another. Each subsequent layer continues to modify the result of the previous layer, which also explains why, when troubleshooting configuration issues, you must first look at "the configuration tree that actually takes effect" rather than just a single patch file—the single file you see may not be what ultimately takes effect. This leads to the command in the next section.
dsh --profile web --dump-config: a single command to inspect the complete configuration tree that actually starts up
Four layers stacked together create a problem: with configuration scattered across multiple places, how can I be sure what is "actually in effect right now"? The answer dsh gives is --dump-config. The example command from the source material is:
# Print the complete configuration tree actually launched on the machine
dsh --profile web --dump-config

# Any entry that gets printed can be replaced by your own patch
This command looks unremarkable, but it is how the entire "open and controllable" promise is fulfilled. What it does is: print out the complete configuration tree that is actually in effect under the current profile after all four layers have been stacked. Note the key phrase "actually in effect"—not the contents of some single patch file, but the result after stacking. For beginners, this means you don't need to simulate the four-layer stacking in your head; just print it out and look.
Why is this so important from an engineering standpoint? Because it turns "what exactly is my Agent" from a black-box question into a readable one. You can use it repeatedly in several scenarios:
- Troubleshooting configuration that isn't taking effect: you changed a patch but the behavior didn't change—dump it and you'll know whether your patch wasn't loaded or was overridden by a later layer.
- Diffing before an upgrade: the preview stage will have breaking changes; dump once before and once after the upgrade, and a diff will show you exactly where the configuration tree changed—more direct than reading a changelog.
- Learning from someone else's configuration: get a profile, dump it, and you can clearly see which bundles it installed and which capabilities it replaced.
- A starting point for replacement: to replace a capability, first find the corresponding entry in the dump result, then write your own patch against it.
The comment in the source material is the key to this section: Any entry that gets printed can be replaced by your own patch. This means dump-config isn't just for "looking"—it's the entry point for "changing": every item you see is something you can take over. This is the concrete operational path for "what your Agent looks like is up to you": review first, then replace.
There's a very easy pitfall here: don't write a patch before looking at the dump result. Because of the four-layer stacking, the patch you write may conflict with a higher-priority layer. The correct order is always: first --dump-config to see the currently effective value → locate which layer sets the entry you want to change → write the patch in a higher (or same-level but later) layer. This habit will save you a lot of confusion from "I changed it but nothing happened."
Comparison of four run modes: the capability composition of Standard / PTC / Minimal / Create
dsh ships with four run modes out of the box, covering the full spectrum from a "fully featured coding Agent" to "minimal benchmarking," and on to "building your own new mode." The differences between these four modes are not UI skins but differences in capability composition—that is, which plugins are installed and which tools are exposed. Understanding their compositional differences helps you pick the right mode and also understand the practical meaning of "everything is a plugin."
| Mode | Positioning | Capability composition | Who it's for |
|---|---|---|---|
| Standard mode | Fully featured coding Agent | File editing, Shell, file and web search, Skills, planning, goals, subagent and workflows | The main mode for everyday coding tasks |
| PTC mode | Code-composed tool calling | Has all the capabilities of Standard mode, and presents tools through the Code Mode SDK—the model composes multi-step operations in a single TypeScript program | Complex tasks that need to compose multi-step tool calls in one go |
| Minimal mode | Minimal benchmarking | Keeps only two tools: persistent bash and str_replace_editor | Model evaluation, controlled experiments |
| Create mode | Custom Agent preset | Has all the capabilities of Standard mode, and provides runtime inspection, plugin experimentation, and preset authoring guidance | People who want to compose their own new mode |
Looking at them one by one gives you a better feel for it.
Standard mode is a fully featured coding Agent, with a capability list that includes file editing, Shell, file and web search, Skills, plans, goals, sub-agents, and workflows. This is a fairly complete toolset: search lets it find information, file editing lets it modify code, Shell lets it run commands to verify, plans and goals let it organize long tasks, and sub-agents let it delegate subtasks for parallel or isolated processing. For the vast majority of introductory scenarios, starting directly with standard mode is fine.
PTC mode is the one with the most research flavor in this system. It has all the capabilities of standard mode, but the tools are presented differently—through the Code Mode SDK, letting the model use a TypeScript program to compose multi-step tool calls. The source material says "PTC mode (the model uses a TypeScript program to compose multiple rounds of tool calls)." For introductory readers, this difference can be understood like this: in normal mode, the model calls tools step by step, waits for results, and then thinks about the next step; in PTC mode, the model can first write a program to string these multi-step operations together. This is extremely valuable for multi-step, patterned tasks that require precise composition—which is also why the source material lists PTC as a feature that attracts AI/ML practitioners.
Minimal mode needs the most separate explanation, because its capability composition is very restrained: it keeps only two tools, persistent bash and str_replace_editor, for model evaluation in a minimized environment. Why have such a "bare-bones" mode? Because when doing model evaluation, you want as few variables as possible—the more tools there are, the richer the behavior, and the harder it is to determine whether it is the model's contribution or the environment's contribution. Cutting the tools down to only two allows you to observe the model's own performance on a clean, controllable foundation. This in turn confirms the power of "everything is a plugin": the differences between modes are just different plugins installed, not different hardcoded branches in the kernel.
Creation mode is prepared for people who say "I want to build a mode myself": it has all the capabilities of standard mode and additionally provides runtime inspection, plugin experimentation, and preset creation guidance. In other words, you can observe system state at runtime, experiment with plugins, and, under guidance, create your own preset to compose a new mode that belongs to you. For advanced readers, this is the entrance from "using dsh" to "customizing dsh," which will be expanded on in the next article.
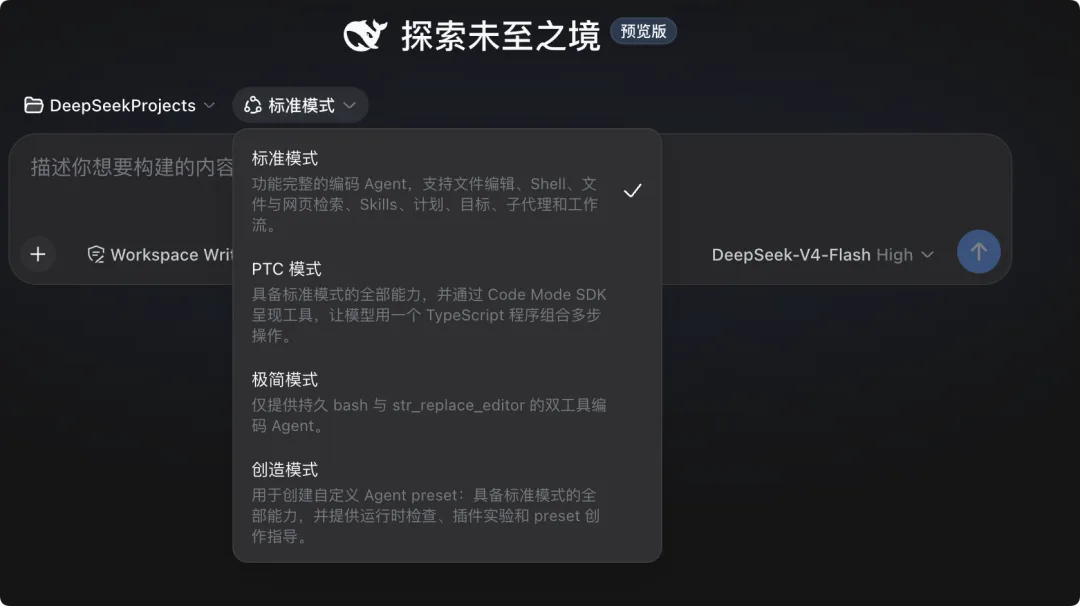
Looking at these four modes together, you will find that they are actually different combination results of the same plugin mechanism: standard mode is "the full set of tools," PTC mode is "a different way of presenting tools," minimal mode is "cut down to only two tools," and creation mode is "give you tools to build your own." A mode is not hardcoded in the kernel, but a recipe for plugin composition. This is exactly what "everything is a plugin" looks like when it lands at runtime.
At this point, the first article has laid out the macro picture of dsh: the division of labor logic of Agent = Model + Harness, the three leaps from prompt engineering to harness engineering, dsh's project identity and notes on the preview stage, the Cordis kernel being responsible only for loading/unloading/dependency management, the extension approach brought by a privilege-free kernel and reversible side effects, the four-layer stacking order of Profile + bundle + patch, using --dump-config to inspect the actual effective configuration tree, and the differences in capability composition among the four runtime modes. But these are all at the level of "using" and "configuring." What truly determines how deeply you can use dsh is how plugins are written, where event extension points are attached, how capabilities are replaced by patches, and how session logs and Trajectory support observability and replay—these are the parts to be unpacked in the next article. Before going further, it is recommended that you first get the environment running according to the two examples in this article, and execute dsh --profile web --dump-config once, to see with your own eyes the plugin tree on your machine.
In the previous section, we already took apart the overall skeleton of DeepSeek Harness (hereafter dsh): the Cordis kernel sits at the center, capability plugins surround it, and the model, tools, skills, sessions, sandbox, storage, loop, scheduling, and UI are all provided by plugins. The single sentence Agent = Model + Harness makes the division of labor clear—"the model is responsible for intelligence, the Harness is responsible for reliable operation." In this section, we zoom in: starting from how a TypeScript program composes multi-step tool calls, we go all the way through session logs, the event system, two installation paths, the three-step Web UI, the division of labor across multiple SDK forms, and finally land on the community playbook as of September 2026 and an executable checklist.
PTC Mode and the Code Mode SDK: Letting the Model Compose Multi-Step Tool Calls with a Single TypeScript Program
Let's start with a pain point many people hit the first time they use an Agent: to do something slightly complex—for example, "find all files in the repository that reference an old config field, read them one by one, replace the field name, then run a type check to confirm nothing broke"—the model often has to go back and forth for a dozen or more rounds: read the directory, read file A, read file B, write file A, write file B, run tsc, see the error, fix it again... Each round is a complete cycle of "model thinks → outputs a tool call → executes → result is fed back." As the number of rounds grows, latency accumulates, context balloons, and there's nowhere to store the temporary variables from some intermediate step—eventually the model itself easily gets confused.
dsh's PTC mode is aimed squarely at this scenario. PTC stands for the idea of "programmatic tool calling": on top of standard mode capabilities, it additionally presents tools to the model through the Code Mode SDK—note that the way they are presented has changed. Tools are no longer just "a callable function signature"; they become a set of TypeScript APIs that the model can write directly. So the model no longer needs to "call once, wait once, call again"; instead, it writes a complete TypeScript program that orchestrates multiple steps together and submits it in one go.
The value of this can be understood like this: in standard mode, the model "drives tools in a question-and-answer fashion"; in PTC mode, the model "strings tools into a pipeline with code." The former is limited by conversation rounds, while the latter is limited by the expressive power of programs—and the expressive power of programs is obviously far broader. In that TypeScript, you can write loops, conditional branches, try/catch, store intermediate results in local variables, and perform a validation before submitting. Work that originally required a dozen or more round trips is condensed into a single program run.
PTC is positioned as "standard mode + Code Mode SDK," which means it loses none of the standard mode capabilities such as file editing, Shell, file and web retrieval, Skills, plans, goals, subagents, and workflows—it simply adds a layer of code-orchestration expressiveness. How does this translate into actual use? An intuitive illustration looks like this:
// Conceptual illustration: in PTC mode, the model can write a TypeScript program like this
// Submit the pipeline "read files → change fields → run validation" in one go, instead of splitting it into a dozen rounds of conversation
import { tools } from "@deepseek-ai/dsh/code-mode";

const targets = await tools.file.search({ pattern: "src/**/*.ts", grep: "legacyFieldName" });

for (const file of targets) {
  const source = await tools.file.read({ path: file.path });
  if (!source.includes("legacyFieldName")) continue;
  const patched = source.replaceAll("legacyFieldName", "newFieldName");
  await tools.file.write({ path: file.path, content: patched });
}

// After all changes are done, run validation once; if it fails, bring the error information back to the model
const check = await tools.shell.run({ command: "pnpm run typecheck" });
if (check.exitCode !== 0) {
  return { ok: false, log: check.stdout };
}
return { ok: true, changed: targets.length };
It should be noted that the above is conceptual illustrative code, intended to help you build the intuition that "a program = multiple rounds of tool calls." For the specific import paths and API names, please refer to the Code Mode SDK documentation for your local dsh version. The real engineering value lies in three points:
- Round convergence: Multi-step operations are compressed into a single program execution, reducing the most expensive overhead of "model round-trips," making long tasks less likely to drift off course midway.
- Intermediate state has somewhere to live: Local variables serve as temporary storage, so results don't have to be fed back into the context at every step, keeping the context cleaner.
- Failures can be handled holistically: Within a program, normal error-handling logic can be used to deal with failures, rather than relying on the model to "guess what went wrong" in the next round.
In contrast to this is minimal mode: it retains only two tools, persistent bash and str_replace_editor, specifically for model benchmarking in minimized environments. Minimal mode aims to "compress variables to the minimum and observe the model's raw capabilities"; PTC mode aims to "maximize orchestration capability and observe the Harness's added value." Having these two extremes coexist within the same framework is itself an embodiment of dsh's "everything is a plugin" philosophy—capability composition is configured, not hardcoded.
Append-only session logs: system prompts, chain-of-thought, tool calls, and sub-Agent scheduling all persisted to disk
What is the hardest problem to troubleshoot with an Agent? It's "why did it do that." You see it delete a file, but you can't see what went through its mind before deleting it; you see it invoke a sub-agent, but you can't see what context it stuffed into that sub-agent. The debugging experience of a black-box Agent is essentially equivalent to guessing.
dsh's answer to this is very straightforward: everything the model sees is written to the session log. System prompts, chain-of-thought, tool calls and results, sub-Agent scheduling, every context injection—all persisted to disk. Moreover, this log uses an append-only design: it only writes forward, never goes back to modify. This sounds plain, but it brings many properties:
- Traceable: Any action can be traced back through the log to see which context or which tool result triggered it.
- Recoverable: If a session is interrupted, you can continue from the event stream in the log without re-running the earlier steps.
- Forkable: Want to try a different path at some node? Fork a new branch from there, and the original path is preserved as-is.
- Searchable: The event stream is a queryable object; asking "how many times did tool calls fail in total during this run" no longer requires manually flipping through pages.
- Replayable: Recovery, forking, search, and replay share the same event stream, meaning what you see in replay is exactly what actually happened at the time—there's no "log and actual execution are inconsistent."
The way these capabilities are implemented deserves a special mention: they are not four separate systems, but four uses of the same event stream. This is the benefit of the append-only design—there's only one copy of the data, and everyone is a view of it. If the log could be freely overwritten, recovery and replay would conflict with each other; precisely because it's immutable, the four uses can coexist and remain self-consistent.
The interface that consumes this log is the Trajectory view. It examines by source: system prompts are one type of source, chain-of-thought is another, tool calls and results another, sub-Agent scheduling yet another, and context injection another still. When a run's results don't match expectations, in the Trajectory view you can trace along the sources to pinpoint whether "the prompt was unclear," "the tool returned dirty data," or "the context the sub-agent received was truncated." For researchers, this is almost a necessity—a fully observable event stream is itself research material; for engineers, this is the rope that pulls the Agent back from "mysticism" to "engineering."
There is one more detail that is easy to overlook: the source material specifically mentions that every context injection the model sees is persisted to disk. Context injection is a subtle thing—it doesn't change your code, yet it genuinely changes the model's behavior. Recording it into the event stream is like laying the "invisible hand" out on the table.
Three levels of events—Session / Agent / Capability: How event-driven extension points mount policies and adapters
For "everything is a plugin" to truly hold, a plugin loader alone is not enough; you also need a sufficiently fine-grained hook network—what do plugins rely on to collaborate? They rely on Cordis's Service and Event. dsh divides event extension points into three levels: session level, Agent level, and capability level.
This division is not arbitrary; it corresponds to three scales of the Agent runtime. Session-level events focus on "the lifecycle of a complete session," such as session start, end, restoration, and forking; Agent-level events focus on "the process of a single task execution," such as Agent startup, planning, delegating sub-agents, and completion; capability-level events focus on "the invocation of one specific capability," such as a particular file read/write, a particular Shell execution, or a particular retrieval. At a glance there are three layers; on closer inspection there are three granularities: a session is a container, an Agent is an execution body, and a capability is an action.
How do developers use these three layers? The answer is mounting policies and adapters. Policy-type plugins listen to events to make decisions—for example, mounting a policy on capability-level events that says "intercept any write operation first and wait for approval"; adapter-type plugins listen to events to perform translation—for example, translating a certain provider's response format into a unified format on Agent-level events. The comparison table below lists the focus, typical uses, and replaceable objects of the three levels:
| Event level | Scale of focus | Typical uses | Objects that can be replaced |
|---|---|---|---|
| Session level | The lifecycle of a complete session | Session restoration, forking, retrieval, replay policies | Storage, session backend, log consumption method |
| Agent level | The process of a single task execution | Planning policies, sub-agent scheduling, result aggregation | Loop (agent loop), scheduler, model routing |
| Capability level | The invocation of one specific capability | Permission approval, result validation, format adaptation | Tools, retrieval, sandbox, UI presentation |
Stacked together, the three layers form an extension network with no blind spots. Swap the model, swap the tools, swap the storage—the entire process requires no changes to any source code—what you change is configuration and plugin composition. The weight of this statement lies in this: the capability boundary of a closed-source Agent is drawn by the vendor, whereas the capability boundary of dsh is drawn by you yourself.
Behind this there is also a very critical mechanism promise: there is no privileged kernel that needs patching at runtime. All capability registrations are reversible side effects, automatically undone when a plugin is unloaded. This statement addresses "the perennial hard problem of plugin systems"—installing plugins is easy, but cleanly removing them is hard, and residual global state makes the system increasingly unstable. dsh turns "registration is a side effect, uninstallation is revocation" into a kernel-level constraint, so extending dsh becomes a very lightweight matter: mount a new plugin next to other plugins. With no privileged layer, there is no place for patches to stand.
The design philosophy of the underlying Cordis corresponds to the paper "A Programming Paradigm for Spatiotemporal Composability." It has academic backing—it's not a wheel cobbled together on a whim. Event-driven architecture + reversible registration + configuration-layer composition—these three things together are what make the slogan "everything is a plugin" hold up.
npx @deepseek-ai/dsh web and Source Installation: Complete Commands for Two Onboarding Paths
With the theory covered, let's get hands-on. dsh's prerequisites are minimal: have Node.js installed, and any of Linux, macOS, or Windows will do. Basic command-line operation, a foundation in Node.js, and a rough idea of what an API Key is—that's enough; no AI research background and no deep machine learning knowledge required.
The first path is one-command startup via npx, suited to those who want to get things running first and take a look:
# Option 1: one-command startup of the Web UI via npx (no prior global install needed)
npx @deepseek-ai/dsh web

# After startup, visit the default address in your browser
# http://127.0.0.1:3080
What this one command does behind the scenes: it pulls the @deepseek-ai/dsh npm package, starts with the web profile, and serves the Web UI at http://127.0.0.1:3080. Note that by default it binds to the local loopback address and is not exposed externally.
The second path is source installation, suited to those who want to read the code, modify plugins, or contribute:
# Option 2: install from source
git clone https://github.com/deepseek-ai/deepseek-harness.git
cd deepseek-harness
pnpm install
pnpm run build
pnpm dsh web
The four steps are: clone the repository, install dependencies, build, and start with the web profile. pnpm is used here instead of npm as a repository convention; just type it as shown. The difference between the two paths isn't in functionality but in "how deep you can modify": with the npx path you get an assembled finished product; with the source path you get a whole machine you can take apart yourself.
Whichever path you take, the first thing after installation should be the same step—review the actual configuration tree that gets started:
# Print the complete configuration tree actually started by the current profile
dsh --profile web --dump-config

# Any entry in the output can be replaced by your own patch
Why is this step important? Because dsh's configuration is layered and stacked: at startup it first applies each Bundle in the order listed by the profile, then the profile's cordis.patch.yml, then the home-level patch, and finally any --patch overlay. In other words, a running dsh is a plugin tree formed by stacking multiple layers. --dump-config lets you see "what this tree looks like right now," and any entry in the output can be replaced by your own patch. This is the key step that turns "open and controllable" from a slogan into fact: don't believe me? Then print out the configuration tree and see for yourself.
Always remember one premise: dsh is currently in its developer preview stage, is released under the MIT license, and the official documentation explicitly warns that there will be breaking changes in the future. This means two things: first, read the changelog before upgrading, and don't bet your production workflows on the stability of a preview release; second, precisely because it is MIT-licensed and its configuration layer is composable, you can pin down behavior in your own patch layer, unaffected by changes to upstream defaults.
The Web UI in three steps: Settings → enter the model key, add a workspace, send a task
The Web UI is the easiest entry point to dsh, with a default address of http://127.0.0.1:3080. Getting started takes just three steps:
- Configure the model: Open "Settings → Models," enter your DeepSeek API key, and save. Here's the key point—model routing takes effect immediately, with no restart required. This feature looks minor, but the difference in experience is huge: you can switch models without stopping the service, which for anyone running long tasks is the difference between an uninterrupted run and a broken one.
- Select a workspace: Add and select the project directory where you started dsh. There's an easy trap to fall into here—until you select a workspace, the session input box is unavailable. First-time users often think the interface has frozen, but actually they just haven't told the Agent "which project you're working in." This design is deliberate: the Agent has a clear filesystem boundary and can't read or write just anywhere.
- Run a task: Send a task, such as "Summarize this repository." The Agent will then read and write files, run commands, and delegate to sub-agents. Regarding permissions—operations that exceed the permission policy will first request your approval, and won't be executed silently. This gate corresponds, within the multi-level event system, to the usage of "attaching policy plugins to capability-level events," and it is also the basic safety line when putting an Agent into a real project.
Looking at the three steps together, dsh's design intent is clear: first define the model (the soul), then define the boundary (the workspace), then release the task (execution). The order is not arbitrary; it corresponds to the three questions that must be answered: "where the model comes from, what it can touch, and what it needs to do."
Multi-form usage: the division of labor among Web UI, headless, CLI, Python SDK, and TypeScript SDK
dsh doesn't have just one interface. Its multi-form design corresponds to different usage scenarios; choose the wrong form and it will feel awkward, choose the right one and it will feel smooth.
| Form | Form positioning | Best-fit scenarios | Usage points |
|---|---|---|---|
| Web UI | Graphical interface, default http://127.0.0.1:3080 | Interactive exploration, viewing Trajectory, manual approval | Three steps: configure model → select workspace → send task |
| headless | One-shot run, prints the final answer and exits | Unattended scenarios such as scripts and CI pipelines | Runs and exits, without entering an interactive loop |
| CLI | Direct command-line operation | Heavy terminal users, configuration file review | Can be used with --profile / --dump-config |
| Python SDK | pip install deepseek-harness-sdk | Embedding the Agent into Python workflows and data pipelines | Comes with its own runtime, no system Node.js required |
| TypeScript SDK | An embedding approach for the TS ecosystem | Deep integration and plugin development in the same language as dsh itself | Along with Code Mode SDK, belongs to the TS-side capabilities |
Let's go through the differences one by one.
Web UI is the most feature-complete form, suited for when a human is present: when you want to see what it intends to do, what a particular round of tool calls returned, or to troubleshoot source by source in the Trajectory view, this is the place. headless, by contrast, runs a task in one shot, prints the final answer, and exits—this form is naturally suited to scripts and CI, because it has no "wait for you to click something in the UI" step. For example, adding an automated check to a pipeline is most natural in headless form.
CLI is the entry point in the terminal, and also the entry point for executing configuration-review commands like dsh --profile web --dump-config. The Python SDK line has a very practical detail: pip install deepseek-harness-sdk, and it ships with its own runtime, requiring no system Node.js. For Python teams this is highly valuable—no need to stuff an extra Node runtime into the environment just to embed an Agent, which greatly reduces the dependency surface. Below is a conceptual example of embedding an Agent into a Python workflow:
# Conceptual example: embedding dsh into your own workflow with the Python SDK
# Install: pip install deepseek-harness-sdk (ships with its own runtime, no system Node.js required)
from deepseek_harness_sdk import Harness

# Point at the project directory and construct a one-off Harness session
harness = Harness(workspace="./my-repo")

result = harness.run(
    "Map out this repository's module dependencies and output a Markdown overview",
    # Operations beyond the permission policy first trigger an approval callback; here we auto-reject everything
    on_approval=lambda req: False,
)

print(result.final_answer)
# The full event stream can be exported separately for replay and retrieval
result.export_events("run-events.jsonl")
Likewise, this is conceptual example code; for field names and callback signatures, refer to the official SDK documentation. Focus on understanding the chain of "construct Harness → pass in a task → get the final answer → export the event stream." Note the last line that exports the event stream—it brings the value of the append-only session log discussed earlier into the SDK: not only can you view it in the Web UI, you can also feed it into your own data pipeline.
The TypeScript SDK, meanwhile, targets deep integration with the TS ecosystem, and belongs to the TS-side capabilities alongside plugin development and the Code Mode SDK. If your team already writes TypeScript, you can go from plugins to orchestration using the same language stack, with a smaller cognitive burden.
Looking at the five forms together, dsh's positioning becomes clear: it is not "yet another library for writing a few agents," but a complete layer that sits above SDKs and frameworks and solves "how an Agent runs reliably." To illustrate this positioning, we can put several popular tools of the moment side by side in a table for comparison:
| Project | Positioning | Relationship to DeepSeek Harness |
|---|---|---|
| Claude Code | Closed-source commercial coding assistant | Comparable in features, but dsh is fully open source, self-hostable, and its capabilities are replaceable |
| Hermes Agent | Self-evolving personal Agent (Nous Research) | Focuses on cross-session memory and skill accumulation; dsh focuses on plugin-based composition and end-to-end observability—the two philosophies complement each other |
| OpenClaw | Local-first messaging Agent | Focuses on multi-channel access and digital sovereignty; dsh provides multiple forms—Web UI / headless / SDK |
| LangGraph / AutoGen / CrewAI | Agent-building frameworks (programming libraries) | Frameworks solve "how to build"; dsh is a complete Harness—"how to run stably + how to swap capabilities" |
The one line in this table that you should remember most is the last one: building a framework and a Harness are not problems at the same layer. When you use a library like LangGraph to put an Agent together, that is "building"; once it is built, whether it is stable, whether it can recover after crashing, whether switching models requires touching the source code, and whether problems can be replayed—that is "running". dsh stands at the latter layer.
Let me also lay out some background data from the industry; these materials all have it: in OpenAI's team experiment with 1 million lines of code, all output over 5 months was completed by Agents, with engineers not writing a single line of code; LangChain optimized only the external harness environment (documentation structure, verification loops, tracing systems), and the coding Agent's score on Terminal Bench 2.0 rose from 52.8% to 66.5%, with its global ranking rising from 30th to 5th, while not a single parameter of the underlying model was changed. The bottleneck is not model intelligence, but infrastructure—this is exactly the reason Harness exists.
If we sort out the evolution of AI engineering paradigms, we can see three leaps: prompt engineering (2023~2024, the optimization target is input wording, solving the quality of a single conversation, with an interaction mode of question and answer), context engineering (2025, the optimization target is information input, solving knowledge boundaries and hallucinations, with an interaction mode of generation after information injection), and harness engineering (starting in 2026, the optimization target is the runtime environment, solving Agent reliability and sustainability, with an interaction mode of humans steering and Agents executing). dsh is the complete productized implementation of the harness engineering philosophy.
Latest progress in September 2026: the plugin community and preset practices starting from dsh --dump-config
By September 2026, the ecosystem around dsh had already grown a fairly clear path of play, and the starting point of this path happens to be the command discussed in the previous section: dsh --profile web --dump-config. Why start from it? Because it lays out "what the system actually looks like". Every entry you see is an assembly point that can be replaced; and the community's way of playing is essentially "using other people's plugins to fill these points, or stuffing your own plugins into these points".
The place to find plugins is GitHub topics: dsh-plugin. Using a single topic to converge the plugin ecosystem has very practical benefits: searching, subscribing, and browsing by topic all rely on GitHub's native capabilities, with no need for an additional centralized marketplace, and no single point of dependency where "if the marketplace closes, everything is gone". This is consistent with the overall orientation of MIT open source, no telemetry, and no cloud lock-in.
Another direction very worth watching around September is Creation Mode. Its positioning is "custom Agent preset", and its capability composition is all the capabilities of Standard Mode plus runtime inspection, plugin experimentation, and preset creation guidance. In other words, Creation Mode is not just a runtime tier; it is more like a "workbench for building Agents": inside it, you inspect runtime state, experiment with plugin mounting, and then, following the guidance, compose a preset.
What is a preset? It can be understood as a snapshot of "a whole set of plugin combinations + configuration overlays". Returning to the overlay order discussed earlier: profile lists bundle packages → apply each bundle package → the profile's cordis.patch.yml → home-level patch → --patch overlay. A preset is simply fixing a certain layer of combinations on this chain, packaging it for reuse. Thus the two most natural ways of playing in the community emerge:
- Horizontal play: swapping parts. Any one of models, tools, skills, sessions, sandboxes, storage, loops, scheduling, and UI can be replaced with a community plugin. For example, replace the default storage with your team's internal storage adapter, or replace retrieval with your own self-built knowledge base.
- Vertical play: stacking presets. Do not change the parts; change the way they are combined. For segmented scenarios such as "frontend refactoring", "data pipeline maintenance", and "documentation site generation", compose a preset for each, and switch once when using it to swap in a different set of Agent behavior.
The lineage of the four run modes becomes especially easy to grasp at this point: Standard mode is a fully featured coding Agent (file editing, Shell, file and web search, Skills, planning, goals, sub-agents, and workflows); PTC mode layers the Code Mode SDK on top of standard capabilities, letting the model compose multi-step tool calls with a single TypeScript program; Minimal mode keeps only persistent bash and str_replace_editor, for minimal benchmarking; Creation mode is standard capabilities plus runtime inspection, plugin experimentation, and preset authoring guidance. The first three are "which gear to run in," and the fourth is "how to build a new gear."
Here is a practical configuration skeleton to help you ground "where patches come from and where they stack":
# Practical illustration: use --patch overlay to replace capabilities without touching source
# 1) First, see the current state clearly
dsh --profile web --dump-config > current-config.txt

# 2) Prepare your own patch layer (illustrative naming; follow the official patch format)
#    Point log storage at the team's internal backend and attach a write-approval policy
cat > my-overlay.patch.yml << 'EOF'
storage:
  driver: team-internal-store
policies:
  - name: approve-writes
    on: capability.file.write
    action: require-approval
EOF

# 3) Start with the overlay, and the config takes effect
dsh --profile web --patch my-overlay.patch.yml
Again, this is a structural illustration, not an official configuration sample; for field names, defer to the documentation for the version you are using. What it aims to convey is that engineering habit—first dump the current state, then stack your own patch, and finally start with the overlay. This habit keeps you in control as the preview version keeps evolving: no matter how upstream defaults change, your overlay stays in your hands.
Finally, three engineering matters especially worth noting around September. First, the preview-period mindset: the official guidance explicitly warns that there will be breaking changes, so keep custom logic in your own patches and plugins as much as possible rather than modifying upstream source directly—upgrades will hurt much less. Second, observability first: since every run is written to an append-only log and the Trajectory view can be inspected by source, use it as your first-hand troubleshooting tool rather than only remembering to dig through it after something goes wrong. Third, configure permission policies early: operations that exceed the permission policy will first request approval—this is a good mechanism, but the default policy may not fit your project. Adjusting the policy to your team's habits through plugins early saves more trouble than remedying it afterward.
Summary and Best Practices
Condense the key points of the whole article into a checklist you can follow directly:
- Remember the main thread first: Agent = Model + Harness. The model is the soul; the Harness is responsible for understanding the environment, using tools, and continuing to work in real scenarios. The bottleneck is usually not model intelligence, but infrastructure.
- Understand the architectural core: The Cordis kernel is only responsible for loading, unloading, and dependency management of plugins; models, tools, skills, sessions, sandboxes, storage, loops, scheduling, and UI are all provided by plugins, collaborating through Service and Event. At runtime there is no privileged kernel that needs patching; registration is a reversible side effect, and uninstallation automatically undoes it.
- Choose the right mode for the scenario: Pick the run mode by scenario—Standard mode for a complete coding Agent; PTC mode to converge multiple rounds of tool calls into a single TypeScript program using the Code Mode SDK; Minimal mode to keep only bash and str_replace_editor for benchmarking; Creation mode for runtime inspection, plugin experimentation, and preset authoring.
- Treat observability as a default action: Everything the model sees is written to an append-only session log (system prompt, chain of thought, tool calls and results, sub-Agent scheduling, context injection). Recovery, forking, retrieval, and replay share the same event stream; use the Trajectory view to inspect by source.
- Attach extensions via three levels of events: Session level manages lifecycle, Agent level manages the task process, and capability level manages specific calls. Attach policies for approval and validation, and attach adapters to replace formats and backends—so you can swap models, tools, and storage without changing source code.
- Don't agonize over installation: For a quick trial, use
npx @deepseek-ai/dsh web; to read source and modify plugins, gogit clone→pnpm install→pnpm run build→pnpm dsh web. The prerequisite is having Node.js installed. - Web UI in three steps: Settings → Models, enter the DeepSeek API key (routing is immediately available, no restart needed) → add and select a workspace (the input box is unavailable when none is selected) → send a task; operations beyond permissions require approval first.
- Pick the right usage form: Use the Web UI for interactive troubleshooting (default http://127.0.0.1:3080); use headless for scripts and CI (one-off run, print the final answer, and exit); use the CLI for terminal operations; use
pip install deepseek-harness-sdkfor Python workflows (bundled runtime, no system Node.js required); use the TypeScript SDK for deep TS integration. - Develop the habit of dumping configuration: Before making changes, run
dsh --profile web --dump-configto see the stacked result of profile → bundle → cordis.patch.yml → home-level patch →--patchoverlay; to change behavior, write your own patch or plugin, don't modify upstream source. - Keep up with the community: Find plugins under GitHub topics: dsh-plugin; to build your own Agent, use Creation mode's preset authoring guidance to solidify "a set of plugin combinations + configuration overlays" and reuse it for niche scenarios.
- Three disciplines for the preview period: Read the changelog before upgrading (the official guidance has already noted there will be breaking changes); keep custom logic in your own patch layer; configure permission policies early according to team habits.
- Remember licensing and boundaries: MIT license, no telemetry, no cloud lock-in, free composition at the configuration layer, and boundaries drawn by you—this is exactly what "Everything is a Plugin." means in engineering terms.
If you take away just one sentence, let it be this: dsh turns "harnessing AI" from a methodology into composable, observable, and replaceable infrastructure. You don't have to write an Agent from scratch, nor do you have to be locked inside someone else's black box—plug in your model, attach plugins your way, and then watch it get the job done step by step in the Trajectory view.