Before you can truly put DeepSeek Harness to use, the installation step may look simple, but it actually hides quite a few forks in the road: do you want to see the Web interface within three minutes, are you preparing to read the source code and write plugins, or do you want to call the Agent from your own Python program? These three paths correspond to three completely different sets of prerequisites and outputs, and choosing the wrong direction often leaves you stuck on the Node version, a missing pnpm, or not being able to find the entry command. This article will use one table, several self-check commands, and paste-ready hands-on code to explain thoroughly the three approaches of npx out-of-the-box use, global installation, and source build, while also bringing the Python SDK installation chain into view along the way. After reading the first half, you should be able to determine clearly which path you should take and know what command to type as your first step.
Before installing, first run through three self-check commands: node -v, git --version, and Python 3.10+
The runtime of DeepSeek Harness is built on top of Node.js, and this determines that the vast majority of installation paths cannot avoid the Node environment. But the three approaches do not have the same requirements for prerequisites: the one-click npm installation only needs Node itself and is the officially recommended out-of-the-box path; the source approach additionally requires Git and pnpm; the Python SDK does not need the system to provide Node at all, because it comes with its own runtime. If these differences are not clarified before getting started, it is very easy to run into the dilemma of "I typed the command but got an error, and I do not know what is missing."
So the first step is not to rush into installation, but to do an environment self-check. The first thing is to confirm that Node exists and that the version is new enough. Run node -v in the terminal. If it outputs a version number like v22.23.1, that means Node is ready; if it says command not found, you need to go to the Node official website and install it first. The empirical value given in the source material is v20+, meaning the Node major version should be at least 20. The repository's package.json will also have its own engines declaration, and the build stage often has stricter version requirements, so the higher the version, the safer it is.
The second thing is to check Git. During source installation, this step is a hard requirement, because cloning the repository itself depends on Git. Run git --version; being able to print information like git version 2.x is enough. Git is optional in the one-click npm installation path, but having it on hand will make it much smoother to switch to the source approach later. The third thing is to confirm the Python version, which is needed only when taking the Python SDK route, and the bottom line is Python 3.10 and above. You can use python -m venv --help to test whether the venv module exists, or directly use python --version to check the version number. Versions below 3.10 may cause problems later when creating a virtual environment or installing the SDK.
In addition to the toolchain, there is one common prerequisite needed by all three approaches: a DeepSeek API key. It is used to configure model routing after startup, and it also supports OpenAI-compatible endpoints. The key itself does not participate in the installation process, but without it, even if installation succeeds and the Web UI opens, you still cannot truly get the Agent running. As for the operating system, Linux, macOS, and Windows are all covered; the Python SDK has somewhat narrower platform requirements, supporting Linux x64 / arm64 and macOS 14+ (arm64).
Organizing these prerequisites into a comparison checklist can help you figure out what you're missing before you start:
- One-click npm install: Node.js required; Git optional; pnpm not required; Python not required; API Key required.
- Source install: Node.js required; Git required; pnpm required; Python not required; API Key required.
- Python SDK: System Node not required (the SDK bundles its own runtime); Git required; pnpm not required; Python 3.10+ required; API Key required.
Here's an engineering detail that's easy to overlook: if pnpm isn't preinstalled, you can add it with a single command, npm install -g pnpm. Since npm itself comes bundled with Node, going from "Node only" to "capable of building from source" is just this one step away. Another detail is mirror configuration in network-restricted environments—both npm and pnpm can solve slow package pulls through mirror sources, which we'll revisit in the troubleshooting section later.
See the output differences of the three installation methods in one table: Web UI, build artifacts, and the deepseek_harness package
Choosing an installation method is essentially choosing "what you ultimately want to get." Even though all three install DeepSeek Harness, the one-click npm install ends at a Web UI running in your browser; the source install ends at a local repository plus complete build artifacts; and the Python SDK ends at a deepseek_harness package you can import in your program. The three aren't competitors—they target three completely different usage goals.
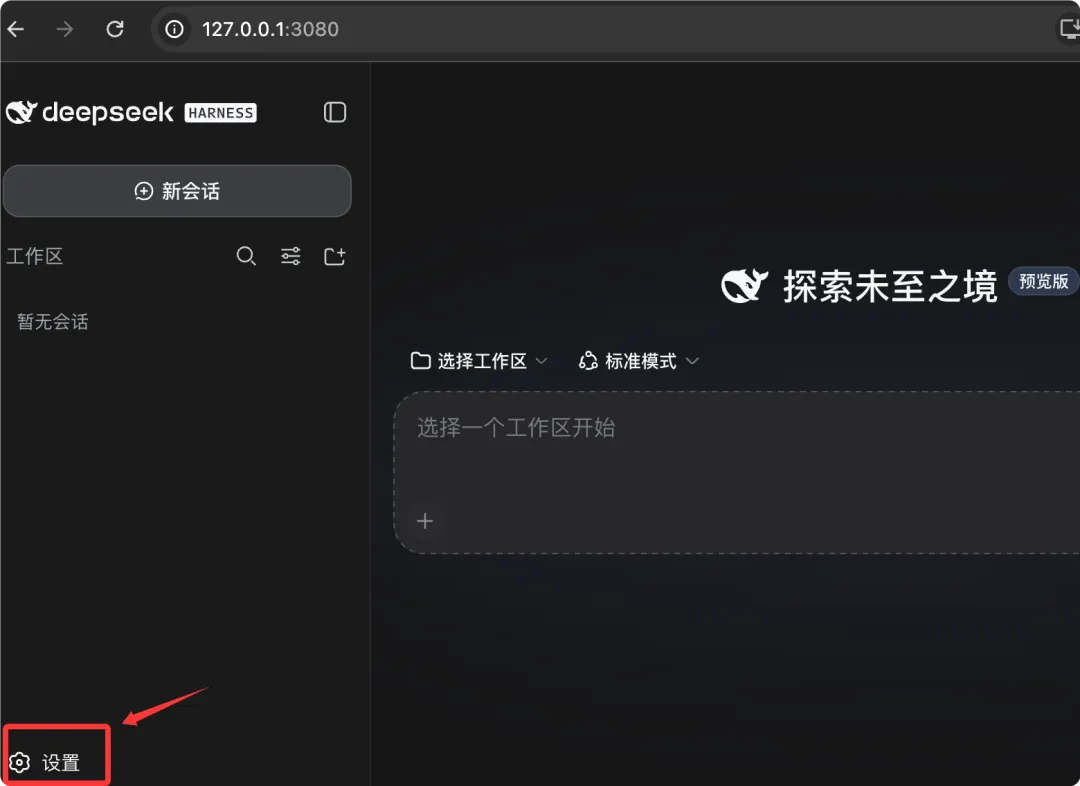
Let's start with the one-click npm install. It's aimed at the vast majority of users who just want to quickly try out the Web UI. The output after installation is straightforward: it launches a web interface, with the default address being http://127.0.0.1:3080. You don't need to care where the TypeScript entry point is or how the frontend artifacts are bundled—dsh hides all of that behind the scenes. For anyone encountering DeepSeek Harness for the first time and just wanting to see what it can do, this is the path of least resistance.
Next, the source install. Its target audience is clearly developers: those who want to build plugins, read the source code, or contribute. The output is a cloned local repository plus the complete build artifacts generated by pnpm run build. The source approach also has a capability found nowhere else—you can run the TypeScript entry point directly with pnpm dsh, without first compiling it to JavaScript. This means you can immediately verify behavior after changing the source code, which is especially critical for plugin debugging.
Finally, the Python SDK. It serves scenarios where you want to call the Agent from within your own Python program. It produces a deepseek_harness package and bundles its own runtime, independent of the system-installed Node. This matters a lot for many data science or backend teams' machines: they may not be willing to maintain a Node environment just for an Agent, and by packaging the runtime in, the SDK effectively absorbs the dependency problem internally. The trade-off is a narrower range of platform support—you need Linux x64 / arm64 or macOS 14+ (arm64).
Put these three paths side by side in a single table, and the choice becomes obvious at a glance:
| Comparison Dimension | npm One-Click Install (Recommended) | Source Install (Development) | Python SDK (Programmatic) |
|---|---|---|---|
| Who it's for | The vast majority of users who want to try the Web UI as quickly as possible | Those who want to develop plugins, read the source code, or contribute | Those who want to call the Agent from within their own Python programs |
| Core Prerequisites | Node.js (Git optional) | Node.js + Git + pnpm | Python 3.10+, Git |
| System Node Required | Yes | Yes | No, the SDK bundles its own runtime |
| Final Output | Launches the Web UI, defaulting to http://127.0.0.1:3080 | Local repository + full build artifacts, can run the TypeScript entry directly with pnpm dsh | deepseek_harness package + bundled runtime |
| Typical Command | npx @deepseek-ai/dsh web or dsh web | pnpm dsh web | python -m pip install deepseek-harness-sdk |
| Possible Next Steps | Configure models, select a workspace, run tasks | Write plugins, inspect the full config tree, contribute to development | import and call from Python code |
When reading this table, keep one criterion in mind: do you need to modify DeepSeek Harness itself. If the answer is no and you just want a working interface, then the npm one-click install is enough; if you need to change code, write plugins, or inspect configuration details, then you must go with the source install; if your host environment is a Python program and you don't want to bring in Node, then choose the SDK. These three paths are not isolated from one another either—starting with the npm approach to build an intuition for the product and then switching to the source approach as needed is the actual path many developers take.
npx @deepseek-ai/dsh web Quick Trial: How the First Run Automatically Initializes the Web Config Template
If you want to take a quick look at DeepSeek Harness without polluting your global environment, npx is the most hassle-free entry point. It is essentially "temporarily download and execute," requiring no prior global installation of any package. The entire command is just one line:
npx @deepseek-ai/dsh web
After running this command, npx resolves the @deepseek-ai/dsh package, pulls it into the local cache, and runs it, with the web argument specifying that the Web interface should be launched. The first key behavior here is: the first run automatically initializes the web config template. In other words, you don't need to manually create any configuration file in advance; dsh will prepare the configuration skeleton needed for the web profile on your behalf, so that subsequent model settings and workspace selections have somewhere to land.
The second key behavior is that it prints the access address in the terminal, which by default is http://127.0.0.1:3080. Note that this address is bound to 127.0.0.1, meaning it is only accessible from the local machine, which is a reasonable default for development-time security. If you find that port 3080 is occupied by another program, you can start it on a different port, for example by changing the argument to --port 8080, provided that the startup arguments are placed before the application arguments—this point will be expanded on later in the profile section.
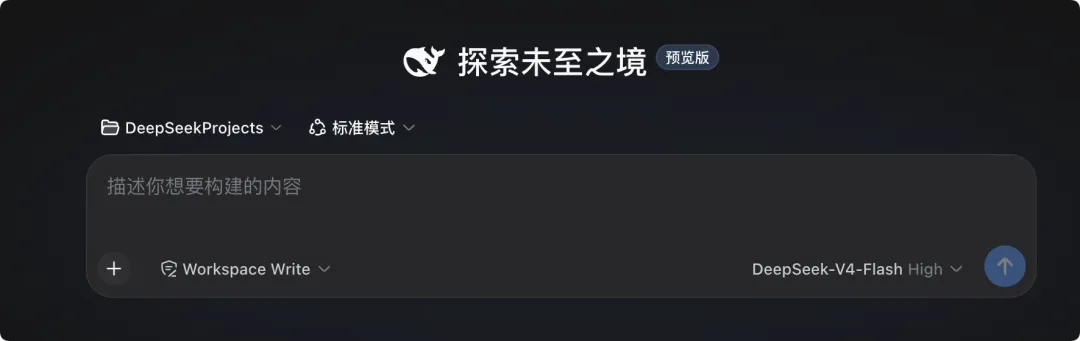
The way to verify success is straightforward: open the address printed in the terminal, and if you can see the DeepSeek Harness Web interface, that means the installation-and-startup chain is working. However, there is a pitfall that beginners often fall into—before adding a workspace, the new Web UI will not have any workspace selected, and the interface looks like it is in an "unavailable" state. This is not an installation failure but normal behavior; it will become available again after you configure a workspace in the next step.
There is also a small tip worth remembering in advance: dsh uses the invocation directory as the default filesystem location. This means that the directory you are in when you run the npx command will be treated as the default filesystem location. So the smarter approach is to first cd into your project directory and then run npx @deepseek-ai/dsh web, which will be the most convenient when selecting a workspace later, so you don't have to manually add a path that is far away.
Below, the complete npx quick-trial workflow is condensed into a sequence of operations you can copy directly, including changing directories, starting up, and an alternative form for when there is a port conflict:
# 1. First confirm the Node environment
node -v
# Expect output similar to v22.23.1

# 2. Enter your project directory (this step makes dsh treat the current directory as the default filesystem location)
cd ~/projects/my-app

# 3. Quick trial without installation; the first run will automatically initialize the web configuration template
npx @deepseek-ai/dsh web
# The terminal will print the default access address: http://127.0.0.1:3080

# 4. If port 3080 is occupied, start on a different port
npx @deepseek-ai/dsh web --port 8080
It should be noted that although the npx approach is convenient, it is temporary: each execution may resolve and fetch the package, which is less stable for people who need to start it frequently than a global installation. It is best suited to the scenario of "I haven't decided whether to use it long-term yet, let me run it first and see." Once you confirm that you will use it continuously, you should consider the global installation discussed below.

After npm install -g @deepseek-ai/dsh global installation, the trade-offs between dsh web and the npx approach
If you have decided to use DeepSeek Harness long-term, a global installation brings something npx cannot provide: a stable, usable dsh command. The installation command is just one line:
npm install -g @deepseek-ai/dsh
Here, -g means global installation; the package will be placed in the global node_modules directory, and the corresponding executable file will be linked into the system PATH. After installation is complete, you no longer need the npx prefix—just enter dsh web to start the Web interface. In terms of behavior, dsh web and npx @deepseek-ai/dsh web are equivalent; both start the Web UI, with the difference being that the former reuses the locally installed version, while the latter may resolve the remote package every time.
This equivalence means the migration cost is almost zero: all the parameters you previously tried with npx still apply once you switch to the dsh prefix. For example, dsh --profile web --port 8080 is how you start it on a different port. Understanding the command structure is very helpful for troubleshooting—dsh's own startup parameters go first, and the application-side parameters go after. --profile web belongs to dsh's profile selection, while --port 8080 is the Web application's own parameter. If you reverse the order, the parameters may be interpreted at the wrong level, leading to the confusion of "it looks like it was set but it didn't take effect."
So in which scenarios should you keep using npx, and in which scenarios should you install globally? You can divide it like this:
- Scenarios for using npx: trying it out for the first time, running it temporarily on someone else's machine, not wanting to leave any installation traces globally, or just wanting to verify the effect of a certain parameter.
- Scenarios for using a global install: using it as your main tool for daily development, needing to write scripts or call it repeatedly in CI, wanting to lock in a version you've already verified, or wanting to use dsh's subcommand system (for example, viewing configuration or managing plugins).
A global install also has a hidden advantage: the command name is shortened from a long package name to dsh, which significantly reduces typing burden when you need to combine multiple subcommands. Common subcommands include running a task in one go with the headless profile, viewing the complete configuration tree with --dump-config, and managing a profile's plugins with the plugin subcommand. These will be covered in detail in the source-code section below, but even if you take the npm one-click installation path, as long as you memorize the dsh prefix, you can call them at any time.

The startup directory is the default filesystem location: why it's recommended to cd into the project directory before running the command
This is the rule in the entire installation process that is most easily overlooked, yet is repeatedly felt in later use: dsh treats the invocation directory as the default filesystem location. In other words, whichever directory you type the startup command in becomes the default candidate for the subsequent workspace. It isn't chosen randomly, nor is it fixed to the user's home directory—it strictly follows the current working directory at the time you execute the command.
Once you understand this rule, many "why can't my Agent see my files" problems are solved instantly. Suppose you directly execute npx @deepseek-ai/dsh web in the user's home directory; then the default filesystem location is the home directory, and when you later go into the Web UI to select a workspace, what you actually need to add is your project directory. Conversely, if you first execute cd ~/projects/my-app and then start dsh, the invocation directory is my-app, and when you later select a workspace it will appear in the most convenient position, requiring almost no extra action.
The engineering value of this rule lies in "reducing one configuration step and lowering the probability of error." The concept of a workspace has actual permission implications in DeepSeek Harness; the permission policy is built around the workspace to define the range of files the Agent can access. If you select the workspace correctly from the start, subsequent reads, writes, and command executions will all fall within the expected range; if you select it incorrectly, you may encounter situations where the agent tries to access files outside the workspace and is blocked. Therefore, it's recommended to make "cd first, then start" a habitual action.
There is one more thing worth setting up in advance: create a dedicated directory for your projects as early as possible. The approach given in the source material is to create a new DeepSeekProjects directory as your workspace. This is not a hard requirement, but it makes it clear at the filesystem level which directory is meant for the Agent, preventing the Agent from rummaging around in your home directory. You can create it first, then cd into it and start:
# Create a project directory specifically for the Agent
mkdir -p ~/DeepSeekProjects

# Enter it so that dsh treats it as the default filesystem location
cd ~/DeepSeekProjects

# From now on, whether you use npx or the global dsh, the startup directory is already correct
npx @deepseek-ai/dsh web
# Or: dsh web
At this point, let's briefly summarize the chain effect of "the directory determines the default location": the startup directory determines the default filesystem location, the default filesystem location determines how convenient workspace selection is, and the workspace in turn determines what the Agent can do within its permission boundary. These three steps are closely linked, so moving the cd step earlier is the most cost-effective optimization.
Four steps for source installation: git clone, pnpm install, pnpm run build, pnpm dsh web
When you shift from the role of "user" to "developer," source installation is an unavoidable path. It suits people who want to develop plugins, read the source code, or contribute. The whole process can be summarized as four steps executed in order: clone the repository, install dependencies, build the artifacts, and start from source. The order cannot be changed, especially since the build must happen before startup; otherwise, you will be missing the packages and frontend artifacts required for production operation.
The first step is to clone the repository, with the target address being https://github.com/deepseek-ai/deepseek-harness.git. After cloning is complete, enter the repository directory; at this point you have the complete source tree. The second step is to install dependencies, with the command pnpm install. This step depends on pnpm. If you do not have it on your machine yet, you can install it first by running npm install -g pnpm. In this project, pnpm's role is not just that of a "faster package manager"; it also handles plugin management under the profile directory, so the source path is almost inseparable from it.
The third step is the build, with the command pnpm run build. This step is responsible for building both the packages and the frontend artifacts, and the official comment explicitly states that it is "required for production operation." In other words, if you skip the build and start directly, you may not get the complete runtime artifacts, the frontend page may fail to load, or some packages may not be compiled correctly. If you understand the build as "translating the source code into a form that can run in production," you will not think it is unnecessary. The fourth step is startup, with the command pnpm dsh web. Note that this uses pnpm dsh rather than the global dsh; it goes through the TypeScript entry point inside the repository, and you do not need to first compile the source code into a global command. This is exactly the convenience of the source-code approach.
Combining the four steps into a copyable command sequence gives:
# 1. Clone the repository
git clone https://github.com/deepseek-ai/deepseek-harness.git
cd deepseek-harness

# 2. Install dependencies (requires pnpm; can be installed with npm install -g pnpm)
pnpm install

# 3. Build packages and frontend artifacts (required for production operation)
pnpm run build

# 4. Start the Web UI from source
pnpm dsh web
The most common point of failure during source installation is the build phase. The material offers three troubleshooting directions: confirm that pnpm is installed; configure a mirror source for npm / pnpm when the network is restricted; and confirm that the Node.js version meets the requirements declared in the repository's package.json under engines. The third point is especially worth noting—the root cause of many build errors is not a code problem, but an overly low Node version, which prevents certain syntax or toolchains from running. So even if the earlier node -v shows a version number, you still need to check it against the engines declaration to confirm it is new enough.
In addition, you need to distinguish between the two concepts of "source installation" and "source running." The installation phase produces the local repository and build artifacts; the running phase can choose different profiles, such as using pnpm dsh web to start a Web UI, or using the later headless profile to run one-off tasks. The same source code can support multiple startup forms, which is also where the source approach is more flexible than npm one-click installation.
Two hidden entry points of the source approach: pnpm dsh --profile headless and --dump-config
When running from source, besides the main entry point pnpm dsh web, there are two often-overlooked but very useful entry points. They solve two types of problems respectively: one is "I want the Agent to run a task once and then directly get the answer," and the other is "I want to know exactly which configurations were loaded in this startup." For plugin developers, the latter is almost a daily necessity.
The first entry point is pnpm dsh --profile headless "run the tests". The behavior of this profile is: run one task once, print the final answer, and exit. It does not start a resident Web server, making it suitable for scripts or CI pipelines. The content in quotes is the task description, and you can replace it with any instruction. Compared with the interactive session of the Web UI, headless mode is closer to an "Agent in the command line," with clean output and a clear exit, and it does not leave behind a service process that needs to be manually shut down.
The second entry point is pnpm dsh --profile web --dump-config. Its purpose is to view the complete configuration tree actually used at startup, and it does not start the server. The significance of this for plugin development is: plugins are ultimately loaded by plugin entries in the configuration tree, so only by understanding what the configuration tree looks like can you know which layer your plugin is attached to and which parameters it receives. Paired with it is --dump-default-config, used to view the default configuration tree, that is, the version that does not include user patches. By comparing the two, you can see exactly what the user's override actions changed.
Putting these two entry points into one command list makes them convenient to use for comparison:
# Run a task once and print the final answer (suitable for scripts / CI)
pnpm dsh --profile headless "run the tests"

# View the complete configuration tree actually used at startup (does not start the server, commonly used in plugin development)
pnpm dsh --profile web --dump-config

# View the default configuration tree (without user patches), forming a contrast with the previous command
dsh --profile web --dump-default-config
Here we need to fill in the initialization rules for profiles: the two profiles web and headless are automatically initialized from built-in templates on first use, which means you can use them directly without creating them manually; other profiles need to be created via the dsh plugin subcommand. This rule explains why the two commands above work out of the box, whereas if you try a custom profile name, you may first be asked to create it.
To emphasize the parameter order issue once again: dsh's startup parameters come first, and application parameters come after. In pnpm dsh --profile web --port 8080, --profile web is for dsh, and --port is for the Web application. Similarly, --dump-config is a switch at the dsh level, and placing it after the profile and before the application parameters is the safest position. Once you understand this layering, it becomes much harder to make mistakes when writing commands.
Python SDK installation chain: venv isolation + pip install deepseek-harness-sdk with bundled runtime
If you want to run DeepSeek Harness inside your own Python program rather than operating it through a browser, the Python SDK is the path to take. Its prerequisites are clearly different from the previous two: it requires Python 3.10+, requires Git, and also requires a DeepSeek-compatible API endpoint and credentials, as well as an isolated workspace that the agent can modify. Note this last point—because the Agent will read and write files and execute commands in the workspace, giving it an isolated directory is good security practice.
The first step of the installation chain is to create and activate a virtual environment. The point of a virtual environment is to isolate the SDK and its dependencies from the system Python, avoiding version conflicts. The creation command is python -m venv .venv, and the activation command on Unix-like systems is . .venv/bin/activate. After activation, subsequent pip installations will land in this isolated environment. The second step is to install the SDK itself, with the command python -m pip install deepseek-harness-sdk. What makes this package special is that it comes with a bundled runtime; under normal circumstances, the system does not need to provide Node. If a missing runtime error occurs at runtime, it usually means the installed package is incomplete, and simply re-running the installation command will fix it.
The complete process for installation and credential configuration can be copied directly from the following block:
# 1. Clone the repository (SDK-related examples are also provided with the repository)
git clone https://github.com/deepseek-ai/deepseek-harness.git
cd deepseek-harness

# 2. Create and activate a virtual environment (requires Python 3.10+)
python -m venv .venv
. .venv/bin/activate

# 3. Install the SDK (bundled runtime, no system Node required)
python -m pip install deepseek-harness-sdk

# 4. Configure credentials
export DEEPSEEK_API_KEY=sk-your-key-here

# If the model is not the default DeepSeek endpoint but an OpenAI-compatible proxy, you also need to set:
# export DEEPSEEK_BASE_URL=http://127.0.0.1:8000/v1
# export DSH_MODEL=deepseek-v4-flash
There are three layers of credential information worth examining separately. The first layer is DEEPSEEK_API_KEY, which is required and starts with sk- in its format. The second layer is DEEPSEEK_BASE_URL, which is only needed when you are not using the default DeepSeek endpoint but instead going through an OpenAI-compatible proxy; an example value is http://127.0.0.1:8000/v1. The third layer is DSH_MODEL, used to specify the model name, with an example value of deepseek-v4-flash. The relationship among these three is: the API Key determines whether you are eligible to make calls, the Base URL determines where calls are sent, and the model name determines which model is actually used.
The entry point for calling is from deepseek_harness import DeepSeekHarness. This single import line is the gateway to the entire SDK. As mentioned in the materials, the repository's built-in examples/jsonrpc-agent/minimal.py is a lightweight wrapper for SDK calls and can be referenced directly; after running, it prints the assistant's final reply, and the session directory receives a JSONL log containing model requests and tool calls. This JSONL logging point is important—it means every call has a structured record available for inspection, so you don't have to guess when debugging Agent behavior.
A quick comparison between the SDK path and the two previous paths makes its positioning clearer:
- Common ground with the npm path: both can drive the same set of Agent capabilities, and both require an API key.
- Difference from the npm path: the SDK does not provide a Web UI; the entry point is Python code rather than a browser.
- Common ground with the source code path: both require Git to obtain the repository, and both allow you to reference the example code in the repository.
- Difference from the source code path: the SDK comes with its own runtime and does not require system Node, whereas the source code approach strongly depends on Node and pnpm.
One more reminder about platform limitations: the Python SDK supports Linux x64 / arm64 and macOS 14+ (arm64). If your target machine is a different platform combination, you may need to switch to the npm or source code path and integrate through other means. This limitation comes from the SDK's bundled runtime, not from the Python language itself, so it cannot be bypassed by upgrading your Python version.
At this point, the map of the three installation paths has been laid out: npx is for zero-cost trial runs, global installation buys you a long-term usable dsh command, building from source opens the door to plugins and debugging, and the Python SDK embeds Agent capabilities into your own programs. Each section has provided executable commands and criteria for judgment, so you can first pick one path that matches your goal and get your first Web UI or first import working. Once the preliminary steps—environment confirmation, artifact selection, and startup directory—are complete, the real work has only just begun. In the next part, we will move on to the first launch and configuration after installation: how to fill in model routing, how to choose a workspace, in which scenarios the four run modes and three permission tiers are used, and how to troubleshoot typical issues such as the browser not opening or the session input box being unavailable.
In the previous section, we laid out the trade-offs and procedures for the three installation paths—npx temporary trial, npm global install, and building from source—and confirmed which method each of the prerequisites (Node.js, pnpm, Git, Python) serves. Now that the process can run, what really determines the quality of the experience comes down to three things: how credentials are supplied, how models are configured, and how permissions are scoped. This section follows the complete loop of the first launch, covering environment variables, the three-step Web UI configuration, run modes, permission tiers, and provider addition, all the way through to the latest September 2026 settings.yaml visual modality declaration—everything reduced to copy-pasteable operations.
The Credential Trio: Configuration Order for DEEPSEEK_API_KEY, DEEPSEEK_BASE_URL, and DSH_MODEL
At startup, the DeepSeek Harness model routing plugin needs to do one thing: know "where to ask, with what identity, and which model to ask." The answers to these three questions correspond to three environment variables. DEEPSEEK_API_KEY is the identity credential and is required; DEEPSEEK_BASE_URL is the endpoint address, needed only when you are not using the official DeepSeek endpoint; DSH_MODEL is the default model name, likewise only relevant when going through a self-hosted gateway or proxy and needing to specify a non-default model.
So there is a very practical principle for configuration order: fill in only the API key first, and add the other two if it doesn't work. If you use the official DeepSeek endpoint directly, then nothing beyond the key needs attention—dsh's built-in catalog already knows the endpoint address and available models, and routing works out of the box. Only when you point requests at an OpenAI-compatible proxy such as a company gateway, local vLLM, or One-API do you need to explicitly supply the baseURL and model name—because in that case dsh cannot guess where the endpoint is or what the model is called.
The syntax for environment variables differs slightly between Linux/macOS and Windows, but the semantics are the same: they are all process-level environment variables read by dsh at startup. Below is an example you can paste directly into a terminal and run, demonstrating both the "key only" and "compatible proxy" forms:
# ---- Form one: use the official DeepSeek endpoint, only the key is needed ----
export DEEPSEEK_API_KEY=sk-your-key-here
npx @deepseek-ai/dsh web

# ---- Form two: use a local or self-hosted OpenAI-compatible proxy ----
export DEEPSEEK_API_KEY=sk-your-key-here
export DEEPSEEK_BASE_URL=http://127.0.0.1:8000/v1
export DSH_MODEL=deepseek-v4-flash
npx @deepseek-ai/dsh web

# Equivalent syntax under Windows PowerShell (form one only, as an example)
# $env:DEEPSEEK_API_KEY = "sk-your-key-here"
# npx @deepseek-ai/dsh web
There are a few engineering details here that are easy to overlook. First, baseURL must include the protocol and path prefix, for example http://127.0.0.1:8000/v1, rather than a bare 127.0.0.1:8000; otherwise the protocol layer will fail first. Second, @deepseek-ai/dsh web uses the directory you are in when you run the command as the default filesystem location, which is why it is recommended to cd into the project directory before starting—later, when you "select a workspace," this will save you a lot of trouble. Third, the environment variable naming is a fixed set of three; if you write the key under some other name (such as DEEPSEEK_KEY), the router will directly report MISSING_CREDENTIAL instead of trying to guess what you meant.
There is one more point worth explaining in advance: environment variables and the "Settings → Model" panel in the Web UI are not mutually exclusive. Environment variables are suitable for scripts, CI, and headless runs; the input fields in the Web UI are suitable for everyday interaction, and once saved they are persistent. When both exist at the same time, the actually saved configuration takes precedence, so if you change an environment variable and find that the behavior has not changed, first go back and check whether an old key has already been saved on the settings page. The table below aligns the responsibilities and required status of the three variables to make troubleshooting easier:
| Environment Variable | Purpose | Required | Typical Value | Behavior When Missing |
|---|---|---|---|---|
| DEEPSEEK_API_KEY | Provider identity credential | Required | A key string starting with sk- | MISSING_CREDENTIAL |
| DEEPSEEK_BASE_URL | Overrides the endpoint address, pointing to an OpenAI-compatible proxy | Required only for proxy scenarios | http://127.0.0.1:8000/v1 | Requests go to the official endpoint, and the proxy does not take effect |
| DSH_MODEL | Specifies the default model name | Required only for non-default models | deepseek-v4-flash | May hit UNKNOWN_MODEL |
To summarize into one executable sequence: install the key first → start → open the page and enter the key once (persistent) → add baseURL and model name when a proxy is needed. Do not fill in all three variables right from the start; if something goes wrong, it will be hard to tell which layer the problem is in.
First Launch in Three Steps: Settings → Model, Enter the Key, Select a Workspace, Send the First Task Instruction
After opening in the browser the address printed by the terminal (by default http://127.0.0.1:3080), the entire first-use process is actually just a three-step loop: configure the model, select a workspace, send an instruction. These three steps have a strict order of dependency; skipping a step will get you stuck, so they are broken down below in order.
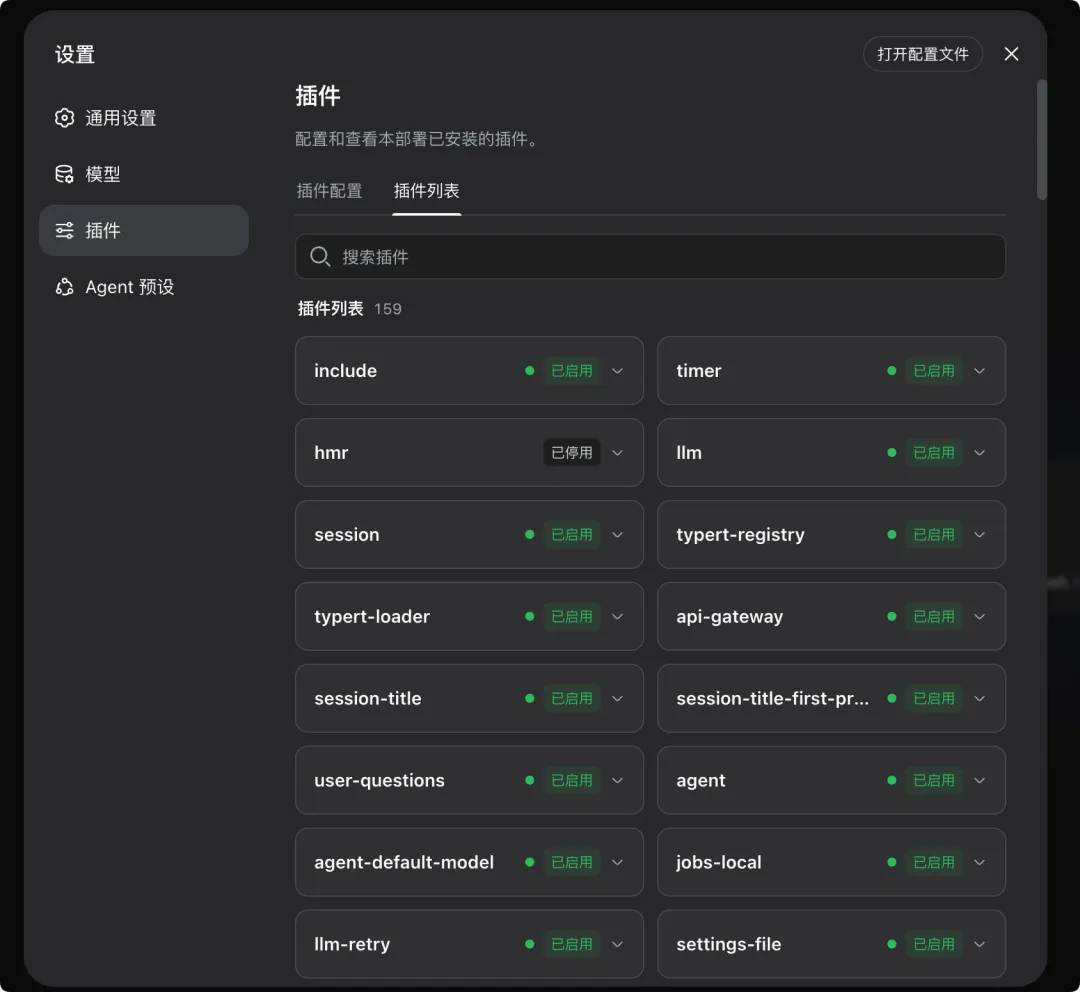
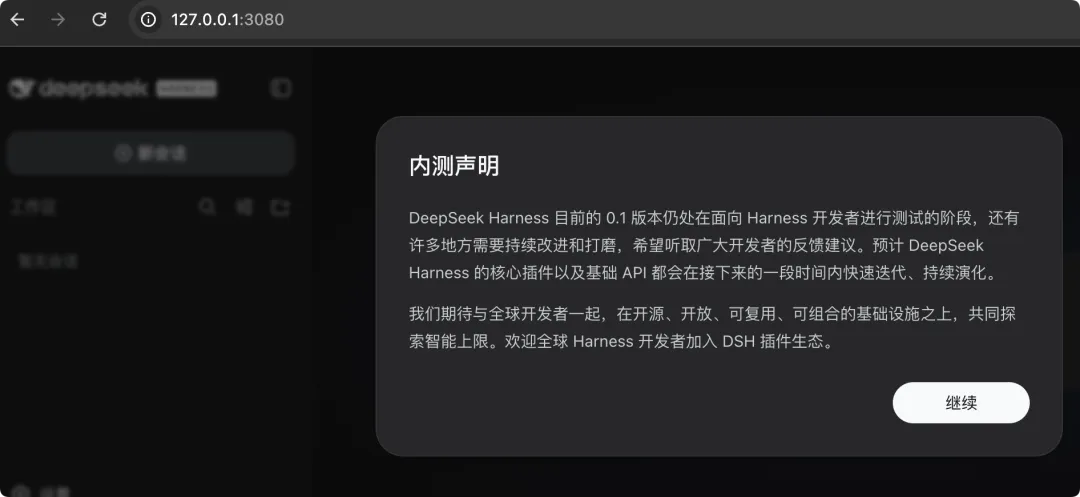
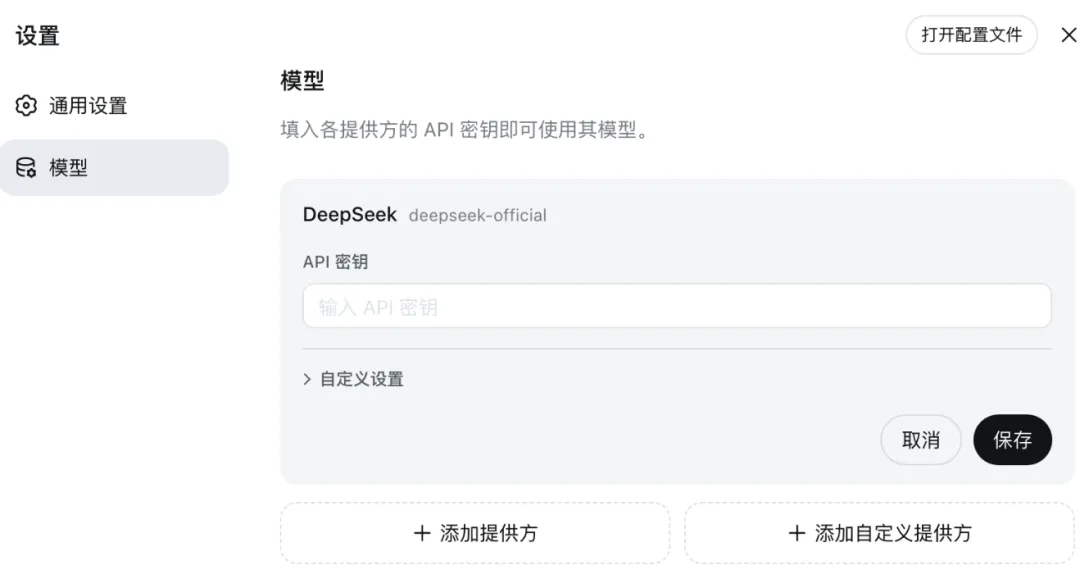
Step 1: Go to Settings → Models, enter your API key, and save. Note that once you save, the model routing takes effect immediately—no server restart is required. This is where many people misjudge things the first time they use it—they habitually close the terminal and reopen it, but that's unnecessary. If you don't have a key yet, you can apply for one on the DeepSeek platform. The project is currently in closed beta, so when you open the page you may first see a beta notice; just click Continue to enter the main interface. Besides the official DeepSeek card, this page also supports directory providers and custom providers, which the next two sections will cover separately.
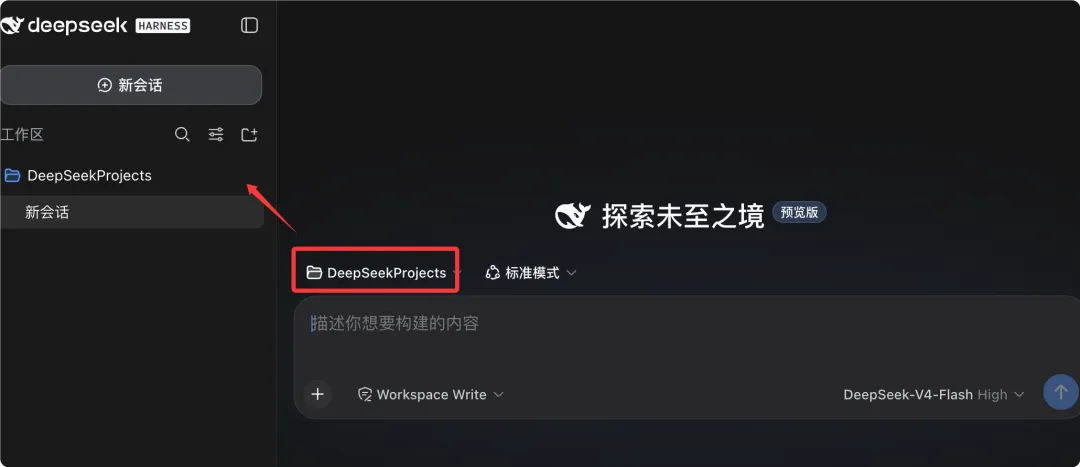
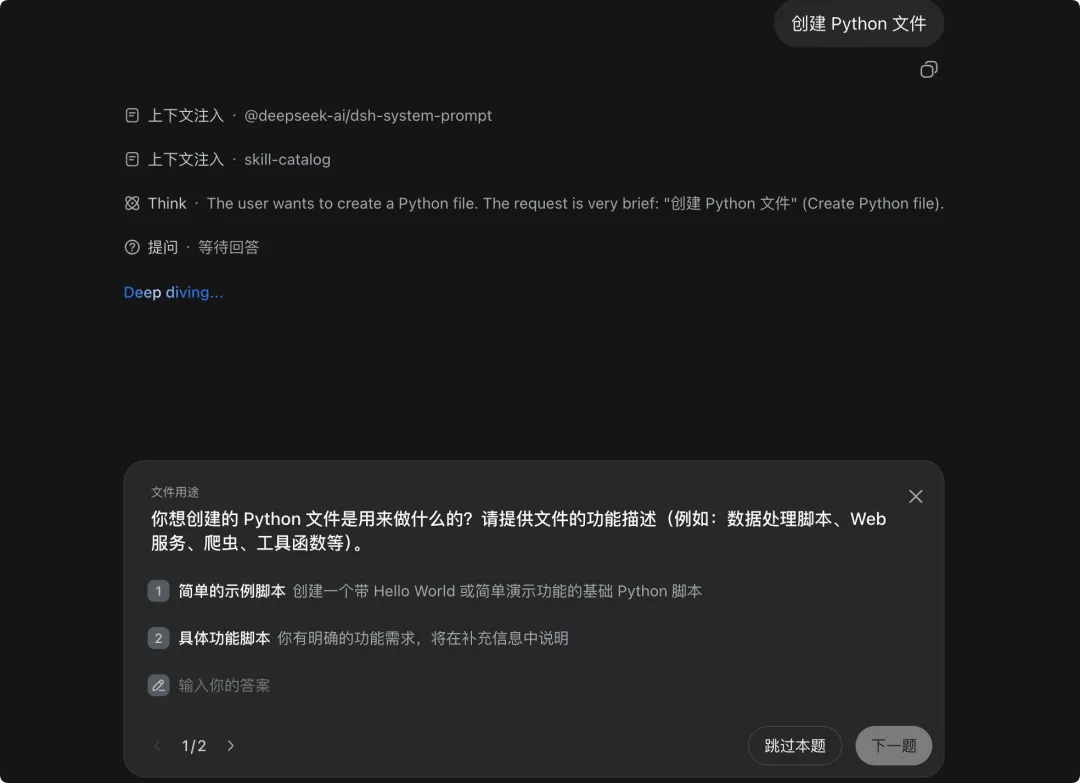
Step 2: Select a workspace. Click "Select Workspace," add the project directory where you launched dsh, and select it. There's a very important behavior here: until a workspace is selected, the session input box is unavailable. The "the input box won't respond to clicks" or "I typed something and nothing happened" that beginners most often run into is, in over ninety percent of cases, caused by not selecting a workspace—not by the software being broken. So it's a good idea to cd into your target project directory before launching dsh, so that the first candidate under "Select Workspace" is the directory you want.
If you don't have an existing project directory on hand, you can create one first as the tutorial does: mkdir DeepSeekProjects, then select this empty directory as your workspace for your first exploratory task. An empty directory can be selected just as well, and the agent will create files and run commands inside it.
Step 3: Issue your first task instruction in the session. The official quick-start guide offers very restrained advice: don't start by handing over real heavy work; first let the agent get familiar with the workspace. For the first task, a lightweight instruction is recommended: Summarize this repository and identify its main packages. The advantage of this instruction is that the agent needs to read files, identify the directory structure, and summarize package information, so it will actually walk through the full chain of "reading and writing workspace files, running commands, delegating to sub-agents, and maintaining a plan," while you won't lose anything from a single misstep.
During execution, the agent will perform requirements analysis and then break the plan down for execution. When an operation exceeds the permission policy you've set, it will stop and ask for your approval first rather than forcing its way through. This "declare first, then approve" mechanism is exactly the core that the permission tier section below will cover.
Let's compress the three-step loop once more so you can use it for troubleshooting:
- Configure the model: Settings → Models, enter your DeepSeek API key and save; routing takes effect immediately with no restart; other providers and custom OpenAI-compatible endpoints are also supported.
- Select a workspace: Click "Select Workspace," add and select the project directory where you launched dsh; the session input box is unavailable until one is selected.
- Run a task: Enter an instruction in the session, such as Summarize this repository and identify its main packages.; the agent will read and write workspace files, run commands, delegate to sub-agents, and maintain a plan, and will seek approval first for operations that exceed its authority.
While we're at it, a reminder about a phenomenon that "looks like a malfunction but is actually normal": the new Web UI won't select any workspace before you add one—this is by design, not a failed installation. Keep this in mind and you'll save yourself an unnecessary reinstall.
How to choose among the four run modes: the applicable boundaries of Standard Mode, PTC Mode, Minimal Mode, and Creative Mode
DeepSeek Harness offers four run modes. They are not a simple progression of "how many features" but rather trade-offs in capability tailored to different use cases. Choosing the wrong mode usually costs you in one of two ways: either you spend extra tokens without using the capabilities, or you turn off the capabilities you need and don't understand why things aren't working well. Let's clarify the boundaries of each one.

Standard mode is the first choice for beginners. It comes with a complete code Agent built in, and plugins for file operations, Shell, retrieval, task planning, sub-Agents, and more are all pre-installed and ready to use out of the box. If you just want the agent to help you read a repository, modify files, and run tests, don't hesitate—use this one.
PTC mode has the same capabilities as standard mode, but additionally supports batch orchestration of tool calls with TypeScript, merging multiple rounds of interaction into a single orchestration to reduce the number of conversation turns and save Tokens. Its barrier to entry lies in its reliance on strong code planning ability, and debugging is also harder. So its applicable boundary is clear: switch to it only when you are clearly in a scenario with a large number of repeated calls—for example, when you need to perform homogeneous processing on a batch of files or run the same checks on a set of interfaces—only then are the benefits obvious; switching to it for sporadic tasks instead adds mental overhead.
Minimal mode keeps only persistent Bash and a file editor, removing additional features. Its purpose is model baseline performance testing—stripping away the "scaffolding bonus" brought by outer plugins to see how the model itself performs under bare-tool conditions. It is not suitable for daily development, because you lose retrieval, planning, sub-Agents, and other things that genuinely improve efficiency.
Creation mode has all the capabilities of standard mode, and in addition can inspect the Cordis runtime environment, debug plugins online, and create new Agents to achieve autonomous extension of functionality. It is suitable when you are doing plugin development, want to figure out what the runtime actually loads, or want to build a new Agent on the spot to validate an idea. For readers who just want to "use" rather than "build," standard mode is enough.
| Mode | Core capability | Extra features | Applicable scenarios | Not applicable |
|---|---|---|---|---|
| Standard mode | Complete code Agent, plugins pre-installed | Files, Shell, retrieval, task planning, sub-Agents | First choice for beginners, daily development | — |
| PTC mode | Same as standard mode | TypeScript batch orchestration, merging multiple rounds, saving Tokens | Scenarios with a large number of repeated calls | Sporadic tasks, people with weak debugging ability |
| Minimal mode | Persistent Bash + file editor | Additional features removed | Model baseline performance testing | Daily development |
| Creation mode | Same as standard mode | Inspect Cordis environment, online debugging, create Agents | Plugin development, autonomous extension of functionality | Users who just want out-of-the-box use |
In practice, the workflow is: select a mode, then click New Session, enter your requirements, and start the conversation. In other words, the mode is a session-level choice; switching modes usually means starting a new session rather than "converting" an old session into a new mode. This is similar to permission tiers—as we'll see later, permission changes are also best applied alongside a new session.
Three Permission Tiers: The Security Trade-offs of Read Only, Workspace Write, and Full access
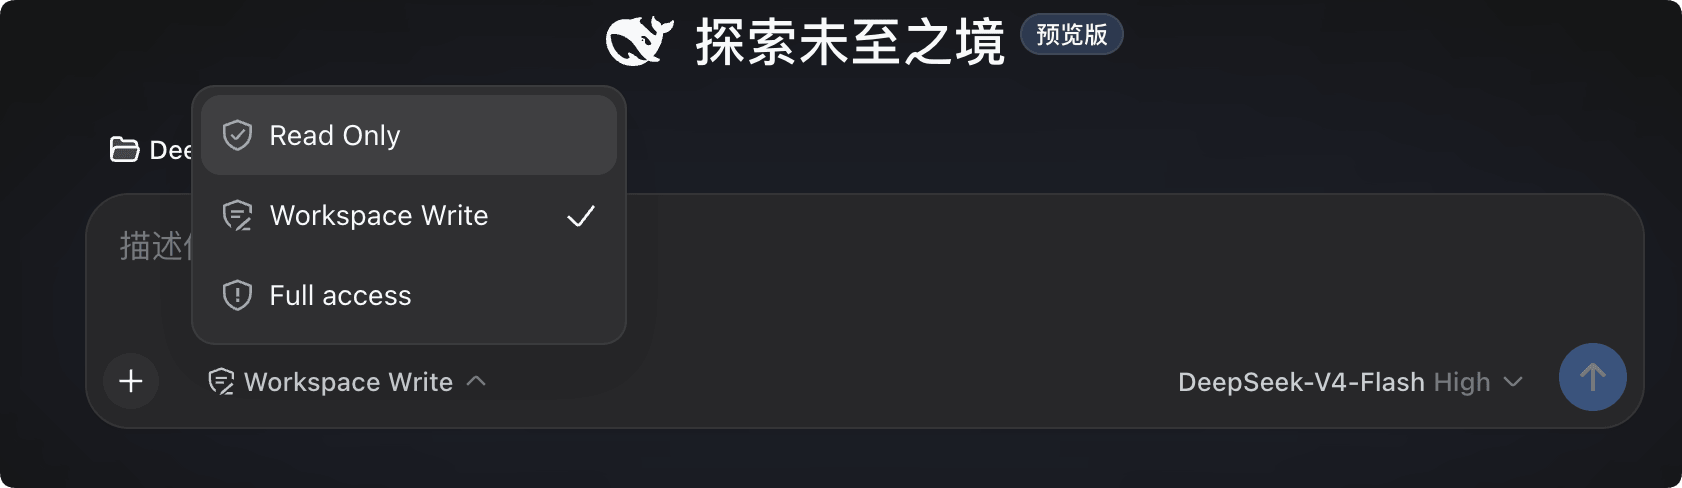
DeepSeek Harness's permission mechanism controls the scope within which an Agent can access local files and execute commands. The security levels, from highest to lowest, are: Read Only > Workspace Write > Full access. Note that "highest to lowest" here refers to security level, not capability—capability runs in the opposite direction: the higher the security tier, the less it can do.
Read Only only permits reading workspace files; it can neither modify files nor execute terminal commands, making it the most secure. It suits scenarios like "I just want the agent to help me understand code, summarize documents, or do a preliminary scan before code review"—where you don't want it writing anything to disk at all. The cost is that as soon as a task requires running a command to verify a conclusion, it gets stuck on permissions.
Workspace Write allows reading and writing files within the current working directory, and also allows executing commands within the working directory, but it cannot access files outside the working directory. This is the recommended tier for everyday development: the vast majority of coding tasks only require tinkering within the project directory, and this boundary is both sufficient and confines risk to a recoverable scope. Even if your project directory gets messed up, the worst case is just that repository, and you can roll it back.
Full access has complete file system access, can read and write files at any path, and execute all kinds of terminal commands, posing a relatively high security risk. It's not that you can't enable it, but you should think carefully about why: for example, when a task genuinely needs to touch configuration files outside the workspace or access system-level toolchains. Once enabled, the agent's mistakes are no longer caught by directory boundaries. It's recommended to use it only temporarily when you clearly know what you're doing and have version control or backups in place.
| Tier | File Reading | File Writing | Command Execution | Security Level | Recommended Scenario |
|---|---|---|---|---|---|
| Read Only | Workspace only | No | No | Highest | Read-only tasks like understanding, summarizing, and reviewing |
| Workspace Write | Workspace | Within working directory only | Can execute within working directory | Medium | Everyday development (recommended) |
| Full access | Any path | Any path | Any command | Lowest | Special tasks that genuinely require going beyond boundaries; use with caution |
There is one more behavioral detail worth adding here: even at lower security levels, operations that exceed the permission policy will still ask for your approval first. This means a permission level is not an "all-or-nothing" switch, but a combination of a default boundary plus an approval confirmation layer. The practical recommendation is: start from Workspace Write, and when you encounter a task that truly needs to cross the boundary, temporarily elevate permissions to handle it and downgrade back as soon as possible; if you changed permissions after a task finishes, open a new session so the settings take effect cleanly.
Let me emphasize security once more: the point of permission levels is not to defend against "malicious AI," but against the combination of "a human who misinterprets instructions + an Agent that over-executes." A vaguely worded instruction might delete something you should not delete under Full access, while under Workspace Write it can at most mess up the current repository. This is also why the official recommendation lists Workspace Write as the recommended value for daily development.
Adding a catalog provider: after choosing Anthropic or OpenAI, you only need to fill in the API key, and the endpoint, protocol, and model are brought in automatically
If you do not want to use only the official DeepSeek endpoint, DeepSeek Harness also supports third-party models, with two paths: catalog providers and custom providers. Let us start with catalog providers, because they are more convenient.
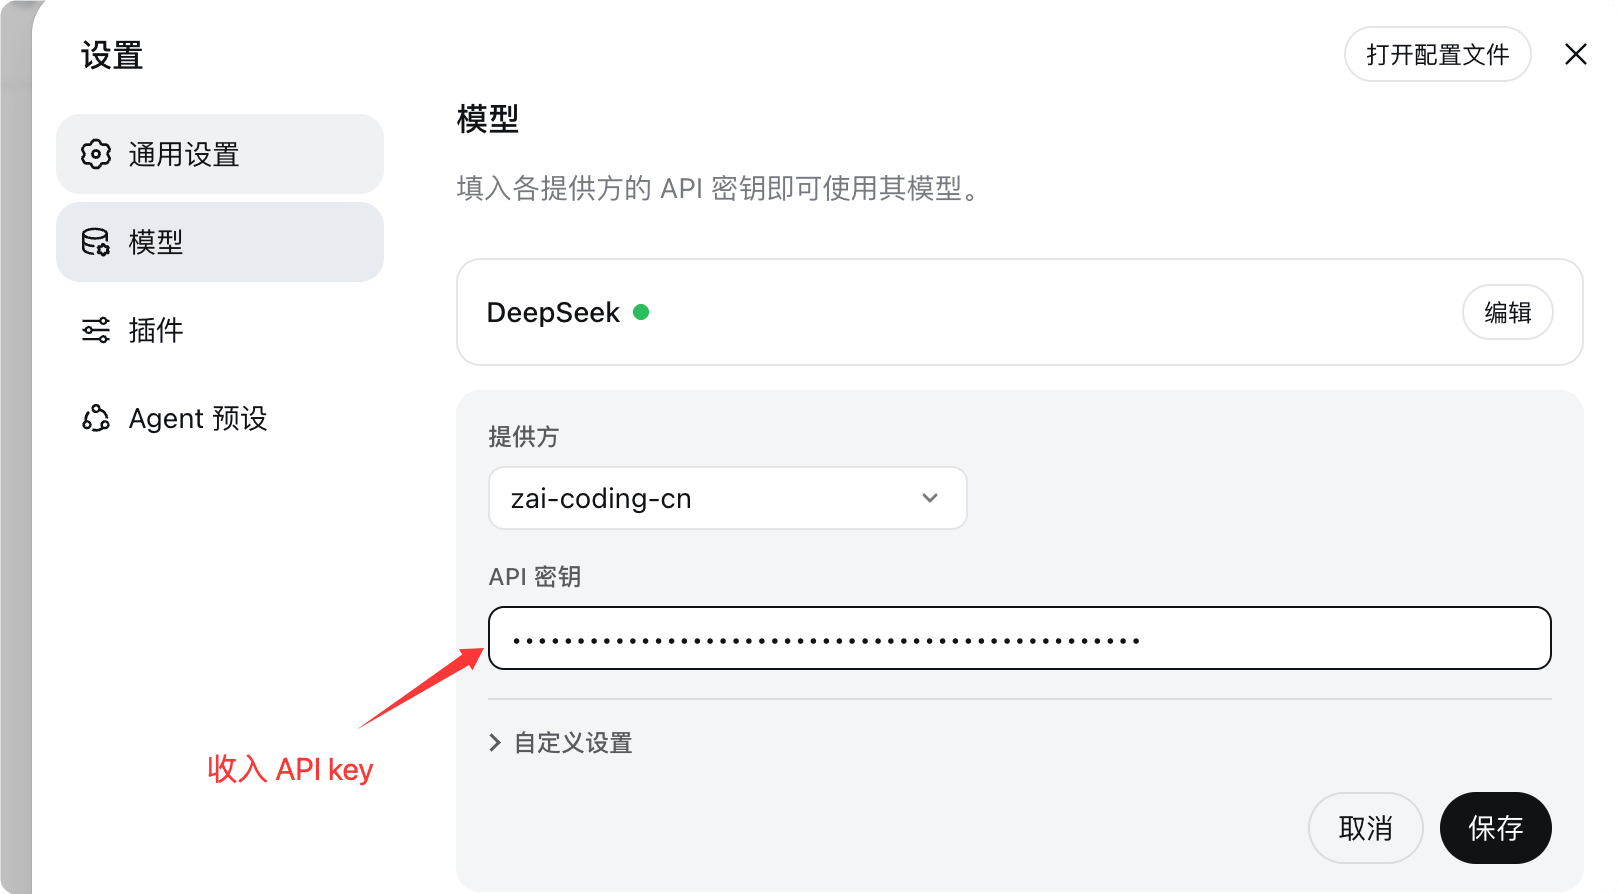
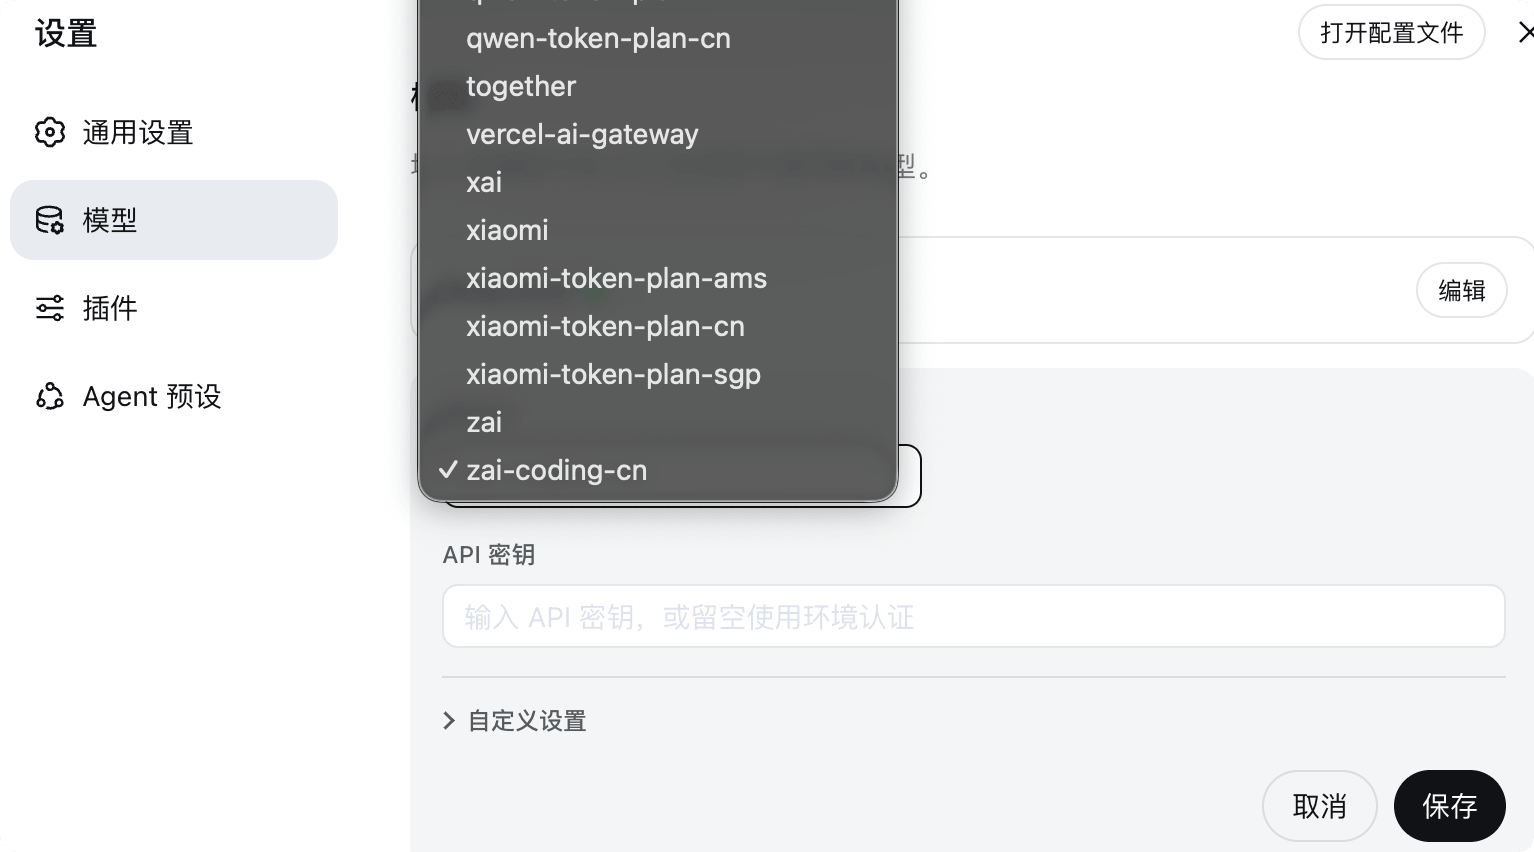
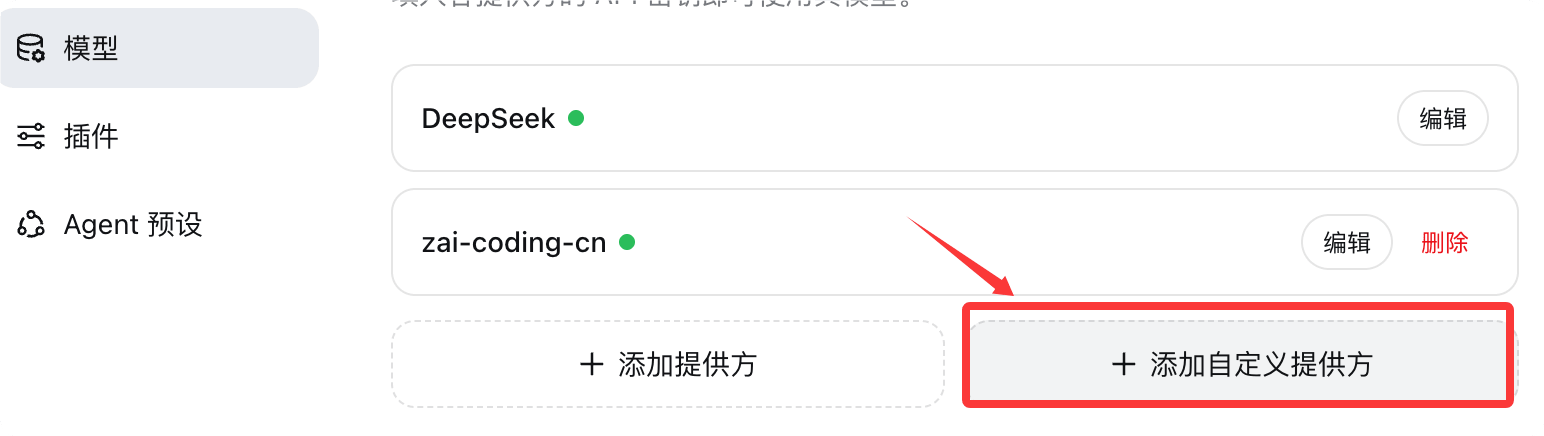
A so-called catalog provider is a provider already included in dsh's installed catalog, such as Anthropic or OpenAI. Its value lies in this: the endpoint, protocol, and model list are all provided automatically by the catalog, so you do not need to fill them in manually. Your operation is simplified to "select Add Provider → choose the specific provider → enter its API key → save." After saving, you can see the model you just added in the model list in the dialog box. For example, connecting to Zhipu's coding plan package follows this path: choose the provider, fill in the key, save, and then select it in the model list.
But there is a pitfall that must be pointed out here: providers using native authentication require their own native credentials, and filling in only the API key field is not enough to complete the configuration. This is not a bug; rather, the authentication mechanisms of these vendors themselves do not follow the "single Bearer key" model. Below are the four categories explicitly given in the source material:
| Provider | Required native credentials |
|---|---|
| Bedrock | AWS credentials and region |
| Vertex | ADC project |
| Azure | api-version |
| Codex | OAuth |
In terms of applicable scenarios, the positioning of catalog providers is "connecting to already-included mainstream vendors." If the target vendor is in the catalog, use it and do not bother writing a custom one; if it is not in the catalog—such as your company's internal gateway or a self-hosted inference server—then use the custom provider in the next section. Also remember an important distinction given in the original text: catalog providers use the installed catalog and do not make network requests. In other words, the step of selecting a provider does not require online probing; the endpoint and model list are provided directly by the local catalog.
Adding a Custom Provider: Key Points for Filling in the Five Fields — Provider ID, baseURL, API Protocol, Credentials, and Models
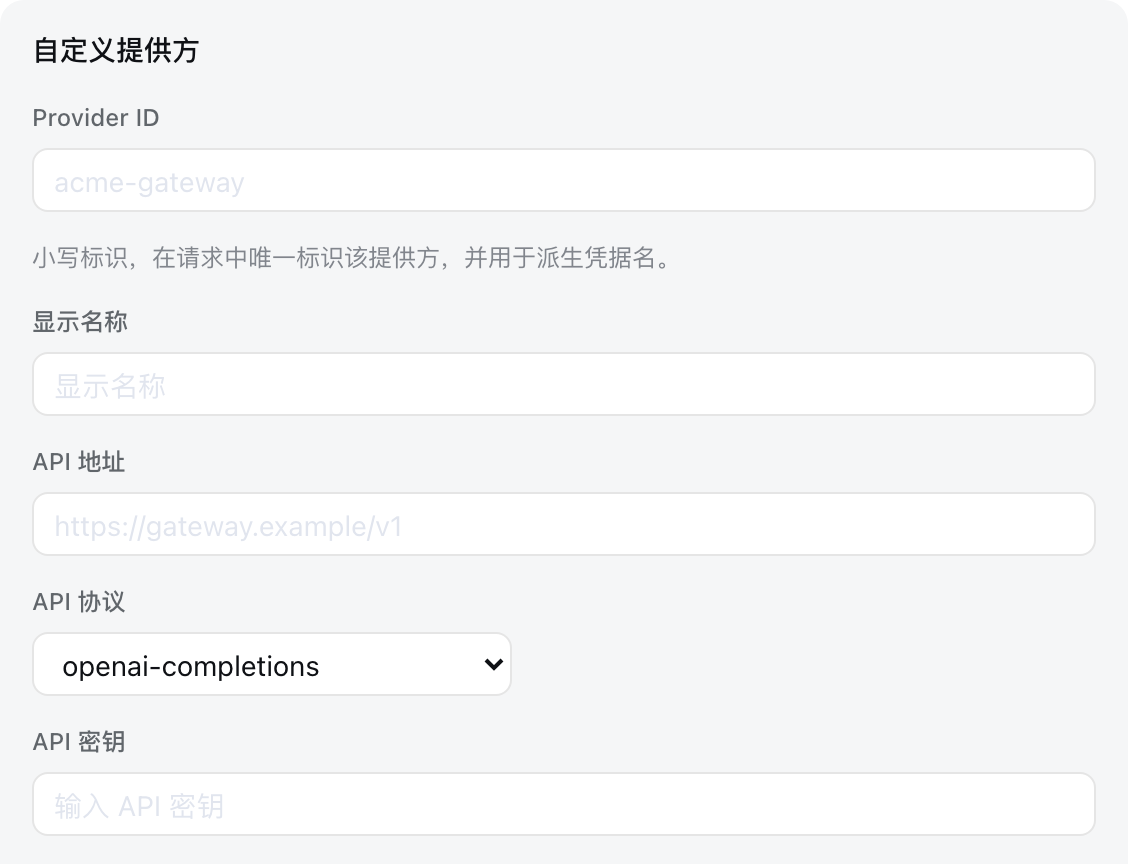
For endpoints that do not exist in the catalog, such as company gateways and self-hosted servers, use a custom provider to connect. After selecting "Add Custom Provider," the form asks you to fill in the following fields. This section explains the key points field by field, because any mistake here will come back to you at runtime in the form of an error code.
| Field | Description | Required |
|---|---|---|
| Provider ID | Lowercase, permanent identifier | Required |
| Display Name | The name shown in the interface | Optional |
| Base URL | The endpoint's baseURL | Required |
| API Protocol | e.g. openai-completions | Required |
| Credentials | API key or environment variable reference | Required |
| Models | At least one model | Required |
Provider ID is the field that requires the most caution here: it is lowercase and permanent. It is permanent because requests, saved sessions, model defaults, and credential references all use it. Provider ID cannot be renamed — if you really need to rename a provider, the correct approach is to add a new provider and delete the old one, not to change the ID. By contrast, the display name, base URL, protocol, credentials, and models remain editable, so if you "typed the name wrong," don't panic — just change the display name; only a "wrong ID" requires the create-and-delete workflow.
For Base URL, enter the endpoint's baseURL, usually the root address with a version prefix such as /v1. The API Protocol determines how requests are sent; the typical value given in the material is openai-completions, i.e. the OpenAI-compatible completions protocol. For Credentials, you can enter an API key, or you can enter an environment variable reference — the latter is safer, avoiding storing the key in a shareable configuration. For Models, enter at least one; you can enter multiple.
The form also has a very useful helper feature: in the model catalog, selecting Fetch Available Models queries the base URL and credentials currently shown in the form and lists candidates. Here you need to understand its boundaries: selecting a candidate only updates the draft; the provider is not stored until you save. In other words, you can safely click around to try queries — as long as you don't hit save, no half-finished configuration will be left behind. Another boundary: model discovery calls the OpenAI-compatible GET /models, so for services that do not provide that endpoint, enter models manually — this is also why the later troubleshooting table entry "Fetch Available Models returns 401" needs to distinguish between an invalid key and an endpoint that does not support model discovery.
Turning the full configuration approach for a custom provider into a YAML snippet you can refer to directly (written into $DSH_HOME/settings.yaml) makes the correspondence between fields much easier to see:
# File path: $DSH_HOME/settings.yaml
# The top-level key llm-pi-ai is the id of the model routing plugin; providers are organized under it by provider id
llm-pi-ai:
  providers:
    my-gateway:
      apiKeyEnv: GATEWAY_API_KEY          # Credential reference: read from the GATEWAY_API_KEY environment variable
      api: openai-completions             # API protocol: OpenAI-compatible completions protocol
      baseURL: https://gateway.runoob.example/v1   # Your gateway endpoint
      models:
        - id: legacy-chat                 # Text-only model; omitting input means it is treated as text-only
        - id: vision-preview              # Vision model
          input: [text, image]            # Declares that it accepts both text and images
In this configuration, apiKeyEnv is the way to "reference credentials via an environment variable," api corresponds to the API protocol in the form, baseURL corresponds to the base URL, and models is the model list. A custom provider has no "model modality" field in the form, so vision capability must be declared in YAML—which is exactly the topic of the next section.
Latest practice as of September 2026: declaring vision model modalities with input and defaultInput in settings.yaml
Here we come to the most easily overlooked pitfall in the current version: manually entered models are treated as text-only by default. To support images, you must explicitly declare the modality. This is not a design oversight but a deliberate strategy adopted by dsh—because there is no step that can ask the endpoint which modalities it accepts, so it can only be "declare first, use later." Your declaration is treated as an assertion about the endpoint, not a check of it: declaring image capability that the endpoint does not actually provide will not be blocked at the configuration stage, but will instead be rejected by the provider at request time.
The specific approach is: add input to that model in $DSH_HOME/settings.yaml. This field accepts text and image, and it applies only to that model, so a single route can serve both text-only models and vision models. If you attach an image to a model that has not declared the image modality, the request will be rejected before it is sent, naming that model—this is friendlier than sending it out and getting a 400 from the other side, since at least you know the problem lies in your local configuration.
The scopes of these three fields must be clearly distinguished—this is also the core takeaway of this section:
- input: Written under a specific model, it applies only to that model. Omitting it or writing it as an empty list are synonymous; in that case, the modality recorded for that model in the installed catalog is retained, and models not described by the catalog fall back to the route's
defaultInput. - defaultInput: This is a fallback value, not an override value. It defaults to
[text]and is written under this route, taking effect for models in this route that are not described by the catalog. If all the models you manually enter accept images, set this fallback once instead of writing it for each model. - modelOverrides: Used to narrow the modality of a model from a catalog provider, keyed by model id. Catalog providers have no models list you can fill in, so overrides can only go here.
Here are two typical examples. The first is the "route-level fallback + individual models without input" pattern, suitable when all manually entered models can see images:
# File path: $DSH_HOME/settings.yaml
# defaultInput is a fallback value, not an override value; defaults to [text]
llm-pi-ai:
  providers:
    vision-gateway:
      apiKeyEnv: GATEWAY_API_KEY
      api: openai-completions
      baseURL: https://vision.runoob.example/v1
      defaultInput: [text, image]   # Takes effect for models in this route not described by the catalog
      models:
        - id: first-model
        - id: second-model
The second is the "reverse narrowing" pattern. Note that catalog providers have no writable models list, so to override the modality in the catalog, you must use modelOverrides:
# File path: $DSH_HOME/settings.yaml
# Catalog providers have no fillable models list; overrides go through modelOverrides
llm-pi-ai:
  providers:
    anthropic:
      modelOverrides:
        claude-sonnet-4-5:
          input: [text]   # Remove this model's image capability
The key constraint to remember is: both input and defaultInput are assertions about your endpoint, not checks of it. So if you declare image capability but the endpoint doesn't actually provide it, dsh won't stop you at the configuration stage—the provider will ultimately reject the request. Conversely, if you narrow a model's capability to [text], that's merely a local policy and doesn't mean the model itself can't see images. The configuration layer and the capability layer are separate; understanding this will keep you from confusing the two when troubleshooting.
Finally, here's a troubleshooting table summarizing common model configuration errors. When something goes wrong, check here first—it can save you a lot of guessing:
| Error | Meaning | Solution |
|---|---|---|
| MISSING_CREDENTIAL | Missing provider key | Store the provider key via the model page, or provide the referenced environment variable |
| UNKNOWN_MODEL | The requested model is not configured | Select a configured model, or add the missing model to the custom provider |
| Fetching available models returns 401 | Invalid key, or the endpoint doesn't support model discovery | Check the key; model discovery calls the OpenAI-compatible GET /models—for services that don't provide this endpoint, enter models manually |
| Image rejected before sending | The model doesn't declare image modality | Add input: [text, image] to the custom provider's model; DeepSeek's own route is text-only and cannot be changed via configuration |
| Provider rejects a request with an image | The model declares image capability the endpoint doesn't actually provide | Remove image from the list granting it image capability, and start a new session |
Note the difference between the last two items: "rejected before sending" means the local modality was not declared, while "rejected by the provider" means the local declaration went too far. The corrective actions for the two directions are completely different: one is to add image, and the other is to remove image, with the latter also requiring a new session for the setting to take effect. In addition, one point deserves special note: DeepSeek's own routing is text-only and cannot be changed through configuration—if you want to view images, switch to a provider that supports vision.
Common Commands Quick Reference
Here is a consolidated list of the entry-point commands covered in this and the previous section, so you can refer to them easily during actual operations. What these commands have in common is that they can all be executed directly in the project directory without switching directories:
| Command | Purpose |
|---|---|
| npx @deepseek-ai/dsh web | Start the Web UI (equivalent to --profile web) |
| dsh --profile headless "task description" | Run a task once, print the final answer, and exit (suitable for scripts/CI) |
| dsh plugin --profile <name> <pnpm args> | Manage plugins for a given profile (forwards to pnpm for execution in the profile directory) |
| dsh --profile web --dump-config | View the complete configuration tree actually used at startup (without starting the server) |
| dsh --profile web --dump-default-config | View the default configuration tree (excluding user patches) |
| pip install deepseek-harness-sdk | Install the Python SDK (includes its own runtime) |
There is one more thing to remember about Profile: the web and headless profiles are automatically initialized from built-in templates on first use, while other profiles need to be created via dsh plugin. In addition, dsh startup arguments come first, and application arguments come after. For example, in dsh --profile web --port 8080, --port belongs to the Web application, not to dsh itself. Reversing this order will directly cause an argument error.
When troubleshooting, the pair --dump-config and --dump-default-config is especially worth remembering: the former tells you "what is actually in effect" (including the patches you wrote), while the latter tells you "what the template originally was." By comparing the two, you can confirm whether your settings.yaml has actually been read in—for example, if the modality declaration is not taking effect, first run the former to see whether input appears in the configuration tree.
Finally, here is a summary of the common issues mentioned in the previous sections for quick diagnosis:
- The browser cannot open http://127.0.0.1:3080: Confirm that the dsh process is still running in the terminal and has not reported an error; if the port is occupied, use
dsh --profile web --port 8080to switch ports; check whether the firewall allows the local port. - npx cannot find @deepseek-ai/dsh or the version is too old: Confirm that Node.js is installed and is a relatively new version (
node -v); the project is in developer preview and iterates quickly, so if necessary clear the npx cache and retry, or switch to installing from source. - pnpm install / build fails when installing from source: Confirm that pnpm is installed (
npm install -g pnpm); if the network is restricted, configure a mirror source for npm/pnpm; the build requires the Node.js version to satisfy the engines declaration in the repository's package.json. - The session input box is unavailable / the agent cannot read or write files: The most common cause is that no workspace has been selected; return to "Select Workspace" to add and select the project directory; confirm that a valid API key has been saved in "Settings → Model"; model routing takes effect without restarting.
- The Python SDK runtime cannot find Node.js: The SDK includes its own runtime and normally does not require a system Node.js; if it reports that the runtime is missing, confirm that you installed the complete package matching the SDK version (
python -m pip install deepseek-harness-sdk), and use Linux x64 / arm64 or macOS 14+ (arm64) according to the official prerequisites.
Summary and Best Practices
This condenses the entire article into a checklist you can follow directly. The installation section (previous part) handles "getting the process running," while the configuration section (this part) handles "making it work the way you expect." Together, they constitute a genuine first launch.
- Confirm the environment before you start: The universal prerequisite is Node.js (
node -v, v20+ recommended); source installation additionally requires Git and pnpm; the Python SDK requires Python 3.10+, and officially supported platforms are Linux x64 / arm64 and macOS 14+ (arm64). - Choose an installation path based on your needs: To try the Web UI as quickly as possible, use
npm install -g @deepseek-ai/dshthendsh web, or simplynpx @deepseek-ai/dsh web; to develop plugins, read the source, or contribute, go with source installation (clone →pnpm install→pnpm run build→pnpm dsh web); to call the Agent from your own Python program, use the SDK. - cd to the project directory before launching: dsh uses the invocation directory as the default filesystem location, so
cdfirst and then launch—this makes selecting the workspace later much easier. - Provide credentials in order: When using the default DeepSeek official endpoint, you only need
DEEPSEEK_API_KEY; when connecting to an OpenAI-compatible proxy, additionally supplyDEEPSEEK_BASE_URL(with protocol and/v1prefix) andDSH_MODEL. Don't fill in all three at once—it makes troubleshooting harder. - Complete the first three-step loop: Settings → enter the key for the model (takes effect on save, no restart needed) → select a workspace (the session input box is unavailable until one is selected) → issue your first task. For the first task, use a lightweight instruction like
Summarize this repository and identify its main packages.to let the agent get familiar with the workspace. - Choose a mode based on the scenario: Use standard mode for beginners and everyday development; use PTC mode to save Tokens when making many repeated calls and you're willing to bear the debugging cost; use minimal mode only for model benchmarking; use creative mode to debug plugins online or create new Agents.
- Start with Workspace Write for permissions: Use Read Only for read-only tasks, Workspace Write for everyday development (read/write limited to the working directory), and Full access—the highest risk—only when necessary; privileged operations will first request approval, and after changing permissions it's recommended to start a new session.
- Prefer catalog providers for third-party models: For already-listed vendors like Anthropic and OpenAI, after selecting a provider you only need to fill in the API key—the endpoint, protocol, and model list are populated automatically, and no network request is made; Bedrock, Vertex, Azure, and Codex require their own native credentials (AWS credentials and region / ADC project / api-version / OAuth).
- Use custom providers for endpoints not in the catalog: Required fields are Provider ID (lowercase, permanent, cannot be renamed—to rename, create a new one and delete the old), base URL, API protocol (e.g., openai-completions), credentials (can reference environment variables), and at least one model; the display name, baseURL, protocol, credentials, and models remain editable afterward; "Fetch available models" only updates the draft and won't be persisted unless saved.
- Vision modality must be explicitly declared: Manually entered models are treated as text-only by default; under the
llm-pi-airoute in$DSH_HOME/settings.yaml, writeinput: [text, image]for the model; to enable image viewing by default across all routes, usedefaultInput(a fallback value, default[text]); to narrow catalog provider models, usemodelOverrides. Remember that input and defaultInput are assertions, not checks—DeepSeek's own route is text-only and cannot be changed via configuration. - For troubleshooting, consult the table before guessing: For MISSING_CREDENTIAL, check the key or environment variable reference; for UNKNOWN_MODEL, check whether the model is configured; for model discovery 401, distinguish between an invalid key and an endpoint that doesn't support
GET /models; "rejected before sending" means image wasn't declared locally, while "rejected by provider" means it was over-declared—remove image and start a new session. - Make good use of configuration self-check commands: Use
dsh --profile web --dump-configto see the actual effective configuration tree, and--dump-default-configto see the default template; comparing the two confirms whethersettings.yamlis really being read; launch parameters come first, application parameters after, e.g.,dsh --profile web --port 8080.
If you remember only one thing: first configure the API Key, select the right workspace, then run a lightweight command with minimal permissions (Workspace Write) to verify the loop end to end. Get these three things right, and everything that follows—whether switching providers, adjusting modalities, or spawning sub-Agents—becomes an incremental tweak on an already working chain, rather than troubleshooting from scratch.