If over the past two years our dilemma when choosing AI coding tools was which side to take among Claude Code, Codex, and Cursor, then the shift in thinking brought by DeepSeek Harness (hereafter dsh) is fundamental: the underlying Runtime can stay fixed, while capabilities are entirely composed by you. dsh's core design creed is just one sentence—Everything is a Plugin. Model adapters, tool registries, session logs, Agent Loop, sandboxes, storage, task scheduling, UI, and even permission policies all exist as Cordis plugins; the host is only responsible for organizing capabilities, while the capabilities themselves are always provided by plugins. This article is the first half of "A Panorama of DeepSeek Harness Built-in Plugins," aimed at advanced readers who have already run through dsh's basic workflow and are preparing to deeply understand the plugin mechanism and selection logic. We will start from Cordis's registration and lifecycle, then layer by layer dismantle the structural differences between traditional chained Agents and the dsh runtime, provide a "requirements-to-plugin" mapping table, explain clearly which environment the web, tui, and headless Profiles each install plugins into, and finally land on the field-by-field breakdown of installation commands and the capability boundaries of the four-piece UI enhancement suite. After reading this section, you should be able to independently judge: for my workflow, exactly which plugins should I install, into which Profile, and how do I verify that they are actually loaded.
Everything is a Plugin: What It Means That dsh Makes Permission Policies into Cordis Plugins Too
To understand just how thorough dsh's pluginization is, you first need to understand the framework layer that carries it—Cordis. Cordis is a lightweight plugin-based application framework, and its responsibility boundary is very clear: it uniformly handles plugin registration, dependency resolution, and lifecycle management. These three things may look plain, but they are exactly what determine what kind of ecosystem dsh can grow.
First, registration. In dsh, a plugin is not an add-on concept of "hanging functionality onto the main program," but a first-class citizen. Model adapters, tool registries, session logs, Agent Loop, sandboxes, storage, scheduling, UI, and even permission policies all exist in the form of Cordis plugins. If you swap in a different model adapter plugin, dsh gains a new model backend; if you swap in a different sandbox plugin, dsh's code execution isolation strategy is entirely replaced. This "capability as plugin" registration model means there are almost no hardcoded capability branches in the host code.
Next, dependency resolution. This is where plugin-based systems most easily fail. When your plugin list grows to more than a dozen items and they have ordering requirements relative to one another (for example, the permission policy plugin must be in place before the tool registry, and the UI plugin depends on the output structure of the session log plugin), arranging the order manually is almost bound to go wrong. Cordis consolidates dependency resolution into the framework layer: plugins declare what they depend on and what they provide, and the framework determines loading order and assembly relationships. This is also why dsh's plugin combinations can "stack"—plugins can stack on one another to form completely different working environments, rather than stepping on each other's toes.
Finally, lifecycle management. The loading, enabling, disabling, and unloading of plugins all require clear hooks and state boundaries. This is especially critical for dsh: because dsh can serve multiple Profiles within the same installation, if lifecycle management is inadequate, a plugin disabled in one Profile may very likely contaminate the runtime state of another Profile.

So, what exactly does it mean that "even the permission policy is a plugin"? I believe there are three layers of meaning here that advanced readers should take seriously:
- Layer one: the security boundary is replaceable, not hard-coded. In traditional Agent frameworks, the permission model is usually part of the framework kernel—which tools can touch the file system, whether Shell execution is allowed, whether network access requires approval—these are often configurations that can only be changed by modifying code. Once dsh turns the permission policy into a plugin, you can swap in an entirely different policy implementation to fit your team's standards, or switch to a stricter or looser policy for CI environments. Security is no longer a question of "whether the framework provides it," but a question of "which plugin you install."
- Layer two: permission policies can form combinatorial constraints with other capability plugins. For example, a browser automation plugin (which preserves the local Chrome's login state and cookies) and a pure UI skin plugin are on completely different levels in terms of how deeply they intrude into the system. When the permission policy itself is a plugin, you have the opportunity to view "which high-privilege plugins are installed" and "what policy constrains them" together, rather than relying on after-the-fact auditing.
- Layer three: the competitive focus of the ecosystem will shift downward. When permissions, sandboxing, storage, scheduling, and the Agent Loop can all be pluginized, what the community truly competes on is no longer whose chat window looks better, but who can provide more solid low-level capability plugins. The implication for developers is: when you write a plugin, you need to think clearly about which layer you occupy.
To summarize this section from another angle: dsh is not an Agent that comes with many features, but a runtime that can continuously assemble Agent capabilities through plugins. The host does only one thing—organizing capabilities; the capabilities themselves all come from plugins. Once you understand this, all subsequent discussions about Profile, installation commands, and category selection are essentially discussions about "how to orchestrate this organizational relationship."
Traditional serial Agent vs. dsh runtime: structural differences in Prompt→Model→Agent→Tool
To see what makes dsh special, the best approach is to compare it side by side with the structure of a traditional LLM Agent.
The structure of a traditional LLM Agent is usually fairly fixed: Prompt, model, Agent, and tools are chained in sequence, forming a one-way processing pipeline. A request comes in, first goes through Prompt assembly, then is handed to the model for inference; the model decides which tool to call, the Agent executes the tool and feeds the result back, looping over and over. This pipeline is clear and easy to understand, but it has a hidden cost: capabilities are mostly encapsulated in the framework kernel. Want to swap in a different interface? Modify the kernel. Want to add visual capabilities? Modify the kernel. Want multiple Agents to collaborate? Still modify the kernel. The kernel grows increasingly bloated, and every team modifies it differently, ultimately leading to forks.
dsh's structure is a different way of organizing things. It splits the model adapter, tool registry, session log, Agent Loop, sandbox, storage, scheduling, UI, and permission policy all into Cordis plugins, with the host only responsible for organizing these capabilities. The result is: we can change dsh's behavior without modifying its core source code. This is not marketing talk, but a directly verifiable engineering fact—all your customization actions happen at the plugin layer, not in diffs to the core layer.

Let's compare the differences between the two from a more engineering-oriented perspective:
| Comparison Dimension | Traditional Chained Agent | DeepSeek Harness |
|---|---|---|
| Structural Form | Prompt→Model→Agent→Tools chained in sequence, with a fixed pipeline | Host + plugin collection, with capabilities dynamically assembled by Cordis |
| Location of Capabilities | Mostly encapsulated in the framework core | Model adapters, tool registries, session logs, Agent Loop, sandbox, storage, scheduling, UI, and permission policies are all pluginized |
| Way of Making Changes | Modify the core source code, producing forks | Without modifying the core source code, change behavior by installing/disabling plugins |
| Composability | Capabilities are coupled in the core and hard to freely stack | Plugins can stack on top of one another to form completely different working environments |
| Environment Isolation | One codebase, one behavior | The same dsh can load different plugin combinations by Profile, without interfering with one another |
| Unit of Extension | Functional modules | Cordis plugins (including system-level capabilities such as permission policies) |
The most thought-provoking parts of this table are the last two rows. The unit of extension in traditional solutions is the "functional module," whereas the unit of extension in dsh is the "plugin"—the difference being that a plugin is an entity with a lifecycle, dependency declarations, and the ability to be isolated by Profile. This means that the same dsh installation can be a complete workbench with a task board and visual capabilities in a Web scenario, just a full-screen TUI in a terminal scenario, and a headless background executor in CI.What you face is never "an Agent application," but a set of Agent infrastructure that can be continuously assembled.
Here is a point that advanced readers easily overlook: pluginizing the Agent Loop also means thatthe session loop and execution strategy themselves are replaceable. In traditional frameworks, the Agent's "think—act—observe" loop is deeply hardcoded in the core, and at most you can tweak parameters; in dsh, however, who drives this loop, what strategy decides when to stop, and how to insert sandbox validation into the loop are all decisions at the plugin layer. This also explains why later we will see "process-solidifying" plugins like dsh_workflow combine with Agent Teams—they essentially layer an additional orchestration capability on top of the Agent Loop.
Once you understand this structural difference, looking back at the mapping relationship from "requirements→plugins" becomes much smoother: you are not actually "adding features to a tool," but "swapping parts for the runtime."
Requirements-to-Plugins Mapping Table: Which to Install for Changing the Interface, Adding Vision, Multi-Agent, Browser, and Context
For teams that have just taken over dsh, the most practical entry point is not to look at the plugin directory first, but to first translate your own requirements into the language of plugins. The following five groups of correspondences cover the vast majority of scenarios:
| Requirement | Approach | Corresponding Plugin Examples |
|---|---|---|
| Change the interface | Install a UI plugin | dsh-web-ui, dsh-TUI |
| Add vision capabilities | Install a vision plugin | modlens, dsh-vision-toolkit |
| Multi-Agent collaboration | Install an Agent Teams plugin | dsh-agent-teams |
| Browser automation | Install a Browser plugin | dsh-browser, BrowserSkill |
| Context management | Install a Context plugin | dsh-context |
The value of this mapping table lies in how it turns the vague question of "what should I install" into the answerable question of "which dimension am I lacking capability in." Below is an explanation of the criteria for judging each dimension:
- Change the interface (UI Plugin): If you need a workbench accessible via browser, a task board, or remote mobile capabilities, choose a Web-side UI Plugin; if you are used to SSH remote development and spend your days in the terminal, choose a terminal TUI Plugin. What this layer determines is "how you use dsh," without changing the Agent's core capabilities.
- Add vision (Vision Plugin): When your work involves OCR, web page screenshot analysis, document understanding, or image content extraction, you need a Vision Plugin to "attach" image capabilities to an Agent that was originally text-centric. Note that different Vision Plugins vary in depth of capability; this will be distinguished in detail later.
- Multiple Agents (Agent Teams Plugin): When you find that a single Agent handling complex tasks has increasingly messy context and increasingly mixed responsibilities, it is time to consider having multiple Agents divide the work and collaborate. This type of Plugin solves "how to get multiple Agents to work together."
- Browser (Browser Plugin): Once an Agent truly enters a production environment, being able to read and write code is often not enough; it also needs to open web pages, read pages, click and input, and execute tasks with a logged-in state. This type of Plugin usually involves additional components such as browser extensions, and its installation method differs from ordinary Plugins.
- Context (Context Plugin): The longer an Agent is used, the more the real problem is often not that the model is not smart enough, but that the context becomes increasingly messy. This type of Plugin revolves around visualizing and managing the composition of context.
The key point is that Plugins can also stack on top of one another to form completely different working environments. A UI Plugin + Vision Plugin + Context Plugin yields a complete workbench oriented toward daily interactive development; a UI Plugin + Agent Teams Plugin + Workflow Plugin yields a task orchestration environment. This is precisely the essential advantage of "Pluginization" over "feature toggles": toggles can only be on or off, while Plugins can be freely combined.
It should be noted that the advantage of dsh is not "the more Plugins, the stronger," but rather free combination according to your own workflow. Do not install a dozen Plugins right away; first get the core workflow running, then gradually add capabilities.
The three Profile forms: which environment web, tui, and headless install Plugins into
There is one obvious difference between Plugin installation in dsh and ordinary npm packages or Python packages, and this is where advanced users must build intuition: after a Plugin is installed, which environment it runs in is determined by the Profile.
In other words, npm install or pip install solves "whether the package is on this machine," while dsh's Profile solves "which runtime this package takes effect in." The same dsh can load different Plugin combinations according to usage scenarios, and different Profiles do not interfere with one another. This is the key mechanism by which dsh achieves "one installation, multiple forms."
The three commonly used Profiles in dsh are as follows:
| Profile | Form | Use Case |
|---|---|---|
| web | Browser-accessed Web workbench | Day-to-day interactive development, task boards, remote access |
| tui | Full-screen terminal interface | SSH remote development, command-line-oriented users |
| headless | Headless background execution | Automation scripts, CI integration, scheduled tasks |
The design logic behind these three forms is remarkably clear and worth exploring in depth:
- web targets scenarios where "a human is watching the screen and interacting." Its plugin composition is typically the heaviest: the full UI suite, sidebar workbench, vision capabilities, and plugin marketplace are all installed at this tier. This is because the Web workbench is naturally suited to capabilities that require visual real estate, such as task boards and Git graphs.
- tui targets users who "do SSH remote development and are comfortable with the command line." Its plugin composition is typically the lightest—a terminal user may only need a single full-screen terminal interface plugin. This is not a lack of capability but a deliberate subtraction: in terminal scenarios, complex visual panels only add noise.
- headless targets scenarios where "no human is present"—automation scripts, CI integration, scheduled tasks. This tier typically installs no UI plugins at all, focusing purely on execution and output.
One engineering intuition deserves special emphasis here: isolation between Profiles has real value—it is not a conceptual game. Imagine running a headless Profile in a CI pipeline. If the plugin composition shared a single state with your local Web Profile, then a browser automation plugin you casually installed locally could cause unexpected network behavior in CI. It is precisely because different Profiles do not interfere with each other that you can confidently experiment with installing plugins in your local Web environment without worrying about polluting the execution environment of your production pipeline.
Another common misconception is to understand Profile as a "theme" or "skin." It is not—a Profile determines which plugins participate in execution; it is the runtime assembly manifest, whereas a skin is just one category of plugin within that manifest. This distinction will come up again later when we discuss skin plugins like dsh-deep-whale.
Plugin Composition Lists for Web Profile and TUI Profile: dsh-web-ui, dsh-better-sidebar, modlens, dsh-market, and dsh-TUI
Now that the concepts are covered, let's look directly at two real, usable Profile plugin compositions—it will be more intuitive.
A typical Web Profile plugin composition looks like this:
Web Profile
├── dsh-web-ui           # Web workbench
├── dsh-better-sidebar   # Sidebar workspace
├── modlens              # Vision capabilities
└── dsh-market           # Plugin marketplace
While a terminal user might only keep:
TUI Profile
└── dsh-TUI              # Full-screen terminal interface
Putting these two trees side by side reveals something quite interesting: the same dsh installation can load completely different sets of plugins. The Web Profile has four plugins, while the TUI Profile has only one; yet they share the same dsh installation and the same plugin management mechanism. This is a direct manifestation of the Profile mechanism's ability to "organize capabilities."
Let's break down what each of the four Web Profile components is responsible for:
- dsh-web-ui: The core workbench plugin on the Web side. It doesn't just swap out the interface; it fills in workbench capabilities such as task boards and Git graphs around the Agent workflow. In other words, it addresses "what dsh should look like in a browser."
- dsh-better-sidebar: It addresses the issue of "workspace organization capability." It provides a complete sidebar workbench—file tree / editor, terminal, Git, sub-agents—and supports third-party plugins registering new Tabs. It's suitable for users who want to turn dsh into an "AI IDE."
- modlens: A vision capability plugin that enables pure text models to handle images (the next section will elaborate on how it works).
- dsh-market: Embeds the plugin marketplace into the settings page, offering search, categorization, and one-click install/update. This is the plugin most recommended to install first when getting started—for a simple reason: rather than manually searching through dozens of GitHub repositories, it's better to let the marketplace help you discover and install.
Meanwhile, dsh-TUI in the TUI Profile takes a different route: a Claude Code-style full-screen terminal TUI, offering streaming thinking, double-Esc backtracking, a status bar, and model switching. It provides streaming output and message backtracking in the terminal, with an experience close to Claude Code. For terminal users, dsh-TUI is more recommended—not because it's "weaker," but because it precisely matches the interaction habits of terminal scenarios—streaming thinking and message backtracking are especially valuable when debugging long sessions.
Here's a practical tip: When getting started, it's recommended to install dsh-market first, then install the remaining plugins on demand through the marketplace, and hand over subsequent update management to it as well. Get the core workflow running first, then gradually add other capabilities. This path works because the marketplace plugin itself solves the second-order problem of "where to find plugins"—plugin discovery is itself part of the plugin-based design.
Breaking down the dsh plugin --profile add command: the complete installation chain from choosing a Profile to verifying loading
dsh provides a unified installation entry point for plugins, accomplished with a single command. The basic form of the command is as follows:
# Install a plugin to the web profile (--profile specifies the target environment, required)
dsh plugin --profile web add <source>

# Install a plugin to the tui terminal environment
dsh plugin --profile tui add <source>
There are three fields in this command that must be understood thoroughly:
- dsh plugin: The unified entry point for plugin management; installation, management, and other actions all start here.
- --profile web / --profile tui: A required parameter that specifies which runtime environment the plugin should be installed into. This is the most fundamental difference between dsh and npm/Python installation—you're not installing "to the local machine," but "to a certain Profile."
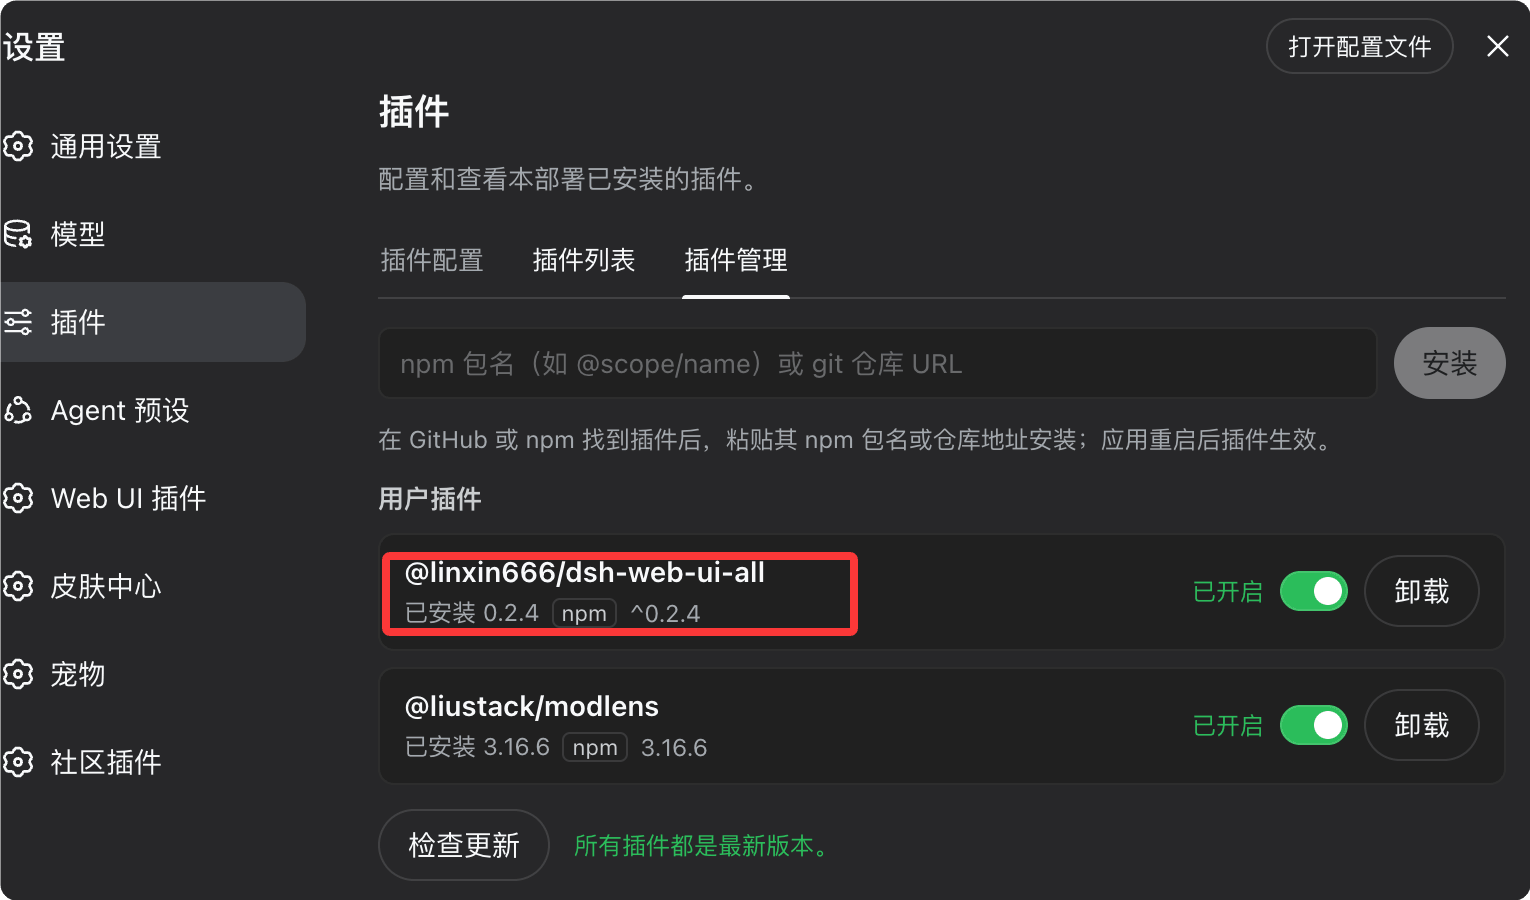
- add <source>: Specifies the plugin source. The source can be an npm package name (e.g., @linxin666/dsh-web-ui-all@latest) or a GitHub repository address (e.g., github:zhu1090093659/dsh-web-ui).
Take installing dsh-web-ui as an example. The official open-source repository is https://github.com/zhu1090093659/dsh-web-ui, and the corresponding command is:
dsh plugin --profile web add @linxin666/dsh-web-ui-all@latest
Note the @latest suffix in this command. During development, tracking the latest version is very convenient, but the plugin versioning strategy for production environments needs separate consideration, which we will expand on later when discussing version pinning.
A complete installation process usually looks like this:
Select Profile
   ↓
Install plugin
   ↓
Check dependencies / README
   ↓
Restart the corresponding service
   ↓
Verify whether the plugin is loaded
In this chain, "restart the corresponding service" is the step most easily overlooked by beginners, and it is also the root cause of many "I clearly installed it but it doesn't take effect" problems. Note the wording here is "restart the corresponding service"—because you only affect the environment of the Profile you specified, and there is no need to tear down and rebuild the entire dsh ecosystem.
In addition, the "check dependencies / README" step is not a formality. Some plugins (especially browser-type ones) require additional browser extensions or external services, and the official team will provide a one-click installation script. For such plugins, it is recommended to install strictly according to the official script or README rather than manually piecing together commands—because manual assembly easily misses implicit steps such as extension registration, causing the plugin to load successfully but its functionality not to work, with extremely high troubleshooting costs.
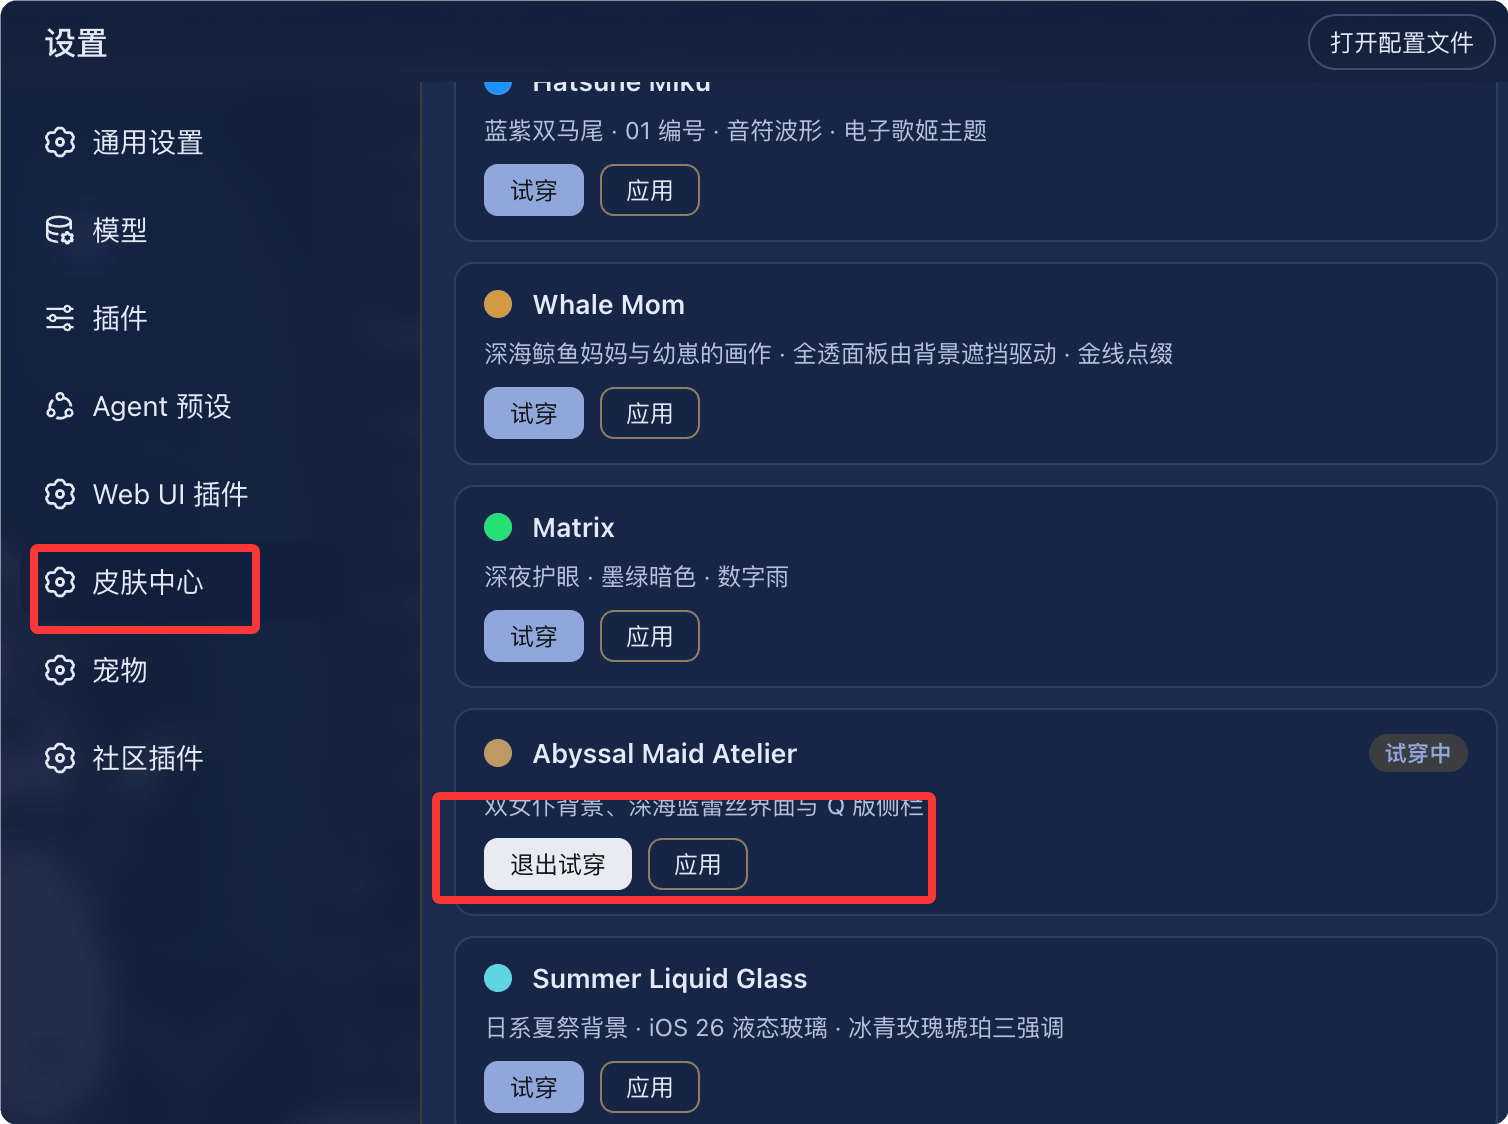
After installation and restart, we can view the installed plugins in the plugin list in settings. This step is the concrete action of "verify whether the plugin is loaded." We can also view the plugin's functionality in the left-hand list and try installing skins—this is both a functional confirmation and the fastest way to experience the plugin's effects.
Plugin list, feature preview, and uninstall entry: three operation spots on the settings page
After plugins are installed, daily operations are actually concentrated in three spots on the settings page. Understanding the division of labor among these three spots can save a great deal of time exploring.
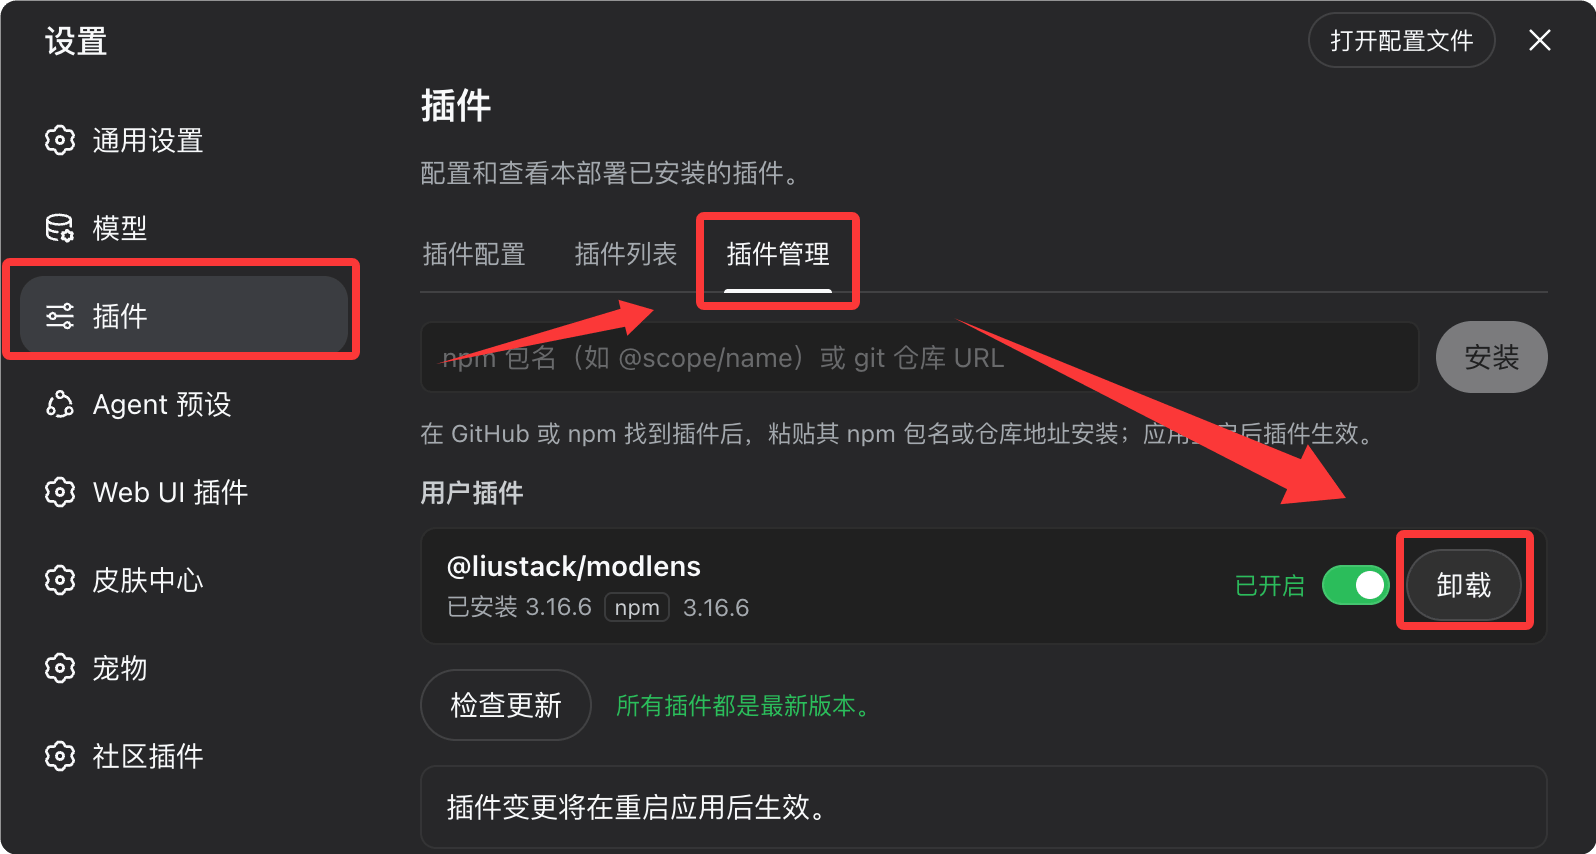
The first operation spot is the plugin list. After installation and restart, we can view the installed plugins in the plugin list in settings. This is the first scene for confirming "whether it is installed"—if your plugin does not appear here, then the problem lies in the installation chain or Profile specification, not in the plugin functionality itself.
The second operation spot is feature preview and skin trial installation. We can view the plugin's functionality in the left-hand list and try installing skins. The value of this spot lies in "zero-cost experience": especially for plugins such as skins, themes, and desktop pets that do not affect core capabilities, taking a look at the effects in the list before deciding whether to keep them is much less trouble than installing and then uninstalling.
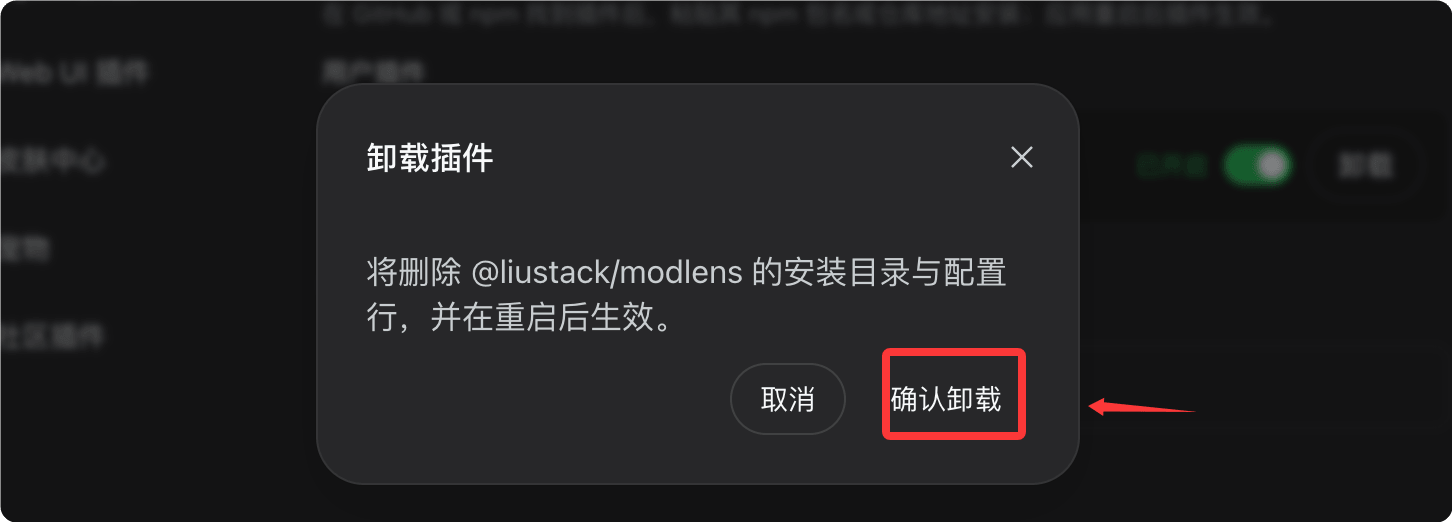
The third action slot is the uninstall entry point. To uninstall a plugin, simply click the uninstall button in the plugin list of the settings menu; click confirm uninstall to complete the removal. The entire process involves no command line, making it especially friendly for team members who are unfamiliar with terminal operations.
Looking at these three action slots together, you'll notice that dsh's plugin management UI design follows a clear principle: discovery, preview, and cleanup are all consolidated into a single list. This is crucial for maintenance as the number of plugins grows—when your Profile is piled with a dozen plugins, a unified list view is almost your only controllable handle.
Here's a practical tip from real-world experience: when trying out a new plugin, it's best to add only one at a time, then immediately verify it and watch for side effects. The reason is that plugins can stack, and the more powerful a plugin is, the greater its changes to runtime state. If you install five at once and something goes wrong, you can't tell which one caused it; but installing one at a time makes the cost of pinpointing the problem almost zero. This principle is especially important when installing high-privilege plugins like browser-type or subscription-type ones.
The UI Enhancement Quartet: Capability Boundaries of dsh-web-ui, DSH-better-sidebar, dsh-TUI, and dsh-at-file
UI enhancement and workbench plugins solve the problem of "the interface isn't good enough," with the goal of upgrading dsh from a command-line tool into a complete workbench close to an IDE. In this category, four plugins are most worth clarifying the boundaries of, because their names are similar but their positioning is completely different—choosing the wrong one means installing in vain.
Let's first pin down the positioning of all four with a table:
| Plugin | Problem Solved | Install Command |
|---|---|---|
| dsh-web-ui | Web UI all-in-one suite: task board, Git graph, right-side panel, remote mobile, desktop pet, real-time Token statistics, skin center | dsh plugin --profile web add github:zhu1090093659/dsh-web-ui |
| DSH-better-sidebar | Complete sidebar workbench: file tree / editor, terminal, Git, sub-agents, supports third-party plugins registering new Tabs | dsh plugin --profile web add dsh-better-sidebar |
| dsh-TUI | Claude Code-style full-screen terminal TUI: streaming thinking, double-tap Esc to rewind, status bar, model switching | dsh plugin --profile tui add @deepseek-harness-tui/dsh-tui |
| dsh-at-file | Input box @ for quick search and referencing workspace files / directories | dsh plugin --profile web add github:omdsh-dev/dsh-at-file |
Let's go through their capability boundaries one by one:
- dsh-web-ui fills in the "surface." It's not just a simple interface swap; it rounds out workbench capabilities such as task boards and Git graphs around the Agent workflow. Note that its feature list includes real-time Token statistics and a skin center—this means it's not just a UI shell, but also carries part of runtime observability. Suitable for users who need "a complete Web workbench."
- DSH-better-sidebar fills in the "structure." What it solves is the problem of "workspace organization capability," providing a persistent sidebar. Capabilities like the file tree / editor, terminal, Git, and sub-agents are organized into the sidebar, and it supports third-party plugins registering new Tabs—this means it is itself an extensible container. Suitable for users who want to turn dsh into an "AI IDE."
- dsh-TUI fills in the "terminal experience." It provides streaming output and message backtracking in the terminal, with an experience close to Claude Code. Note that it installs the tui Profile, not the web Profile—this is the only one of the four that crosses Profiles, once again confirming the necessity of the Profile mechanism.
- dsh-at-file fills in "input interaction." Its usage is very intuitive: type @ in the input box to search for and reference workspace files. Example usage:
Please analyze @runoob-demo/src/main.py

Compare @runoob-demo/src/api and @runoob-demo/src/service
For a code Agent, this interaction method is far more natural than manually copying file contents. It doesn't change the Agent's capability ceiling, but it significantly lowers the operational cost of "feeding the correct context to the Agent"—from an engineering perspective, this is precisely the most underestimated link in the context quality problem.
Putting these four plugins together, a clear division of labor emerges: dsh-web-ui governs "what the workbench looks like," DSH-better-sidebar governs "how the workspace is organized," dsh-TUI governs "how terminal users use it," and dsh-at-file governs "how context is quickly referenced." They can be stacked, or chosen as needed. Among them, dsh-web-ui and DSH-better-sidebar are the most popular combination in the community: the former rounds out the functional surface of the Web interface, while the latter provides a persistent sidebar—if you're preparing to use dsh as your primary development environment, these two are almost the top-priority starting points.
Finally, a reminder about installation details: of these four plugins, three install the web Profile and one installs the tui Profile, and their source formats also differ—there's an npm package name (dsh-better-sidebar), a package with an @scope (@deepseek-harness-tui/dsh-tui), and a repository address with a github: prefix. This means that when you copy installation commands, be sure to copy the source format along with them, not just the plugin name, or the installation will likely fail. As for the specific source format specifications, and the four security checks that must be done when installing third-party plugins (source code, license, dependencies, version pinning), we'll continue to expand on those in the second half. Next, we'll move into an in-depth analysis of core plugin categories such as vision and multimodality, multi-Agent and workflows, browser automation, memory and context migration, and plugin discovery and management, and provide a complete scenario-based recommendation and security checklist.
In the previous section, we thoroughly unpacked dsh's plugin classification, the Profile isolation mechanism, the unified installation entry point of `dsh plugin`, and a batch of UI/workbench plugins. This section focuses on "capability-type plugins": from vision add-ons that upgrade a pure-text model to multimodal, to multi-Agent collaboration, browser automation, and then to context governance and long-term management practices, finally giving a ready-to-follow implementation checklist.
Visual Capability as a Plug-in: The Division of Labor Between modlens's Structured Visual Evidence, dsh-vision-toolkit, and dsh-vision-router
dsh itself is not an inherently multimodal runtime; its strategy is to "plug in" visual capabilities as plugins to an Agent that is otherwise text-centric. The point most easily misunderstood here is this: what the community calls "turning a pure text model into a multimodal one in seconds" is not about stuffing an image into the model's context and letting it guess on its own, but rather first using a layer of plugins to convert the image into structured visual evidence, which is then handed to the text model for processing.
Take modlens as an example. Its core idea is this: when you paste a webpage screenshot into a session, what the model receives is not a vague statement like "this is a webpage screenshot," but a set of evidence that a text model can read closely—including OCR text (what text is on the page and what each piece says), layout information (the hierarchy and placement relationships of blocks), coordinates (the positional boundaries of each element in the frame), and semantic labels (whether a given region is navigation, a button, or body text). This output is extremely friendly to downstream text models: the model does not need to understand pixels, only to read a "page manual" with positions and semantics, and it can answer the user's questions, such as "where on the page is that submit button in the screenshot" or "what is the price in the body text."
The engineering value of this approach lies in moving uncertainty from the model layer to the plugin layer. The accuracy of OCR, the fidelity of layout reconstruction, and the precision of coordinates are all the responsibility of the visual plugin and can be tuned independently; the text model is only responsible for semantic reasoning. When something goes wrong, it is also easier to pinpoint: if OCR misreads characters, that is a problem in the visual chain; if OCR is correct but the model answers incorrectly, that is a problem in the reasoning chain. By contrast, if you throw an image directly at a pure text model, you get neither intermediate evidence nor any way to tell which link the error occurred in.
Two other visual plugins in the community made different trade-offs. dsh-vision-toolkit is a more complete visual toolbox, covering intent-based Q&A, long-screenshot OCR, UI reconstruction, grounding (locating natural-language references to specific elements in the frame), and pixel diff (comparing the differences between two screenshots). If your daily work centers on scenarios like front-end development, UI replication, and screenshot comparison, it is far more practical than solutions that only do OCR—because UI reconstruction requires not just text, but also knowing "what this button looks like, where it is, and how many pixels it differs from the previous version." Meanwhile, dsh-vision-router is positioned as a free visual chain and pixel-level tool, supporting routing of visual reasoning to a local Ollama or LM Studio. For teams that are data-sensitive and want visual capabilities fully deployed locally, this point is especially critical: images never leave the machine, and model calls go through a local inference service, which both saves cost and meets compliance requirements.
The division of labor among the three can be understood this way: modlens solves "turning images into evidence that a text model can read," dsh-vision-toolkit solves "performing more fine-grained visual operations in front-end and UI scenarios," and dsh-vision-router solves "where visual reasoning runs and whether it needs to go online." They can be used in combination, but at the initial stage it is not recommended to install all of them. First clarify your main scenario: for general OCR and document understanding, prioritize modlens; for front-end replication, prioritize dsh-vision-toolkit; for localization and cost sensitivity, prioritize dsh-vision-router.
The table below compares the positioning and applicable boundaries of the three plugins together to facilitate selection:
| Plugin | Core Output | Typical Scenarios | Deployment and Cost Tendency |
|---|---|---|---|
| modlens | Structured OCR, layout, coordinates, semantic labels | Webpage screenshot analysis, document understanding, image content extraction | General-purpose, depends on external or local visual models |
| dsh-vision-toolkit | Intent-based Q&A, long-screenshot OCR, UI reconstruction, grounding, pixel diff | Front-end development, UI replication, screenshot regression comparison | Broad functional coverage, suitable for deep visual workflows |
| dsh-vision-router | Free visual chain and pixel-level tools, can route local inference | Local deployment, cost- and compliance-sensitive scenarios | Supports local execution via Ollama / LM Studio |
Installation commands all go through the dsh plugin --profile web add entry point. For example, to install modlens into the Web Profile:
# Install the vision plugin into the web profile
dsh plugin --profile web add @liustack/modlens

# For frontend and UI replication scenarios, you can layer on the vision toolkit
dsh plugin --profile web add @anionex/dsh-vision-toolkit

# Localized vision chain: first make sure your local Ollama or LM Studio is ready
dsh plugin --profile web add dsh-vision-router

# After installing, restart the corresponding service, then confirm the load status in the plugin list under settings
A common engineering pitfall is installing a vision plugin into the wrong Profile. If you work in the terminal TUI day to day but install the vision plugin into the web Profile, vision capabilities will not appear in your terminal session—Profiles are isolated, and a plugin takes effect in whichever environment it is installed. Another pitfall is installing the router plugin before the local vision chain is started, so that the inference service cannot be found when called. The recommended order of operations is: first confirm the local model service is available, then install dsh-vision-router, and finally do an end-to-end verification in a session using a screenshot.
Skins and desktop pets are also plugins: installation differences between dsh-deep-whale and the whale-girl/dsh-pet series
If you want the best evidence of just how thoroughly "everything is a plugin," skins and desktop pets are the best example. In traditional Agents, themes, appearances, and easter eggs are usually hardcoded into the core, and changing them means either waiting for an official update or maintaining your own fork. In dsh, however, even "what the interface looks like" and "whether there is an extra pet on the desktop" are plugins that can be added or removed at any time, without affecting the core logic.
The first example is dsh-deep-whale. This is a whale-girl skin series that includes themes such as the Deep Sea Maid Workshop, and supports both light and dark modes. Its significance is not just aesthetic: for developers who stare at the screen for long hours, switching between light and dark modes is a genuine experience requirement. Previously, such needs had to be met by editing theme config files and overriding styles; now a single install command mounts it, and if you are not satisfied you can uninstall it in settings—clean and simple.
The second example is the whale-girl and dsh-pet series of desktop pets. It places a little whale on your workbench that can be dragged, fed, and interacted with. This sounds like pure entertainment, but it precisely proves the boundaries of the plugin system: the plugin's permissions and capabilities are large enough to render an interactive, stateful UI component and coexist with the Agent's workbench. Getting a desktop pet to run shows that plugin loading, lifecycle management, and UI mount points are all working.
Installation differences require special attention. dsh-deep-whale follows the standard GitHub source installation path:
# Install the whale-girl skin series (supports light / dark modes)
dsh plugin --profile web add github:Small-tailqwq/dsh-deep-whale
Meanwhile, the whale-girl and dsh-pet series have multiple repositories in the community, whose implementations, dependencies, and configuration options may differ from one another, and no single universal install command covers them all. The correct approach is to install according to each repository's own README, and not to blindly apply someone else's command based on experience. Such plugins usually come with some extra configuration, such as the pet asset pack path, interaction toggles, initial position, etc. After installing, go back to the plugin list under settings to verify that it loaded successfully, then restart the corresponding service.
The engineering advice is this: skins and desktop pets are "pure presentation layer plugins," so the risk is relatively manageable, but you still need to scrutinize their dependencies. A plugin that looks like nothing more than a reskin is worth being wary of if it pulls in a pile of unrelated dependencies or requires extra network permissions. Also, skin plugins often have style coupling with UI plugins—if you have both dsh-web-ui and a certain skin installed and run into style conflicts, first confirm the load order and scope of the two, and if necessary disable the skin to isolate the problem.
Division of labor between multi-Agent and workflows: dsh-agent-teams breaks down tasks, dsh_workflow locks in processes
UI plugins address "how to use dsh," while multi-Agent plugins address "how to get multiple Agents to work together." These two types of plugins operate at completely different levels of abstraction, and precisely because of that, they can be stacked to build very powerful workflows.
The idea behind dsh-agent-teams is very intuitive: turn the current session into a "team lead," and the team lead breaks the task down and assigns it to multiple sub-Agents that can continue the conversation. Note that the key word here is "continuable"—a sub-Agent is not a one-off function call, but an execution unit with its own independent conversation context, so you can keep following up with a sub-Agent, correct it, or add requirements. In addition, it supports task orchestration with dependencies and automatic scheduling, as well as a real-time panel for observing the progress of each sub-Agent.
The point about "tasks with dependencies" deserves elaboration. Real development tasks are rarely flat: a frontend page depends on backend interface definitions, testing depends on both frontend and backend being done, and review depends on tests passing. agent-teams lets you express these dependency relationships, and the scheduler advances them in topological order rather than having all sub-Agents rush in at once. In real engineering, this can save a great deal of manual waiting and manual coordination. The real-time panel, meanwhile, solves "black-box anxiety"—you can see what each sub-Agent is currently doing and where it is stuck, rather than waiting for a final result.

And dsh_workflow solves a problem in another dimension: locking down an Agent's workflow and executing it repeatedly. In the official description, it is a Workflow layer that can be generated, saved, restored, observed, and governed. Translated into engineering language: it precipitates a successful execution path into a reusable process definition, so that the next time a similar task comes up, execution can be restored directly instead of letting the Agent improvise every time.
The division of labor between the two can be summed up in one sentence: agent-teams solves "multiple Agents working together," while workflow solves "locking down an Agent's workflow and executing it repeatedly." The former handles parallelism and collaboration, while the latter handles determinism and reusability. They do not conflict; rather, they complement each other.
The installation commands are as follows. Note that agent-teams uses an npm-style source, while dsh_workflow is currently a GitHub source:
# 多 Agent 协作:当前会话变队长
dsh plugin --profile web add @nanmicoder/dsh-agent-teams

# 工作流层:可生成、保存、恢复、观察、治理
dsh plugin --profile web add "github:dsh-external/dsh_workflow#main"

# 注意:生产环境不建议长期追踪 main 分支,建议固定到具体 commit
A common pitfall is treating the "captain" of agent-teams as an all-purpose scheduler and endlessly decomposing particularly heavy tasks, which results in an explosion in the number of sub-Agents, runaway Token costs, and dependency relationships so complex that no one can understand them. It's advisable to set a limit on decomposition—for example, keeping the number of sub-Agents in the single digits and limiting dependency levels to no more than three. Another pitfall is having a workflow track the main branch—this is fine during development, but if this process has already entered daily production, a main update can lead to "it ran yesterday, but it broke today." This point will be expanded on in a later section.
Leader/Frontend/Backend/Test/Review execution chain: the complete flow from requirement decomposition to repeated Workflow execution
Combining agent-teams with workflow forms a complete execution chain. This chain is the best example for understanding how dsh moves "from a tool toward a runtime."
The starting point is a requirement. After this requirement enters the session, the current session, acting as the Leader Agent, first performs task decomposition: translating a vague requirement into several subtasks that can be executed independently and have clear deliverables. Then the various sub-Agents take the stage in turn—the Frontend Agent handles UI implementation, the Backend Agent handles the interface and data layer, the Test Agent handles verification, and the Review Agent handles quality control. These sub-Agents are not isolated: they carry dependency relationships among them and are advanced in order by an automatic scheduler. The frontend must wait for the backend to finalize the interface definition, testing must wait for both frontend and backend to be completed, and Review starts after testing passes.
Once this chain has run through successfully once, its value is not just that "this one task is done," but that this execution pattern itself can be solidified by the Workflow layer: saved as a process definition and restored for execution the next time a similar requirement arises. Thus the process shifts from "re-orchestrating every time" to "reusing a verified path," and observability also gains a foothold—you can see the input and output of each step, and when something goes wrong you can pinpoint the specific stage.
Writing out this chain looks like this:
Requirement
  ↓
Leader Agent (task decomposition: define deliverables and dependencies)
  ├── Frontend Agent
  ├── Backend Agent
  ├── Test Agent
  └── Review Agent
  ↓
Workflow (process solidification: generate / save / restore / observe / govern)
  ↓
Final result
At this point dsh's role undergoes a qualitative change: it is no longer just "AI helps me write code," but "AI Agents organize multiple execution units themselves to complete tasks." Developers shift from "directing line by line" to "defining goals and constraints," while how exactly to decompose, schedule, and verify is left to the runtime and plugins. This is also why it is said that dsh's value lies not in how many features it ships with, but in the composable runtime layer it provides.
An engineering reminder: this chain has very high requirements for context quality. Only if the Leader decomposes clearly will the sub-Agents not go off track; if the interface agreements among sub-Agents are not clear, the Frontend and Backend can easily each write their own version and end up mismatched. The practical recommendation is to write the "interface contract" and "acceptance criteria" clearly during the Leader's decomposition stage as explicit inputs for the subtasks, rather than expecting the sub-Agents to guess on their own.
dsh-browser and BrowserSkill: directly driving the local Chrome while preserving login state and Cookie
Once an Agent truly enters a production environment, being able to read and write code is often not enough; it also needs to open web pages, read page content, click and type, and execute tasks while carrying login state. This is where browser-type plugins come into play.
The most critical difference here is that dsh-browser directly drives your local Chrome, rather than spinning up a clean headless browser. This distinction is decisive from an engineering standpoint. A headless browser approach typically starts as a blank slate every time—no login state, no cookies, none of the sessions you've accumulated in your local browser. So for an Agent to complete a task, it first has to go through the login flow, and when it hits CAPTCHAs, two-factor authentication, or risk-control policies, it easily gets stuck.
dsh-browser, by contrast, reuses your local Chrome's existing login state and cookies, so the Agent doesn't have to log in from scratch every time. For tasks that require a logged-in state—website automation, backend operations, data collection, web testing—this is a tangible efficiency difference. The accounts you've already logged into in Chrome, the Agent can use directly, and the task shifts from "solve login first" to "get straight to work."
Tencent's open-source BrowserSkill takes a similar approach, offering an automation solution based on a real, already-logged-in browser, in the form of a CLI plus a browser extension. What these solutions have in common is that they're not just a matter of installing an npm package—they often also require a companion browser extension or other external components.
For this reason, the installation method must be handled with care. In the community, dsh-browser is installed via a one-click install script provided by the repository (which includes the browser extension), while BrowserSkill is installed according to its repository instructions. The correct approach is to install via the official script or README, not by manually piecing together commands. There are three reasons: first, the browser extension needs to be loaded into the browser in a specific way, and manually piecing together commands makes it easy to miss this step; second, such plugins may involve a local port or bridge process for communicating with the browser, and if the parameters are wrong, the connection will fail; third, the extension's permission scope is fairly broad, and the official script usually clearly indicates which permissions you're granting, whereas a manual installation might install the extension without you being clear about the permissions.
On the security front, it must be emphasized: the permission level of a browser automation plugin is notably higher than that of a UI skin plugin. It can read the content of your logged-in pages and can click and type on your behalf, which means that if the plugin's code has problems, the impact could extend to your accounts and data. So before installing, be sure to review the source code first, focusing on the parts involving browser control, the file system, and network requests; pin the version or commit; and don't casually install browser extensions of unknown origin into your main browser.
Context governance and migration: lossless import with dsh-chat-import, Token trends with dsh-context
The longer you use an Agent, the more the real problem often isn't that the model isn't smart enough, but that the context gets messier and messier—a reality that any developer using a Coding Agent for a long time will encounter. Around this problem, dsh has a dedicated set of plugins.
dsh-chat-import solves the "migration" problem: it can losslessly import historical sessions from tools like Claude Code, Codex, ChatGPT, Cursor, and Gemini. For users who already make heavy use of other Coding Agents, the value of this kind of migration plugin is very high—the conversations, decision records, and context clues you've accumulated in the past don't have to be lost, and can be brought into dsh to continue using. What this actually lowers is the switching cost: previously, changing tools meant starting from scratch; now you can come in with your history.
dsh-context solves the "see clearly" problem: it provides a visualization panel for context composition, Token trends, and compression and trimming. You can see what parts the current context is composed of—how much is taken up by the system prompt, historical messages, tool call results, and file contents respectively; you can see the trend of Token consumption and judge whether it's heading in an out-of-control direction; and you can compress or trim when needed and observe the effect. For a long-running Coding Agent, this kind of visualization isn't a nice-to-have but a necessity: if you can't see the context, you can't govern the context.
This brings us to a more fundamental judgment: an Agent's effectiveness depends largely on "model capability + context quality + tool capability + task state," rather than on model benchmarks alone. Many people fixate on model scores when choosing tools, but the real gap in experience often comes from the other three factors. With poor context quality, even the strongest model will answer off-target; with weak tool capability, the Agent can only talk in the abstract; with chaotic task state management, it will lose its goal after multiple turns. dsh's plugin system happens to turn all of these into pluggable, observable, and replaceable parts, which is precisely where its long-term value lies compared to "an Agent with hardcoded functionality."
The engineering advice is: if you're migrating from other tools, first install dsh-chat-import to bring your history over, then install dsh-context to establish context observability. These two plugins, combined with dsh-at-file (referencing workspace files with @ in the input box), form a very smooth migration combo—your historical sessions are there, the context is visible, and file references feel more natural.
# Import historical sessions from other Coding Agents
dsh plugin --profile web add dsh-chat-import

# Context composition, Token trends, compression / trimming visualization panel
dsh plugin --profile web add dsh-context

# Works with @ to reference workspace files, for example:
# Please analyze @runoob-demo/src/main.py
# Compare @runoob-demo/src/api and @runoob-demo/src/service
A pitfall to watch out for: after importing historical sessions, the context size may balloon rapidly, which instead slows down responses and drives up costs. The right approach is to immediately use dsh-context to check the Token trend after importing, and compress or trim history you no longer need, rather than stuffing everything into the context at once. The purpose of migration is to preserve valuable decision clues, not to carry old baggage over as-is.
Latest developments in September 2026: dsh-find-plugin natural language plugin discovery and the long-term management approach with dsh-market
As the number of plugins grows, a new problem naturally arises: where to find plugins. dsh's answer to this question is very much in keeping with its consistent style—"finding plugins" is itself a plugin.
dsh-market has a built-in plugin marketplace on the settings page, supporting search, categorization, and one-click install and update. This means you no longer need to dig through GitHub repositories one by one and manually copy installation commands; common plugins can be found and installed right in settings, and subsequent updates can be left to it. For anyone planning to use dsh long-term, this is almost the top-priority plugin.
dsh-find-plugin goes a step further: find plugins directly in a session using natural language, returning descriptions and installation commands. For example, if you directly ask "is there a plugin that can analyze webpage screenshots," it will return the plugin name, feature description, and the corresponding installation command. This turns "discovering plugins" from "know the keyword, then search" into "describe your need, and you can find it." For new users just getting into dsh and not yet familiar with the plugin naming system, this entry point is very friendly.
The installation commands are as follows:
# Built-in plugin marketplace on the settings page: search, categorize, one-click install / update
dsh plugin --profile web add dshmarket

# Natural language plugin search within a session, returning descriptions and installation commands
dsh plugin --profile web add dsh-find-plugin
If you plan to use dsh long-term, the recommended approach is: first install dsh-market, then install the remaining plugins on demand through the marketplace, and hand over subsequent update management to it as well. Don't start by manually searching through dozens of GitHub repositories—that's inefficient and makes it easy to install things of unknown origin or incompatible. Get the core workflow running first, then gradually add other capabilities—this is the most suitable way to use dsh. It's not "install, open, done," but progressive building.
The next point is the most important discipline in production practice: pin versions or commits, don't chase latest or main. dsh is still in a phase of rapid iteration, and the APIs of community plugins may also change. If you always track the main branch, you run the risk of "it works today, but as soon as the plugin author pushes an update, it suddenly breaks tomorrow." In production environments, this kind of uncertainty is very costly, because it is hard to immediately tell whether the problem was caused by a plugin update or by your own configuration.
| Approach | Example syntax | Applicable stage | Risk |
|---|---|---|---|
| Track branch | github:dsh-external/dsh_workflow#main | Personal experimentation, following new features | May become unusable as soon as upstream changes |
| Pin commit | github:xxx/xxx@a1b2c3d | Production environments, team collaboration | Requires actively following security and feature updates |
The exact syntax depends on the current version of the plugin manager, but the principle is clear: in production, pin dependencies to a specific commit and turn "upgrading" into a deliberate, rollback-capable action rather than something you passively accept. You can understand the trade-off this way: tracking main gets you the latest features at the cost of stability; pinning a commit gets you reproducibility at the cost of having to schedule upgrades yourself. In team collaboration scenarios, the latter is almost always the better deal.
When installing third-party plugins, there are also four checks worth turning into a habit: look at the source code first, especially for plugins involving Shell, browsers, OAuth, API Key, filesystem, or network permissions; don't just read the promotional README; check the license, and if you plan to use it commercially, do secondary development, or deploy it inside an enterprise, confirm the License restrictions in advance; check the dependencies, because a project that looks like just a UI plugin is worth being wary of if it pulls in a large number of unnecessary dependencies; pin the version or commit, for the reasons above. If you want to explore more plugins, you can start with the GitHub topic "dsh-plugin," community-maintained curated lists, and community plugin directory sites. Be especially careful with subscription-type plugins—they often involve account authorization and third-party services, and their security risks are clearly higher than ordinary UI plugins. Do not install them based merely on keywords like "free model" or "free subscription"; be sure to inspect the source code, permission scope, and actual authorization flow first.
Summary and Best Practices
At this point, the full landscape of dsh's built-in and community plugins has basically been laid out. Let's compress the key points of the whole article into an actionable checklist:
- Understand Profile isolation first: a plugin takes effect in whichever environment it is installed into (web / tui / headless), and installing it into the wrong Profile is the most common reason for "the plugin isn't responding."
- Use a unified installation entry point: all plugins go through
dsh plugin --profile <target> add <source>; after installation, restart the corresponding service, then verify the loading status in the plugin list in settings. - Choose visual capabilities by scenario: for general OCR and document understanding, choose modlens; for frontend reproduction, UI restoration, and pixel diff, choose dsh-vision-toolkit; for localization and cost sensitivity, choose dsh-vision-router (together with Ollama / LM Studio). Remember the principle is "first convert images into structured evidence, then hand it to the text model."
- Skins and desktop pets are also plugins: dsh-deep-whale is installed via the standard GitHub source, while the whale-girl / dsh-pet series should be installed according to each repository's README; do not blindly reuse someone else's commands.
- Use multi-Agent and workflows together: agent-teams handles parallel collaboration and dependency scheduling, while workflow handles solidifying processes and executing them repeatedly. Set upper limits on the number of sub-Agents and dependency levels to avoid runaway costs.
- The key point of the execution chain is the contract: during the Leader's decomposition stage, write the interface contract and acceptance criteria into the subtasks; don't expect the sub-Agents to align themselves on their own.
- Understand the permissions of browser plugins: dsh-browser directly drives the local Chrome and preserves login state and Cookies, which is hugely different from headless solutions; when browser extensions are involved, install according to the official script or README, and prioritize reviewing the source code and permissions.
- Govern context; don't hoard it: dsh-chat-import handles migration, while dsh-context handles visualization and compression/trimming; after importing history, immediately look at the Token trend once and clean up promptly.
- The four elements of effectiveness: model capability + context quality + tool capability + task state. Missing any one of them will hold you back, so don't just stare at model benchmark scores.
- Long-term management posture: install dsh-market first, then expand as needed and let it manage updates; use dsh-find-plugin to find plugins in a session using natural language.
- Production discipline: pin commits rather than chasing latest / main; upgrades must be rollback-capable, and do not passively accept upstream changes.
- Four checks before installation: check the source code (focus on Shell, browser, OAuth, API Key, filesystem, and network permissions), check the license, check the dependencies, and pin the version or commit.
- Build progressively: start with installing Harness, choosing a Profile, and installing basic plugins, then add tools, Agents, Workflow, and Memory / Context in sequence, ultimately forming your own Agent Runtime.
To wrap up in one sentence: the dsh core runtime is responsible for connecting capabilities, plugins are responsible for providing capabilities, Profiles are responsible for organizing capabilities, and you are responsible for defining your own Agent. If this ecosystem continues to evolve, it may become more than just an "AI programming tool"—it may be more like a composable Agent runtime environment. And that is precisely what makes Everything is a Plugin most worth studying.