When you want to move DeepSeek Harness (dsh for short) out of a page in the browser and into your own program, Pure's Web UI can no longer help you—an interaction mode designed for a human to watch cannot be reused by batch scripts, CI pipelines, or your own products. At this point, the entry point you actually need is the Python SDK: it turns dsh into a single line of code in your program, rather than an interface that requires manual clicking. As the first half of "DeepSeek Harness's Python SDK and Multi-Form Invocation: From Web UI to Headless Operation," this article focuses on the most practical path—installing deepseek-harness-sdk, getting the repository's built-in example minimal.py running, understanding the lifecycle of the DeepSeekHarness context manager, and along the way clarifying the engineering details around credentials, endpoints, and session logs that are easily overlooked yet directly determine success or failure. After reading this section, you should be able to drive an Agent headlessly in an isolated workspace, laying a solid foundation for the multimodal and multi-form invocation in the next section.
What the Python SDK Installs: deepseek-harness-sdk and the Built-in Runtime
Many people ask the first time they encounter the SDK: I already have the dsh command-line tool installed globally, so why do I need to install a Python package too? The answer lies in the SDK's design. The SDK's job is not to reimplement an Agent runtime, but to serve as a lightweight adaptation layer—turning runtime startup, configuration assembly, task dispatch, and result collection into Python-side APIs. The problem it truly solves can be summed up in one sentence: turn dsh into a single function call in your program, rather than a page in the browser.
The key point of this adaptation layer is version binding. When you run python -m pip install deepseek-harness-sdk, pip doesn't just install the Python package itself; it also pulls the built-in runtime of the same version. In other words, the SDK version number and the runtime version number are paired, and the official team guarantees interface agreement this way, avoiding mismatches like "the SDK passes field A, but the runtime only recognizes field B." This is important for advanced readers: if you manually upgrade one side without touching the other, you may hit compatibility pitfalls. The safe approach is to always use pip to install or upgrade the SDK, letting the dependency resolver lock in the paired version for you, rather than modifying the runtime separately.
Another easily misunderstood point is the Node.js dependency. dsh itself is a toolchain oriented toward multilingual invocation, and in its command-line form it does indeed intersect with the Node ecosystem. But the SDK's runtime is a bundled copy: after installing the SDK, the runtime does not require the system to provide Node.js—the Python process carries a usable runtime with it. This means you can run an Agent in a clean container with only Python installed, without additionally maintaining a Node environment, npm versions, or global package conflicts. For CI/CD and production deployment, this can significantly reduce image size and the risk of environment drift.
So who exactly is the SDK for? The official documentation lists three typical scenarios:
- Batch tasks: when the same Agent task needs to be run repeatedly across hundreds or thousands of inputs, manually clicking through the UI is clearly impractical;
- Integration into in-house products: when Agent capabilities are treated as a feature module within a product, requiring in-process invocation rather than bolting on a web page;
- Driving Agents in tests: when constructing tasks and asserting outputs in automated tests to verify whether Agent behavior has regressed.
These three scenarios share one common trait: the caller is a program, not a human. The SDK is precisely the abstraction born for programmatic invocation—it consolidates state such as lifecycle, credentials, and sessions into a controllable object, so that higher-level code only needs to care about "what task to send and what result comes back." Once you grasp this positioning, the installation and invocation that follow all fall naturally into place.
Prerequisites comparison table: Python 3.10, Git, and Linux/macOS 14+ arm64
Before getting hands-on with the installation, check your environment against the requirements first. The SDK spells out its system requirements fairly clearly, and skipping this step makes it easy to hit baffling errors only at runtime. The table below lists the five prerequisites one by one, and it's advisable to verify each item:
| Dependency | Requirement | Verification points |
|---|---|---|
| Python | 3.10 or higher | Anything below 3.10 will fail during installation or import; run python --version first to confirm |
| Git | Installed | The very first step of the installation process is cloning the repository; without Git you're stuck at the starting line |
| Operating system | Linux x64, Linux arm64, or macOS 14+ on arm64 | Note the macOS version and architecture restrictions; older systems or Intel architecture are outside the supported range |
| API endpoint | A DeepSeek-compatible API endpoint and credentials | Have your API Key ready, and if necessary a base URL for a compatible proxy |
| Workspace | An isolated workspace the agent can modify | Must be a directory the Agent has read/write access to; isolation is meant to prevent accidental modification of host machine files |
Let's break these down one by one. First, Python 3.10+—this is a hard threshold, not a recommendation, because the SDK may internally use newer type annotations and syntax features, and 3.9 and below cannot be guaranteed to import successfully. Second, Git, because the officially recommended way to get started is to clone the repository and run the bundled examples; if you don't clone, you'll have to write the configuration by hand, which costs more and is error-prone.
The third item, the operating system, deserves a bit more explanation: the supported range is Linux x64, Linux arm64, and macOS 14 and above on arm64. Note that macOS has two constraints—version 14+ and arm64 architecture. If you're on an older macOS or a Mac with an Intel chip, you're outside the officially supported list and lack a fallback when problems arise. The fourth item is the API endpoint and credentials; when using the default DeepSeek official endpoint, only an API Key is needed; if you're going through an OpenAI-compatible proxy, you'll also need to provide a base URL (covered in the environment variables section later).
The last item, isolating the workspace, is the easiest to overlook, but it is actually the security baseline. When an Agent executes tasks, it reads and writes files and runs commands. If you point it directly at your home directory or project root, a single misoperation could modify files that should not be touched. The correct approach is: set aside a dedicated empty directory as the workspace, let the Agent work freely inside it, and discard or archive it as needed after the task is complete. This workspace must also be an absolute path, for reasons that will be explained in the command-line arguments section.
Once these five items are aligned, you have a checklist that means "ready to start." If any item is not satisfied, it is recommended to fill the gap before continuing; otherwise, when troubleshooting later, it will be hard to tell whether the problem is environmental or usage-related.
Clone the repository into a virtual environment: complete the installation in four commands
After the environment check passes, the installation itself is actually very short. The official recommendation is to use a virtual environment so that the SDK is isolated from other Python packages on the system and version conflicts are avoided. The complete process can be compressed into the following set of commands, which should be executed in order:
# Step 1: Clone the repository to get runnable examples
$ git clone https://github.com/deepseek-ai/deepseek-harness.git

# Step 2: Enter the repository directory
$ cd deepseek-harness

# Step 3: Create a virtual environment
$ python -m venv .venv

# Step 4: Activate the virtual environment (Linux / macOS)
$ . .venv/bin/activate

# Step 5: Install the SDK and the bundled runtime of the same version
$ python -m pip install deepseek-harness-sdk
Here is an explanation of what each command does and common pitfalls:
- git clone: Pull the repository to your local machine. The purpose is not that you must run from source, but to get the runnable examples under
examples/and the accompanying configuration files. Theminimal.cordis.ymlin the examples describes which plugins to start; writing it from scratch is time-consuming and easy to get wrong. - cd deepseek-harness: Enter the repository root directory; subsequent commands are based on it. The example paths are relative to the repository root, so if you do not enter it, the paths will not be found.
- python -m venv .venv: Create a virtual environment named
.venv. Usingpython -m venvinstead of directly typingvenvis a good habit; it ensures that the currentpythoninterpreter is used, avoiding a different interpreter pointed to by PATH. - . .venv/bin/activate: Activate the virtual environment. After activation, the command-line prompt usually includes the environment name, and at this point
pythonandpipboth point to the versions inside the virtual environment. If you use Windows, the activation script path is different, but the official support matrix does not include Windows, so it will not be covered here. - pip install deepseek-harness-sdk: Install the SDK. As mentioned earlier, this step also installs the bundled built-in runtime. After installation, the runtime is self-contained and no longer requires the system to provide Node.js.
Why do we keep emphasizing virtual environments? Because the Agent runtime introduces a series of dependencies, and installing them directly into the system Python can easily clash with existing packages, especially when you maintain multiple projects on the same machine. A virtual environment locks dependencies into a sandbox, and deleting .venv is equivalent to a clean uninstall—this kind of reversibility is a property that engineering values highly.
After installation is complete, it's a good idea to do a quick self-check: run an import inside the activated virtual environment to confirm the package can be found and the version matches expectations. If the import fails, first check whether the virtual environment is actually activated and whether the Python version is at least 3.10. Once you've ruled out these two points, the vast majority of installation-time issues can be pinpointed.
Getting minimal.py to run: verifying the entire SDK chain
A successful installation doesn't mean the chain is usable. The repository thoughtfully provides a built-in example, minimal.py, whose purpose is a "minimal runnable verification": getting it to run means you've verified the entire SDK chain, from calling via Python, starting the runtime, reading credentials, dispatching tasks, and receiving model responses to collecting results. It doesn't aim for feature completeness—only for getting the end-to-end path working—which makes it an excellent first litmus test before you integrate it into your own project.
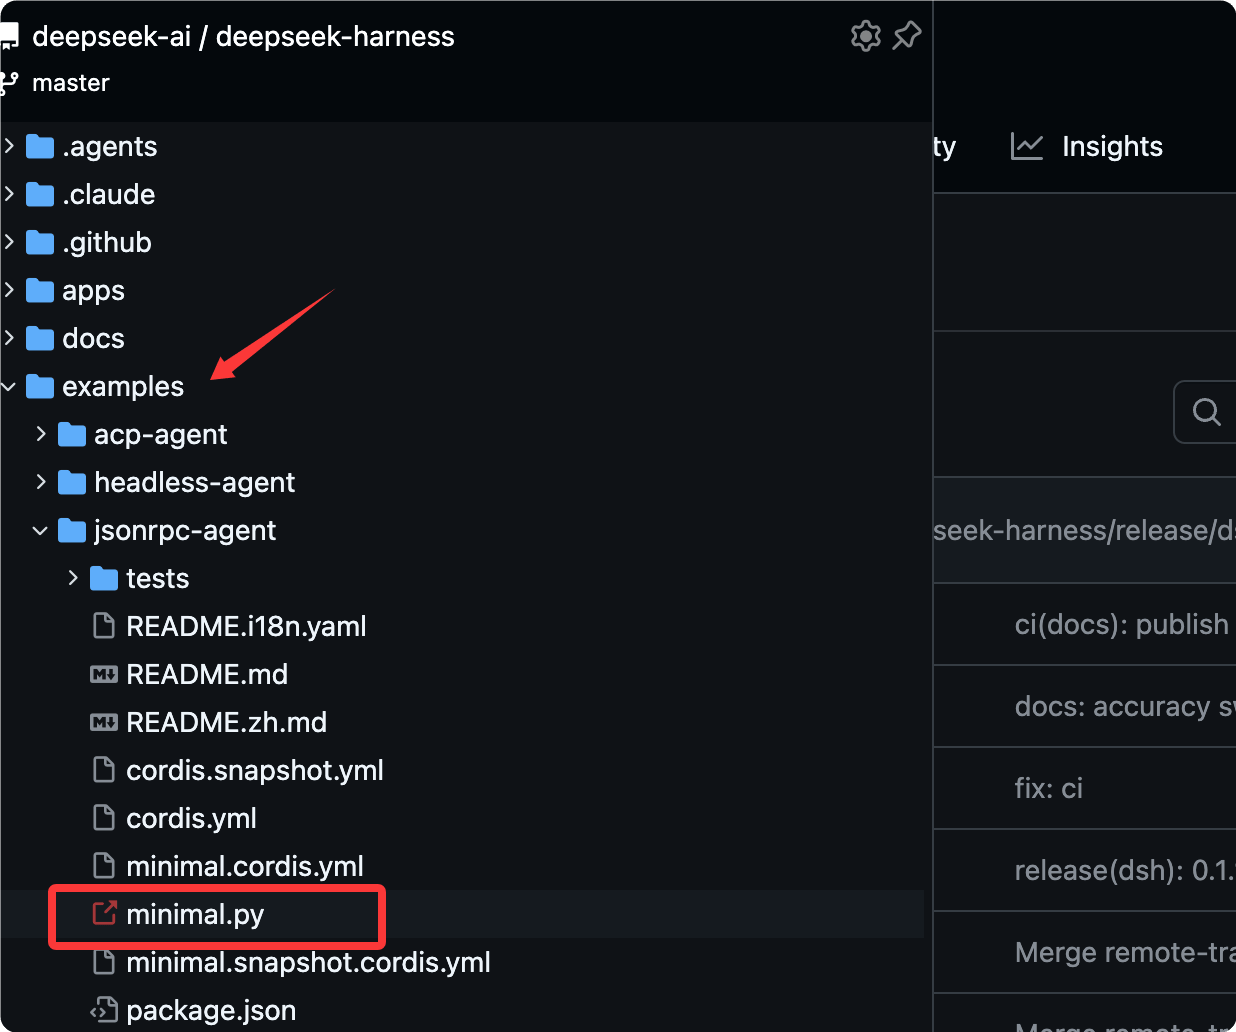
minimal.py is located at examples/jsonrpc-agent/minimal.py. It's a command-line executable script that takes several parameters, initiates a task, and prints the assistant's final reply. Its criterion is very intuitive: as long as the script can normally print the model's final reply and doesn't exit with an exception, it means the credentials, endpoint, runtime, and configuration links are all working. Conversely, if it gets stuck at some link, the error message usually points to the specific link—wrong credentials will report an authentication failure, a wrong path will report that the directory doesn't exist, and a wrong configuration will report a plugin loading exception.
It's worth noting that this example can be "minimal" because it reuses the composite configuration file provided by the repository, rather than hardcoding the plugin assembly details into the script. A so-called composite configuration is a manifest describing "which plugins to start," and the SDK uses it to assemble the runtime. Understanding this is crucial for later calling it from your own program: when you replicate the example's core logic, you'll likewise need to specify a configuration file.
The benefit of getting the example to run goes beyond "verifying it works." It's also a referenceable skeleton: when you adapt the example to your own task, how to pass parameters, how to provide paths, and how to label sessions all have ready-made templates. Many beginners skip the example and write their own calling code directly, only to repeatedly trial-and-error on configuration and paths, which ends up being slower. Run it first, then modify it—that's the more time-efficient path.
Credential and endpoint environment variables: DEEPSEEK_API_KEY, DEEPSEEK_BASE_URL, DSH_MODEL
minimal.py relies on several environment variables to obtain credentials and runtime parameters. The official way to set them is as follows:
# 必填:你的 DeepSeek API 密钥
$ export DEEPSEEK_API_KEY=sk-your-key-here

# 可选:仅当模型不是由默认 DeepSeek 端点提供时才需要
# export DEEPSEEK_BASE_URL=http://127.0.0.1:8000/v1

# 可选:指定模型名
# export DSH_MODEL=deepseek-v4-flash

# 可选:自定义系统提示词
# export DSH_SYSTEM_PROMPT='You are a helpful software engineer assistant.'
The value logic for these variables needs to be clearly distinguished, especially the trigger condition for DEEPSEEK_BASE_URL:
- DEEPSEEK_API_KEY: Required. It is the authentication credential; if missing or incorrect, requests will be rejected outright. It is recommended to set it via an environment variable rather than hardcoding it into the code, to avoid leaking the key along with the code.
- DEEPSEEK_BASE_URL: Only needed when your model is not served by the default DeepSeek endpoint but is provided through an OpenAI-compatible proxy. If you are using the official endpoint, this item can be omitted, and it is commented out in the example as well. When setting it, note that the URL must include the version path; the example gives a form like
http://127.0.0.1:8000/v1, pointing to a local proxy. - DSH_MODEL: Specifies the model name. The value given in the example comment is
deepseek-v4-flash. When you have multiple available models and need to pin down a specific one, explicitly setting it is more reliable than relying on the default value. - DSH_SYSTEM_PROMPT: A custom system prompt. The example gives a single line describing a software engineer assistant persona. In batch tasks, fixing the system prompt helps stabilize the output style and reduce drift.
Here is a very practical rule of judgment in engineering: when you switch to a self-hosted or third-party proxy endpoint, you must simultaneously ensure that DEEPSEEK_BASE_URL points to that proxy and that DEEPSEEK_API_KEY is a credential recognized by that proxy. A mismatch between the two is the most common root cause of "authentication 401 even though the key is clearly correct"—the key is correct, it just belongs to another endpoint. Conversely, if you temporarily set up a compatible proxy locally, be sure to explicitly export BASE_URL; otherwise requests will hit the official endpoint, causing unexpected billing or permission issues.
Another detail is variable scope. Environment variables set with export are only valid in the current shell session and are gone when you open a new terminal. If you want them to persist, you need to write them into your shell configuration file, or inject them uniformly in a startup script. In a CI environment, it is recommended to inject them using the platform's secret management mechanism rather than writing the key into a repository file.
minimal.py command-line arguments: --workspace, --session-root, --session-id
Once the environment variables are set, you can run the example. The official command form is as follows:
$ python examples/jsonrpc-agent/minimal.py \
    --workspace /absolute/path/to/workspace \
    --session-root /absolute/path/to/sessions \
    --session-id example-001 \
    "Inspect the repository and fix the failing tests."
The three arguments each have a clear division of labor; let's explain them one by one:
- --workspace: The working directory the Agent can access. Must be an absolute path. This directory is the "sandbox" the Agent can freely read and write in; actions in the task such as "inspect the repository and fix the failing tests" all take place inside it. Using a relative path would make the resolution base at runtime uncertain and could point to a location you did not expect, so the official requirement is an absolute path.
- --session-root: The directory where session logs and state are saved. Likewise must be an absolute path. The on-disk files of all sessions are centralized under this root directory, making unified management and cleanup easier.
- --session-id: The identifier for this persistent conversation. The example gives
example-001. It binds a task to a session log for later retrieval; the same session-id also means the continuation of the same conversation context.
The string wrapped in quotes at the end of the command is the task description—that is, what you want the Agent to do. In the example, it is "check the repository and fix the failing tests," a very typical software engineering task. Note that how the task is phrased affects the Agent's behavioral path; the more specific you are, the more likely you are to get a usable result.
Why must the path be absolute? Because the current working directory at runtime, the working directory of the SDK process, and the working directory when the Agent internally executes commands may not be consistent. Relative paths create ambiguity among these three, while absolute paths eliminate it. This is the root cause of many "the file is clearly there but it can't be found" problems. From an engineering perspective, it is recommended to generate absolute paths in code using something like Path("/absolute/path/to/workspace").resolve(), normalizing before handing them to the SDK to reduce manual errors.
One more reminder: it is recommended to keep the workspace and the session directory separate. The workspace is the Agent's work area and will be frequently modified or even have files deleted; the session directory is the logging area and needs to be retained for auditing and debugging. Mixing them together will let the logs be polluted by the Agent's write operations, and will also let the work area be filled up with log files.
JSONL logs in the session directory: what is recorded for model requests and tool calls
After the example runs, in addition to the final reply printed on the screen, there is something more worthy of advanced readers' attention—the JSONL logs persisted to disk in the session directory. When the script runs, the session directory receives records in JSONL format, which include two categories of content: the assembled model request and tool calls. The value of these two types of records is completely different, so let's look at them separately:
- The assembled model request: This is the request body actually sent to the model after the SDK and runtime have assembled the user task, system prompt, historical context, list of available tools, and so on. Note the phrase "assembled"—it is not the task description you wrote in code, but the final form processed by the runtime and containing the complete context. If you want to know what the Agent "sees," this record is the most direct way to find out.
- Tool calls: Records of the tools the Agent calls while executing the task, including what was called, what parameters were passed, and what was returned. Tasks like fixing failing tests often include a series of tool calls such as reading files, modifying code, and running commands, all of which leave traces.
The JSONL (JSON Lines) format itself is also worth mentioning: each line is an independent JSON object, naturally suited to streaming append writes and line-by-line parsing. Logs are written as execution proceeds, so they can be read without waiting for the task to finish, which is very friendly for debugging long tasks—you can tail the logs while the Agent is still running and observe in real time what it is doing.
By looking at these two types of records together, you can reconstruct the complete timeline of a task: what the model received, which tool it decided to call, what the tool returned, and what decision the model made based on that. This chain is especially critical for troubleshooting abnormal Agent behavior. For example, when you encounter "the Agent always modifies the wrong file," checking the model request to see whether the workspace description is accurate and checking the tool calls to see what the first file it read was is often much faster than staring at the final reply and guessing.
It must be emphasized that session logs will contain records that may contain sensitive information, such as model requests and tool calls. If your task involves private code or internal data, be sure to include the session directory in access controls at the same level as your code, and do not casually commit it to a public repository. Regularly cleaning up expired sessions is also a good habit, to avoid the disk being filled up by logs.
DeepSeekHarness context manager: lazy startup and automatic release
The built-in example minimal.py in the repository is actually a lightweight wrapper around the SDK call. After stripping away command-line argument parsing, the core logic has only two steps: construct the context and send the task. The following equivalent code can serve as a starting point for integrating it into your own program:
# File path: the equivalent of examples/jsonrpc-agent/minimal.py
from pathlib import Path
from deepseek_harness import DeepSeekHarness

# Absolute path to the example composition config file (.cordis.yml describes which plugins to start)
config = Path("examples/jsonrpc-agent/minimal.cordis.yml").resolve()

# The workspace the agent can access; must be an absolute path
workspace = Path("/absolute/path/to/workspace").resolve()

# Directory where session logs and state are stored; must be an absolute path
sessions = Path("/absolute/path/to/sessions").resolve()

# Context manager: lazily starts the built-in runtime on enter, releases automatically on exit
with DeepSeekHarness(
    provider="deepseek-official",   # Use the official DeepSeek provider
    model="deepseek-v4-flash",      # Model name; this is also the SDK default
    max_tokens=49_152,              # Maximum number of tokens per reply
    cwd=str(workspace),             # Set the workspace as the agent's working directory
    session_root=str(sessions),     # Where session logs are written
    cordis=str(config),             # Which composition config to start with
) as harness:
    # Send a task; session_id identifies this persistent conversation
    result = harness.run(
        "Inspect the runoob-demo repository and fix the failing tests.",
        session_id="example-001",
    )

# Print the assistant's final response
print(result.final_response)
The focus of this code is the lifecycle semantics of the DeepSeekHarness context manager. It is the SDK's core class, using Python's with protocol to manage the runtime:
- The built-in runtime is lazily started when entering the with block. Note the word "lazily"—the runtime is not spun up the moment the object is constructed, but only when the block is entered. This lazy strategy lets you first construct the config object and perform parameter validation, deferring the time-consuming runtime startup until it is truly needed, so failure points surface earlier and are easier to pinpoint.
- Automatic release on exit. Whether the block ends normally or raises an exception,
withtriggers the release logic, shutting down the runtime and reclaiming resources. This eliminates the risk of leftover processes caused by forgotten manual cleanup, and is the most practical value of a context manager. - run can be called repeatedly within the block. The runtime starts once, and you can run multiple tasks within the same block without restarting the runtime for each task. For batch-processing scenarios, this reuse feature directly determines efficiency—the startup cost is paid only once.
The constructor parameters also carry a fair amount of information. Let's go through them one by one:
- provider: The value
deepseek-officialindicates the use of the official DeepSeek provider. Change this when switching providers; the SDK uses it to select the endpoint and authentication strategy. - model: The example uses
deepseek-v4-flash, and the comment explicitly states that this is also the SDK's default model. Just change this item when you need a different model. - max_tokens: The maximum number of tokens for a single reply; the example uses
49_152. Python's underscore numeric literals make large numbers easier to read. This value determines the upper limit for a single reply; setting it too high wastes quota unnecessarily, while setting it too low may cause truncation. - cwd: Sets the workspace as the Agent's working directory. Here we pass in the absolute path string resolved earlier.
- session_root: The location where session logs are written to disk, corresponding to the JSONL log directory discussed in the previous section.
- cordis: Specifies which composition configuration to use for startup. The example points to
minimal.cordis.yml, which describes which plugins to start.
The call form of the run method is also worth noting: the first argument is the task description string, and session_id identifies this persistent conversation. The final_response property of the returned result is the assistant's final reply, which can simply be printed.
If you need to do batch processing, it is recommended to put the with block on the outside and the loop inside the block, so that the runtime is started only once; conversely, putting the with inside the loop rebuilds the runtime every time, multiplying the startup overhead many times over. This is a place where both forms are semantically correct but differ enormously in performance, and advanced readers should especially avoid this pitfall. Another practical suggestion is to use different session_id values for different tasks, so that each conversation stands alone in the session directory and can be retrieved by id later without interference; if you reuse the same id, the contexts of multiple tasks may become entangled in unexpected ways.
At this point, the SDK's installation, verification, credentials, parameters, logging, and lifecycle have been linked into a complete chain. You can already make the Agent execute tasks headlessly in an isolated workspace and leave behind auditable JSONL records. Next there is still a key piece of the puzzle: when the input is no longer just text but a mix of images and text, in what form should Harness be invoked—this is exactly the multimodal and multi-form invocation to be unfolded in the next section.
In the previous section we went from visual debugging in the Web UI all the way to the basic form of headless operation, confirming that dsh can be used by humans watching the screen and can also be driven by programs in a non-interactive way. In this section we push the perspective thoroughly down to the code level: first dissect every constructor field of the Python SDK, then extend to multimodality, the entry point for a qualitative change in Agent capabilities, so that you can both plug Harness into automated pipelines and let the Agent truly "see" images and design drafts.
Two required paths and one configuration file: workspace, sessions, minimal.cordis.yml
In the world of the SDK, everything starts from three Path objects. They are not optional decorative parameters, but the foundation for whether the Agent can run and whether it can still be traced after it finishes. The official example minimal.py is extremely minimal at its core, but behind that minimalism lie three paths that must be pinned down.workspace is the workspace that the agent can read and write; all file-level operations are restricted under this root directory. It is an isolated sandbox, not your entire disk. The SDK converts it to an absolute path with Path("/absolute/path/to/workspace").resolve(). This is done to eliminate the ambiguity caused by relative paths under different working directories—if you only write a relative path, then when the process's current directory changes, the Agent may manipulate files outside your repository root.sessions is the directory where session logs and state are stored, and it likewise must be .resolve()d to an absolute path. After each call to harness.run, this directory gains JSONL logs that record the assembled model requests and the ins and outs of every tool call. Without it, you only have a final reply printed in the terminal, and there is no way to review what happened when problems arise; with it, the entire reasoning chain is auditable.minimal.cordis.yml is the configuration file that beginners often overlook but that determines "what capabilities the Agent has." It describes a complete composition scheme for which plugins to load at startup, that is, dsh's plugin assembly manifest. You can understand it as the Agent's "skill configuration sheet": which tools to enable, which providers to connect, and which runtime behaviors to inject are all declared here. The SDK example uses Path("examples/jsonrpc-agent/minimal.cordis.yml").resolve() to point to the repository's built-in composition configuration. In real projects you usually need to put it in a directory you control and version it together with the product, because when the configuration changes, the Agent's capability boundary changes.
These three form a stable triangle: cordis determines "what can be done," workspace determines "where it is done," and sessions determines "where the traces of what was done remain." The most common engineering pitfall is that the path is not made absolute, or the workspace points to a read-only directory, so when the Agent actually wants to modify files, it fails midway due to permissions or path resolution errors. Another subtle pitfall is when the sessions directory is shared by multiple concurrent tasks without isolation, causing logs to overwrite each other, making troubleshooting feel like watching two tapes stacked together. The recommended approach is to add another layer of subdirectories by task or by user, so that each session has its own landing spot.
Breaking down the constructor parameters field by field: provider, model, max_tokens, cwd, cordis
When entering the context manager with DeepSeekHarness(...) as harness:, the SDK will lazily start the built-in runtime, and when exiting the with block it will automatically release it. This sentence has two layers of engineering meaning: first, the moment you enter the with block is not when the process is actually launched; resources are prepared only when first needed, so startup overhead is deferred; second, whether an exception occurs in between or it ends normally, the runtime will be cleaned up and no orphan process will be left behind. Below, the constructor parameters are broken down one by one.
- provider: which provider to use. In the example it is
deepseek-official, meaning it goes through the official DeepSeek provider. When you are not using the official default endpoint but providing the model through an OpenAI-compatible proxy, you need to set theDEEPSEEK_BASE_URLenvironment variable separately to specify the proxy address. provider and base_url are two orthogonal pieces of information: one says "who to find," and the other says "where to find them." - model: the model name. The SDK default is
deepseek-v4-flash, meaning that if you do not explicitly pass a value, it will still use this model. Writing it explicitly in the example is just to make the parameters clear at a glance. When you want to switch models, this is the field you change. - max_tokens: the maximum number of tokens for a single reply. The example gives
49_152; Python's underscore numeric literal makes it easier to read, and it is equivalent to 49152. This value is directly related to the complexity of the task you want to deliver: too small will truncate long replies, while too large will increase VRAM and latency pressure under high concurrency. 49_152 is a fairly generous setting, suitable for letting the Agent produce longer code or analysis in a single turn. - cwd: pass in
str(workspace)to set it as the agent's working directory. Note that a string conversion is done here, because cwd accepts a string, while workspace above is a Path object, and this conversion cannot be omitted. - cordis: which composition configuration to start with; what is passed is the string form of the configuration file path, namely
minimal.cordis.ymlfrom the previous section. It determines which plugins are assembled for this run.
Looking at these fields together, you will find that they fall into two groups: provider, model, and max_tokens describe "which brain to use and how much budget to give it," while cwd and cordis describe "in what environment and with what equipment." This division is very useful when troubleshooting—if the model answers incorrectly, look at the first group; if the Agent cannot use tools or cannot reach a certain directory, look at the second group. After the SDK is installed, there is another easily overlooked fact: the runtime does not require the system to provide Node.js; the Python process carries a built-in runtime itself. This means you can deploy in a clean container with only Python, without additionally maintaining a Node toolchain and version compatibility issues, which is a very practical reduction in burden for putting an Agent into CI or a backend service.
The calling pattern of harness.run: task string + session_id for persistent conversations
Once construction is complete, what actually drives the Agent is harness.run. After entering the with block, you can call run repeatedly—a point often misunderstood as "one with block can only run once." The calling pattern is very simple:
# Send a task; session_id identifies this persistent conversation
result = harness.run(
    "Inspect the runoob-demo repository and fix the failing tests.",
    session_id="example-001",
)

# Print the assistant's final response
print(result.final_response)
The first argument is the task string, describing in natural language what you want the Agent to accomplish. The example is a typical software engineering task: inspect the repository and fix the failing tests. The second argument is session_id, which identifies this persistent conversation. Reusing the same session_id across multiple runs means the conversation context is continuous—the Agent remembers what happened before; switching to a different session_id starts an entirely new conversation. In the returned result object, final_response carries the assistant's final reply—note the word "final": the intermediate tool-calling process does not appear in this field; it is written to the JSONL logs under the sessions directory. So when troubleshooting, look along two lines: final_response for the conclusion, JSONL for the process.
Here is a habit well worth cultivating in practice: do not frantically pump unrelated tasks into the same session_id inside a loop. Because context accumulates, the more you stuff in, the longer the history carried by each subsequent request, and both cost and latency rise accordingly. The sensible approach is to assign session_id by "a bounded unit of task," such as a single CI build, a single user session, or a single bug-fix round. When task sets are independent of one another, using different session_ids is actually cleaner and more economical.
Three typical landing spots for the SDK: batch processing, product embedding, and test-driven Agents
The point of the SDK's existence is to turn dsh into a single line of code in your program, rather than a page in the browser. Under this positioning, it has three most typical landing spots.
- Batch processing tasks. You have a batch of repositories to inspect, a batch of reports to generate, a batch of failing tests to fix—clicking through them one by one in the Web UI is clearly unrealistic. Write a loop with the SDK, assign an independent workspace and session_id to each task, hand them to the Agent for batch processing, and collect the results uniformly. The key to batch processing is isolation: each task's workspace must be separate, to avoid one task's intermediate artifacts contaminating another.
- Integrating dsh into your own product. Your product wants to quietly invoke Agent capabilities in the background—for example, the user clicks "auto-fix" and the backend drives a Harness run. Here the SDK is that embedding point: provider and model serve as product configuration, and cordis determines the skill set assembled at factory time. Product embedding is especially sensitive to resource release, and the with block's automatic release mechanism is exactly what covers you on exception paths.
- Driving the Agent in tests. This is an underrated usage: you can write the Agent into automated tests as the object under test, construct a controlled workspace, have it run a deterministic task, then assert on final_response or inspect the sessions logs. Because the runtime is self-contained and does not depend on the system Node.js, such tests run very lightly in CI containers.
Getting the repository's built-in minimal.py example to run successfully is equivalent to validating the entire SDK chain: from credential loading and runtime startup to task execution and log persistence. Before running the example, set your credentials in the environment. The official example lists several optional variables:
$ export DEEPSEEK_API_KEY=sk-your-key-here
# export DEEPSEEK_BASE_URL=http://127.0.0.1:8000/v1
# export DSH_MODEL=deepseek-v4-flash
# export DSH_SYSTEM_PROMPT='You are a helpful software engineer assistant.'
Of these, DEEPSEEK_API_KEY is required; DEEPSEEK_BASE_URL only needs to be set when the model is served by an OpenAI-compatible proxy rather than the default DeepSeek endpoint; DSH_MODEL and DSH_SYSTEM_PROMPT override the model name and system prompt, respectively. The example run command passes in both the isolated workspace and the session directory:
$ python examples/jsonrpc-agent/minimal.py \
  --workspace /absolute/path/to/workspace \
  --session-root /absolute/path/to/sessions \
  --session-id example-001 \
  "Inspect the repository and fix the failing tests."
The script prints the assistant's final reply, and the session directory receives a JSONL log containing the assembled model requests and tool calls. Installing the SDK itself follows the virtual environment route; the official recommendation is to use venv to isolate the SDK from other Python packages on the system:
$ git clone https://github.com/deepseek-ai/deepseek-harness.git
$ cd deepseek-harness
$ python -m venv .venv
$ . .venv/bin/activate
$ python -m pip install deepseek-harness-sdk
Prerequisites should be confirmed first: Python 3.10 or higher, Git installed, an operating system of Linux x64, Linux arm64, or macOS 14+ arm64, a working DeepSeek-compatible API endpoint and credentials, and an isolated workspace the agent can modify. The table below compares these requirements alongside the SDK's behavioral characteristics, so you can check them off one by one before deployment.
| Dimension | Requirement / Behavior | Engineering Implication |
|---|---|---|
| Python version | 3.10 or higher | Lower-version interpreters cannot install |
| Git | Installed | Needed to clone the repository for the example |
| Operating system | Linux x64 / Linux arm64 / macOS 14+ arm64 | Other platforms are not on the supported list |
| API endpoint | DeepSeek-compatible endpoint and credentials | Can point to a proxy via DEEPSEEK_BASE_URL |
| workspace | An isolated directory the agent can modify | Read/write sandbox; isolate per task recommended |
| Node.js | Not required from the system | The Python process ships with a built-in runtime |
| Runtime lifecycle | Lazy startup on entering with, automatic release on exit | No process leaks even on exception paths |
| Default model | deepseek-v4-flash | Used even when model is not passed |
| Single-reply cap | Example max_tokens=49_152 | Equivalent to 49152; controls truncation and cost |
What Is Multimodality: From Text, Images, Audio, and Video to a Unified Token Sequence
To move an Agent from the world of text into the world of vision, you must first understand the word modality. A modality refers to a different form in which information is expressed: text is one modality, and images, audio, and video are each distinct modalities as well. In the past, large language models handled only a single modality—text—and everything you sent them had to be converted into text first. Multimodal models, by contrast, can receive images and text at the same time, converting them all into a unified token sequence and processing them together. The table below aligns the four modalities, their common forms, and the corresponding capabilities, so you can judge which type of model a given requirement actually calls for.
| Modality | Common Forms | Corresponding AI Capability |
|---|---|---|
| Text | Articles, code, conversations | Large Language Model (LLM) |
| Images | Photos, screenshots, design mockups, charts | Visual understanding models |
| Audio | Speech, music | Speech recognition and generation models |
| Video | Short clips, screen recordings, surveillance footage | Video understanding models |
Here is a decisive technical detail: images are not "seen directly" by the model. They are first sliced into small patches by a vision encoder and converted into vectors, which are then concatenated with text tokens into a single sequence. In other words, what the model faces is always one token sequence—it is just that this sequence mixes tokens originating from images with tokens originating from text. Once you grasp this layer, you can understand why images drive up request costs, why image clarity and cropping method affect comprehension quality, and why "converting images into the same sequence" is the key that makes unified multimodal processing possible.

For an Agent, multimodality brings a qualitative change, not just a nice-to-have enhancement. The comparison below makes the gap immediately clear: a text-only model takes only text as input, so when troubleshooting a code error the user must manually transcribe the error into text, when recreating a design mockup there is no visual reference to work from, and when analyzing a data chart the figures inside the image cannot be read; a multimodal model, by contrast, can mix text and image inputs—sending an error screenshot directly, writing a page against a design mockup, and drawing conclusions straight from an image.
Why Images Are Also Billed: The Vision Encoder Slices Patches, Up to 384 Tokens per Image
Since an image is first sliced into patches and then converted into vectors, it inevitably consumes part of the token budget. A single image occupies at most 384 tokens, and this is precisely where the multimodal billing rule comes from. This upper-bound information is extremely useful in engineering, because you can use it for capacity planning: suppose a single request stuffs in several high-resolution screenshots—token consumption will not balloon without limit, but neither will it be zero, and 384 is the ceiling per image. Once you understand this, several practical conclusions follow naturally.
- Do not pile on images blindly just because "an image is at most 384 tokens". Every image consumes part of the budget, and stacking multiple images will still significantly raise the cost and processing time of a single request, so supply images as needed.
- The clarity and information density of a screenshot matter a great deal. Since an image is understood after being sliced into patches and converted into vectors, whether the information within those patches is legible directly determines comprehension quality; blurry, overly small, or largely blank images often cost more than they are worth.
- When the same image is used multiple times, think carefully about how to pass it in. The trade-offs among three ways of passing images will be covered later; for frequently reused images, the Files API is usually the more economical choice.
Looking at "modality classification" and "image billing" together makes the cost model of multimodality clear: text is billed by text tokens, images are billed by visual tokens with a per-image cap, and both are processed together by the model within the same sequence. Your optimization space lies half in reducing useless text, and half in controlling the number and quality of images.
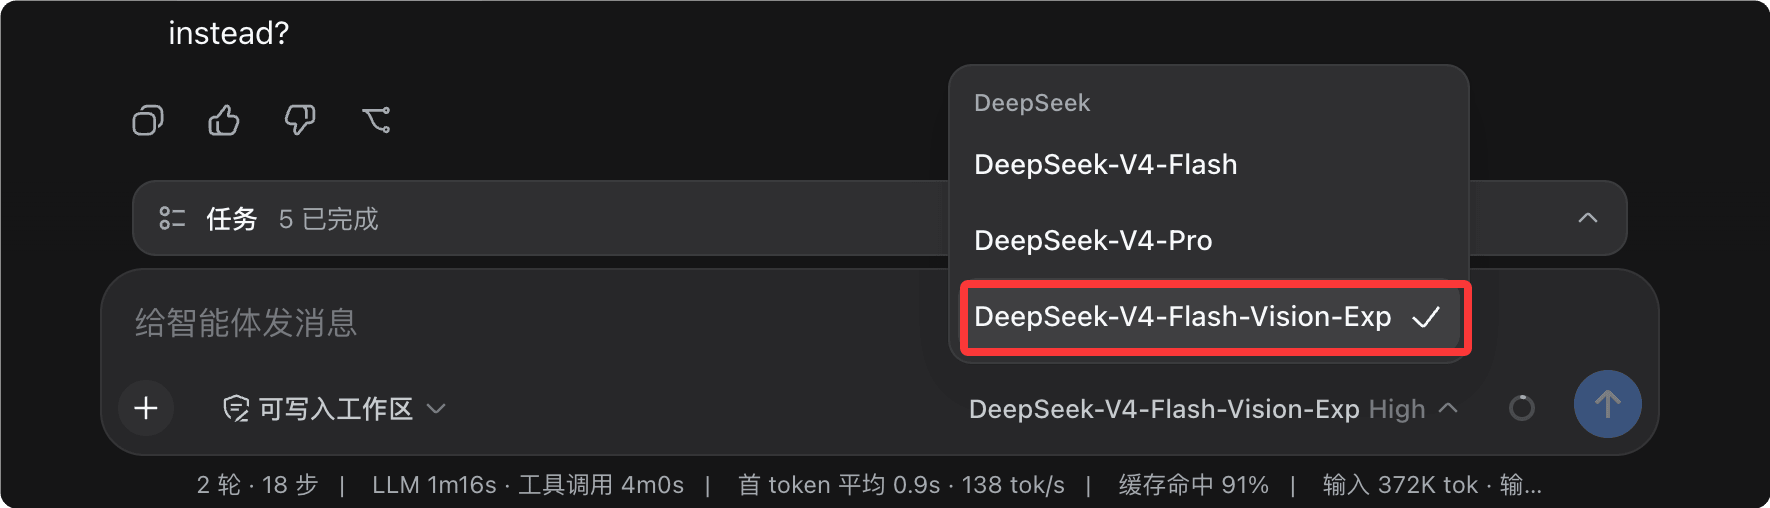
DeepSeek-V4-Flash-Vision-Exp and Three API Call Formats
To start working with multimodality, first update to the latest version. Before use, install the latest version of the dsh command-line tool:
npm install -g @deepseek-ai/dsh@latest
After updating to the latest version, you can see that DeepSeek-V4-Flash-Vision-Exp is already in the model list. After switching to the vision model, you can directly push images or ppt files into the document and let it look at the content in the images. This model is an experimental multimodal visual understanding model, now available on the DeepSeek API platform, accessible by setting model='deepseek-v4-flash-vision-exp'. Its capability positioning can be summed up in one sentence: text capability undiminished, visual capability greatly improved. In terms of pure text capabilities (Agent, reasoning, world knowledge, etc.), it is on par with the official release of DeepSeek-V4-Flash; on Agent Benchmarks requiring visual understanding, it achieves a substantial leap compared with DeepSeek-V4-Flash, with multimodal Agent capability approaching Opus-4.8.
| Capability Dimension | DeepSeek-V4-Flash | DeepSeek-V4-Flash-Vision-Exp |
|---|---|---|
| Pure text Agent tasks | Official release baseline | On par with the official release |
| Reasoning and world knowledge | Official release baseline | On par with the official release |
| Visual understanding Agent tasks | Not supported; multimodal elements ignored in evaluation | Substantial leap, approaching Opus-4.8 |
| Model positioning | Official release | Experimental release |
The evaluation methodology needs to be clearly stated to avoid misreading the comparison data: for the Code Agent text tasks in the public benchmark suites, the DeepSeek series models are tested using DeepSeek Harness minimal mode as the framework, with the max setting, temperature=1.0, and topp=0.95. In the ApexBench and Agents' Last Exam evaluations, the text model DeepSeek-V4-Flash ignores the multimodal elements within them—which also explains why its vision row is marked in the table as "Not supported; multimodal elements ignored in evaluation."
At the integration level, the multimodal API supports three call formats: Chat Completions, Messages, and Responses, making it easy to integrate with various Agent tools. The three formats have identical capabilities, so just choose the interface style you are familiar with.
| Call Format | API Style | Who It's For |
|---|---|---|
| Chat Completions | OpenAI's classic chat API | Developers who already have OpenAI SDK code |
| Messages | Anthropic Messages API, with base_url set to https://api.deepseek.com/anthropic | Developers who already have Anthropic-style code or toolchains |
| Responses | OpenAI's new Responses API | Developers using the new SDK who prefer a concise input structure |
All three formats support mixed text-and-image input, and images themselves can be passed in three ways: base64 inline, external URL, and Files API. Their trade-offs come down to request body size, whether an image host is needed, and the scenarios they suit.

| Input Method | Request Body Size | Image Host Needed | Applicable Scenarios |
|---|---|---|---|
| base64 inline | Large | No | Local images, one-off small images |
| External URL | Small | Yes | Images already deployed on a publicly accessible server |
| Files API | Small | No | Reusing the same image multiple times, high-frequency batch tasks |
The most straightforward way to get started is base64 inline: encode a local image into a base64 string and write it directly into the request body as a data URL. The DeepSeek endpoint is compatible with the OpenAI SDK, so you can switch by changing base_url. The code below can be pasted and run directly.
# File path: vision_base64_demo.py
# Dependency: pip install openai
import base64
from openai import OpenAI

# The DeepSeek endpoint is compatible with the OpenAI SDK; switch by changing base_url
client = OpenAI(
    api_key="sk-your-key",                      # Required: replace with your own DeepSeek API key
    base_url="https://api.deepseek.com"       # Required: the official DeepSeek endpoint
)

# Read a local image and encode it into a base64 string
with open("runoob-logo.png", "rb") as f:
    b64 = base64.b64encode(f.read()).decode("utf-8")

response = client.chat.completions.create(
    model="deepseek-v4-flash-vision-exp",     # Required: multimodal vision understanding model
    messages=[
        {
            "role": "user",
            "content": [
                # Text and images are interleaved in array order; the model understands them in order
                {"type": "text", "text": "What text is in the image?"},
                {
                    "type": "image_url",
                    # base64 inline: data:image format;base64,encoded content
                    "image_url": {"url": f"data:image/png;base64,{b64}"}
                }
            ]
        }
    ],
    stream=False                              # Optional: whether to stream output, defaults to False
)

print(response.choices[0].message.content)
There are a few details in this code worth noting. First, content is an array: text blocks and image blocks are interleaved in array order, and the model interprets them in that order, so whether you "give context first, then the image" or "give the image first, then ask" affects the result—arrange them according to the semantics of your task. Second, the type of an image block is image_url; even for base64 inline data you must go through this field, with the url value in the form data:image/png;base64, plus the encoded content. Getting the format declaration wrong will cause parsing to fail. Third, stream defaults to False; only turn it on explicitly when you need streaming output. Fourth, base64 inline data noticeably enlarges the request body, which is also why it is classified as "large." It is fine for one-off use with small local images, but it is not cost-effective when the same image appears repeatedly—that is exactly where the Files API comes in, since the request body stays small and no image host is needed; and if the image is already deployed on a publicly accessible server, an external URL is the most convenient choice.
Summary and Best Practices
Looking at the SDK and multimodal capabilities together, what it comes down to in engineering terms is a checklist you can follow directly.
- Make paths absolute before passing them in. Always
.resolve()the three Paths—workspace, sessions, and cordis—to eliminate relative-path ambiguity; point workspace at a genuinely writable isolated directory, and subdivide sessions by task or user to avoid concurrent logs overwriting each other. - Understand the constructor parameters grouped by responsibility. provider, model, and max_tokens determine "which brain to use and how much budget to give it," while cwd and cordis determine "in what environment and with what equipment." When troubleshooting model issues, look at the first group; when troubleshooting tool and path issues, look at the second group.
- Use session_id to delineate task boundaries. Reusing the same session_id keeps the conversation coherent, but do not feed unrelated tasks into a loop and cause the context to expand indefinitely; giving independent tasks their own session_id is cheaper and cleaner.
- Look at final_response for conclusions and JSONL for the process. Intermediate tool calls do not appear in final_response; to troubleshoot the full chain, go into the sessions directory and dig through the JSONL logs.
- Take advantage of with's deferred startup and automatic release. Even exception paths will not leak runtime processes, which especially benefits product embedding and test-driven scenarios; after entering the with block you can call run repeatedly, without having to do it one block at a time.
- Turn dependency prerequisites into a deployment checklist. Python 3.10+, Git, Linux x64 or arm64 or macOS 14+ arm64, a usable compatible endpoint and credentials, and an isolated workspace; the good news is that the runtime is bundled, the system does not need Node.js, and CI containers can be cleaner.
- Set only the necessary variables for credentials. DEEPSEEK_API_KEY is required; set DEEPSEEK_BASE_URL only when going through an OpenAI-compatible proxy rather than the default endpoint; override DSH_MODEL and DSH_SYSTEM_PROMPT as needed.
- For multimodal, first think clearly about "why look at the image." A pure text model requires users to transcribe errors into text, cannot reference design mockups, and cannot read charts, whereas multimodal can directly handle screenshots, design mockups, and charts; only bring in a vision model when the task is inherently visual.
- Remember the token cost model for images. Images are split into patches by the vision encoder and turned into vectors, then concatenated with text tokens, with a maximum of 384 tokens per image; provide images as needed and control their resolution and count—do not pile on images just because an upper limit exists.
- Choose the right model and format. When you need visual understanding, use
deepseek-v4-flash-vision-exp; its pure text capability is on par with the official DeepSeek-V4-Flash release, and its visual Agent capability approaches Opus-4.8, but it is positioned as an experimental version, so production workloads should evaluate its stability; for the integration format, choose among Chat Completions, Messages, and Responses according to your tech stack—all three have equivalent capabilities. - Choose the image delivery method by reuse frequency. Use base64 inline for one-off small local images, external URLs for images already publicly deployed, and the Files API for the same image used multiple times or for high-frequency batch tasks.
- Interpret the data against the evaluation methodology. The public benchmark's Code Agent text tasks use DeepSeek Harness minimal mode, max tier, temperature=1.0, topp=0.95; in ApexBench and Agents' Last Exam, text models ignore multimodal elements, so do not read text scores as visual scores.
At this point, you already have two practical paths in hand: one uses the Python SDK to turn dsh into a single line of code within your program, covering batch processing, product embedding, and test-driven workflows; the other uses the multimodal API to let the Agent truly see screenshots, design mockups, and charts, while making well-founded trade-offs on cost and format. Combine the two, and you have an Agent engineering foundation that can both run at scale and understand visual input.